The atmospheric conditions present during a photograph's capture can often detract from its intended impact, leaving images appearing flat, washed out, and lacking in detail. Haze, whether caused by natural phenomena like fog, mist, and atmospheric scattering, or by environmental factors such as pollution, can obscure distant subjects and mute vibrant colors. Fortunately, Adobe Photoshop, through its powerful Dehaze tool, offers a sophisticated solution for photographers seeking to restore clarity and depth to their images. This comprehensive guide delves into the intricacies of using the Dehaze command within Photoshop, exploring its functionalities, potential pitfalls, and advanced applications for landscape photography.
Understanding Atmospheric Haze and Its Impact on Images
Haze in photographs is a direct consequence of how light interacts with particles in the atmosphere. When light travels through air laden with moisture, dust, or pollutants, it undergoes scattering. This scattering effect reduces the contrast and color saturation of distant objects, making them appear less distinct and often imparting a bluish or grayish tint. In landscape photography, this can be particularly problematic, as it diminishes the grandeur of mountains, the clarity of distant horizons, and the richness of the sky.
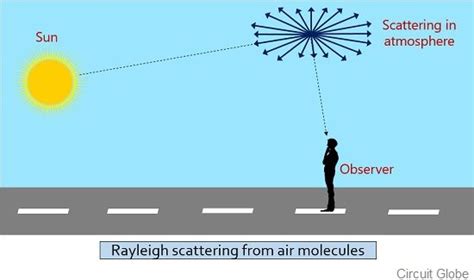
The natural blue appearance of distant areas is a result of Rayleigh scattering, where shorter blue wavelengths of light are scattered more effectively by atmospheric molecules than longer red wavelengths. While a subtle blue cast can lend a sense of depth and realism, excessive haze can overwhelm the scene, rendering it dull and uninspiring. Photographers often find themselves frustrated when their captured images, despite their visual appeal at the moment of shooting, appear significantly degraded on screen or in print due to these subtle atmospheric distortions.
The Dehaze Tool: A Powerful Post-Production Solution
Introduced as a significant advancement in Adobe's Creative Cloud suite, the Dehaze tool, accessible within Photoshop's Camera Raw filter and Lightroom, is designed to counteract the effects of atmospheric haze. It's not merely a filter that magically eradicates haziness; rather, it operates by intelligently boosting contrast and sharpness within specific tonal ranges that typically correlate with hazy highlights and midtones. This targeted approach allows for the restoration of lost detail and color saturation without adversely affecting other parts of the image, provided it is used with care.
The Dehaze command is built upon the theory of light transmission, estimating the loss of light due to absorption and scattering. By analyzing the scene at a granular level, it can effectively reverse these atmospheric effects. While its primary function is to reduce haze, the Dehaze slider is remarkably versatile; it can also be used in reverse to intentionally add a sense of atmospheric depth or to emulate specific lighting conditions.
Accessing and Utilizing the Dehaze Command in Photoshop
The Dehaze functionality is primarily accessed through the Camera Raw filter within Photoshop. This integrated tool offers a more nuanced approach compared to standalone filters, allowing for greater control over the editing process.
Step-by-Step Guide to Using Dehaze in Photoshop
- Open Your Image: Begin by opening your chosen image in Adobe Photoshop.
- Duplicate the Layer: To ensure non-destructive editing, it is crucial to duplicate your background layer. This can be done by pressing
Ctrl+J(Windows) orCmd+J(Mac), or by right-clicking the layer in the Layers panel and selecting "Duplicate Layer." - Access Camera Raw Filter: With the duplicated layer selected, navigate to the menu:
Filter > Camera Raw Filter. This will open the Camera Raw interface, which provides a comprehensive suite of editing tools. - Locate the Effects Tab: Within the Camera Raw interface, click on the "Effects" tab, usually represented by an "fx" icon.
- Adjust the Dehaze Slider: You will find the Dehaze slider here. Move this slider to the right to reduce atmospheric haze. A good starting point for significantly hazy images might be around
+50, but the optimal setting will vary greatly depending on the original image. As you adjust the slider, observe the changes in your image, paying close attention to the restoration of detail and the enhancement of color.

Advanced Techniques for Nuanced Dehazing
While a simple adjustment of the Dehaze slider can yield impressive results, more complex scenarios may require a layered approach to achieve a balanced and natural-looking outcome. The user's experience with an "ugly blue-cyan tint" on distant mountains and clouds highlights a common challenge: the Dehaze tool can amplify existing color casts.
One effective method to manage this is by separating the luminosity and color adjustments.
- Dehaze Luminosity: Apply the Dehaze filter as described above to the duplicated layer. Name this layer "Dehaze Luminosity." Set its blend mode to
Luminosity. This layer will primarily affect the contrast and detail without introducing unwanted color shifts. - Dehaze Color (Optional but Recommended): Duplicate the original layer again (or the "Dehaze Luminosity" layer, depending on your workflow). Apply the Dehaze filter to this new layer. Name it "Dehaze Color." Set its blend mode to
Color. This layer will focus on enhancing the color saturation. - Refine and Blend: With both layers in place, you can adjust the opacity of each layer independently to fine-tune the overall effect. If the "Dehaze Color" layer introduces an undesirable tint, you can reduce its opacity or use color correction tools to neutralize it. For instance, if an unwanted blue-cyan tint persists, you might use the HSL (Hue/Saturation/Lightness) panel within Camera Raw or Photoshop to selectively reduce the saturation of blues and cyans in the distant areas.
This layered approach allows you to control the intensity of both the contrast enhancement and the color saturation, ensuring a more natural and pleasing result.
Advanced Photoshop Techniques | FREE COURSE
Exploiting Dehaze Beyond Haze Removal
The Dehaze tool's mechanism of boosting contrast and detail in specific tonal ranges makes it a versatile tool applicable to a wider array of photographic situations beyond just atmospheric haze.
Enhancing Skies and Cloud Details
The Dehaze slider can dramatically improve the richness and depth of skies. In images where the sky appears flat or washed out, a moderate boost in Dehaze can bring out the subtle gradients of color and enhance the definition of clouds. It can tease out cloud shapes that might otherwise be lost and intensify the colors of the blue sky. This is particularly useful for landscape and cityscape photography where a dramatic sky can elevate the overall image.
Boosting Faded Tones
For photographs with faded colors, perhaps due to age or overexposure, the Dehaze tool can act as a powerful revitalizing agent. By increasing contrast and selectively enhancing midtones, it can bring back vibrancy and life to muted colors, making the image appear more dynamic and engaging.
Adding Punch to Specific Subjects
The Dehaze effect isn't limited to global adjustments. Using Photoshop's selection tools or Camera Raw's local adjustment brushes, you can apply Dehaze selectively to specific elements within an image. For example, you can:
- Enhance Buildings: Apply positive Clarity, Exposure, and Dehaze to buildings to make their architectural details pop. Using the "Auto-Mask" feature with the Adjustment Brush can help confine the effect to the desired area.
- Sharpen Foreground Elements: If foreground elements lack contrast or detail, a targeted Dehaze adjustment can bring them into sharper focus, creating a more balanced composition.
The Inverse Effect: Adding Haze for Artistic Purposes
The Dehaze slider's ability to move in both directions means it can also be used to add haze or atmospheric effects. This can be useful for:
- Creating Depth: In scenes that appear too sharp and flat, adding a subtle amount of haze can simulate atmospheric perspective, pushing distant elements back and creating a greater sense of depth.
- Emulating Specific Conditions: Photographers might use the Dehaze slider to emulate specific lighting conditions, such as a misty morning or a soft, diffused light.
Potential Unwanted Side Effects and How to Counter Them
Despite its power, the Dehaze tool is not without its potential drawbacks. Overuse or improper application can lead to undesirable outcomes:
Color Shifts and Casts
As noted in the initial user feedback, a common side effect is the introduction of unnatural color casts, often a blue-cyan or purple tint, particularly in skies and clouds. This occurs because the Dehaze algorithm amplifies existing colors and contrast.
Countermeasures:
- HSL Adjustments: The HSL (Hue/Saturation/Lightness) panel in Camera Raw is your primary tool for correcting color casts. Select the color range that exhibits the unwanted tint (e.g., Blues, Aquas) and reduce its saturation. You can also subtly shift the hue or adjust the lightness of these colors.
- Layered Blending: As previously discussed, separating luminosity and color adjustments using blend modes can help isolate and control color shifts.
- Selective Color Adjustments: Use Photoshop's Selective Color adjustment layer to target specific color ranges and neutralize unwanted hues.
Deep Shadows and Overly Dark Areas
Aggressive Dehaze adjustments can sometimes lead to shadows becoming too dark, losing detail and appearing crushed.
Countermeasures:
- Shadow Slider: In the Camera Raw interface, the "Shadows" slider can be used to lift and recover detail in dark areas.
- Dodging and Burning: For more precise control, use the Dodge and Burn tools in Photoshop to selectively lighten or darken specific areas.
- Layer Opacity: Reduce the opacity of the Dehaze layer if the overall effect is too strong.
Over-Saturated Colors
In some instances, particularly with vibrant scenes, Dehaze can push colors beyond a natural appearance, leading to oversaturation.
Countermeasures:
- Saturation and Vibrance Sliders: Use the "Saturation" and "Vibrance" sliders in Camera Raw to reduce overall color intensity. Vibrance is often preferred as it targets less saturated colors, protecting skin tones and preserving subtle color variations.
- HSL Adjustments: Similar to correcting color casts, the HSL panel can be used to reduce the saturation of specific color ranges.
Dehaze in Camera Raw vs. Lightroom
While the Dehaze functionality is present in both Photoshop's Camera Raw and Lightroom, the workflow and interface differ slightly.
- Photoshop (Camera Raw Filter): Offers the advantage of non-destructive editing on layers within Photoshop's broader editing environment. This allows for complex compositing and the integration of Dehaze with other Photoshop tools.
- Lightroom Classic CC: Provides a streamlined workflow for photographers who primarily manage their library and edits within Lightroom. The Dehaze slider is found in the "Effects" panel of the "Develop" module. Lightroom also allows for local Dehaze adjustments using the Graduated Filter and Adjustment Brush tools directly within its interface.
Regardless of the platform, the core principle of the Dehaze tool remains the same: intelligently adjusting contrast and clarity to restore detail and color.
When to Use the Dehaze Slider
The Dehaze slider is a powerful tool that can add a fresh dimension to post-photography work. It is particularly effective in the following scenarios:
- Landscape Photography: To enhance distant mountains, clear skies, and improve overall depth.
- Aerial Photography: To cut through atmospheric distortions and reveal details on the Earth's surface.
- Wildlife Photography: To improve the clarity of subjects that may be partially obscured by mist or distance.
- Wedding and Event Photography: To salvage shots taken in challenging lighting conditions or with atmospheric interference, ensuring precious memories are captured clearly.
- Restoring Old or Faded Photographs: To bring back contrast and color to images that have lost their vibrancy over time.
- Creative Effects: To add atmospheric perspective or emulate specific weather conditions.
Limitations of the Dehaze Tool
It is important to acknowledge that the Dehaze tool has its limitations. It cannot work miracles on images where the original detail is completely lost.
- Beyond the Focal Plane: If a background element is significantly out of focus (beyond the focal plane), Dehaze will not be able to magically bring sharp details back. It works by enhancing existing information, not creating it from scratch.
- Extreme Haze: In cases of extremely dense fog or mist, the Dehaze tool might struggle to restore complete clarity, and excessive adjustments could lead to unnatural artifacts.
Conclusion
The Dehaze tool in Adobe Photoshop and Lightroom represents a significant leap forward in image editing capabilities. By understanding its underlying principles and employing it judiciously, photographers can transform hazy, flat images into clear, vibrant, and impactful photographs. Whether used for its primary purpose of atmospheric haze removal or for more creative applications, the Dehaze slider is an indispensable asset in the modern digital darkroom. Mastering its nuances, including managing potential side effects and integrating it with other editing tools, will undoubtedly elevate the quality and artistic expression of your photography.