When crafting visually appealing designs, especially those reminiscent of classic insignias, retro logos, or intricate badges, the ability to manipulate text is paramount. Curved text, in particular, adds a dynamic and engaging element that can significantly enhance a design's aesthetic. While Adobe Photoshop offers various tools to achieve this, understanding the nuances of each method is crucial for producing professional and polished results. This article delves into the most effective techniques for bending and curving text in Photoshop, moving from simpler, quick fixes to more precise and versatile approaches, ensuring you can select the method that best suits your design needs.
The Pitfalls of Premature Warping: Why the Warp Text Tool Isn't Always the Answer
A common initial instinct for many users when faced with the need to curve text is to reach for the "Warp Text" tool. This tool, readily accessible from the options bar when the Text tool is active, offers a seemingly quick and easy solution. It allows for the application of various preset styles like "Arc," "Flag," or "Wave," and provides sliders to adjust the "Bend" and "Distortion." However, as experienced designers know, this method often leads to amateurish results. The primary issue with the Warp Text tool is that it fundamentally deforms the letterforms themselves, stretching and squashing them in ways that can compromise legibility and aesthetic integrity. For instance, when comparing two badges, one curved with the Warp Text tool and another created on a vector path, the difference in quality is often stark. The Warp Text tool can be a shortcut, but it’s a shortcut that frequently sacrifices the clean lines and proportional integrity essential for professional design. It's important to note that if the "Type > Warp Text…" option is grayed out, it might be due to Faux Bold or Faux Italic being applied; these should be turned off in the Character panel before attempting to use the Warp Text feature.
The Superior Approach: Text on a Vector Path
The proper and more professional method for creating curved text in Photoshop involves utilizing vector paths. This technique ensures that your text retains its original shape and proportions while gracefully following a defined line. This approach is particularly beneficial for logos, badges, and labels where precision and a polished look are paramount.
Crafting Your Curve: The Pen Tool and Shape Tools
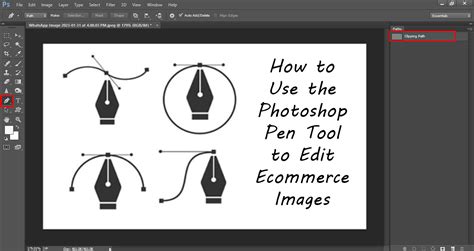
To begin, you'll need to create a vector path that your text will follow. Photoshop offers two primary tools for this purpose: the Pen Tool and the various Shape Tools.
The Pen Tool (P): This is the most versatile tool for creating custom paths. To use it, select the Pen Tool from your toolbar. Click on your canvas to set the starting point of your path. Then, click again to set the ending point. For a curved line, click and hold the mouse button at the second point, and then drag in the opposite direction you want the line to curve. This action creates anchor points and Bezier handles, allowing for precise control over the curve's shape and flow. You can add more anchor points to create complex curves. Pressing Esc will finalize the path.
Shape Tools (Ellipse, Rectangle, etc.): For simpler, geometric curves, the built-in Shape Tools are excellent. The Ellipse tool is frequently used for creating circular or oval paths, ideal for text that needs to encircle a design element. To use the Ellipse tool, select it from the toolbar (it's often grouped with the Rectangle tool; click and hold the Rectangle tool icon to reveal it). Before drawing, ensure the mode in the options bar is set to "Path." Then, click and drag on your document to draw the desired shape. You can pick any shape you like or use the Pen tool to draw your own path that your text will follow.
Adding and Manipulating Text on the Path
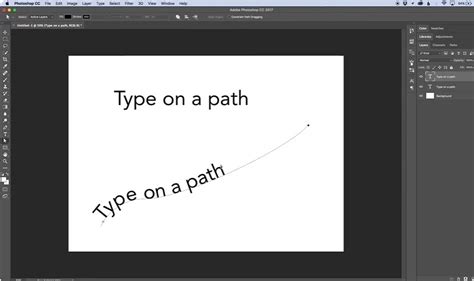
Once you have your vector path established, the next step is to add your text.
- Select the Type Tool (T): Activate the Type Tool from your toolbar.
- Hover over the Path: Move your cursor over the path you've created. You'll notice a change in the cursor's appearance. It will transform from a standard "T" to a "T" icon accompanied by a small, wavy line, indicating that it's ready to type on the path.
- Click and Type: Click on the path where you want your text to begin. You can then start typing your desired text.
- Adjusting Text Placement and Alignment: After typing, you might find that the text isn't positioned exactly where you want it, or it might be on the "wrong" side of the path.
- Start and Stop Points: On the path, you'll find two points that define the beginning and end of where the text will be placed. To adjust the text's position along the path, switch to the Path Selection Tool (the black arrow) or the Direct Selection Tool (the white arrow). Drag these points to reposition your text. Your cursor should change to a text cursor with two arrows when you hover over these points, indicating you can drag them.
- Flipping Text: Text typically aligns to one side of the path. For instance, on a circle, it might appear on the outside. To move the text to the other side of the path, use the Path Selection Tool (black arrow) and drag the text along the path until it flips to the opposite side.
- Committing Changes: Once you are satisfied with the text placement, click the commit button (a checkmark icon) in the options bar, or press Enter (on Windows) or Return (on Mac) to confirm your changes.
This method ensures that your text remains fully editable, and you can easily adjust the path or the text itself at any time. If you have a line or ellipse shape layer under your text that you no longer need, you can delete that layer in the Layers panel to the right, leaving only your text on the path.
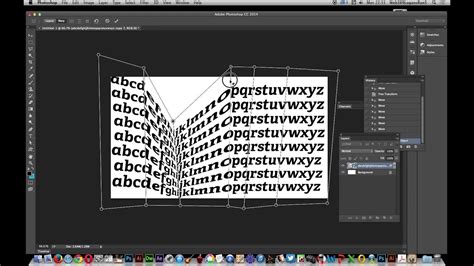
Advanced Text Warping with Smart Objects
For more complex or organic warping effects that go beyond simple arcs, converting your text layer into a Smart Object opens up powerful transformation options. This is particularly useful if the standard Warp Text tool's presets are too limiting, or if you need to apply more intricate distortions.
- Type Your Text: Begin by typing your text using the Type Tool.
- Convert to Smart Object: In the Layers panel, right-click on your text layer and select "Convert to Smart Object." This action encapsulates your text layer into a single, editable smart object.
- Apply Transform > Warp: With the Smart Object layer selected, go to the menu bar and navigate to
Edit > Transform > Warp. This will apply a bounding box with a 2x3 grid over your text. - Manipulate the Warp Grid: You will notice bold points and intersection lines within the grid. These are Bezier curve handles and control points. You can click and drag these points, the corners of the box, or the intersection points of the grid lines to bend, twist, and distort the text into virtually any shape you desire. This method offers a high degree of control for creating custom warp effects.
- Commit the Transformation: Once you have achieved the desired warp, press Enter/Return or click the commit icon in the options bar.
It's important to note that once text is converted to a Smart Object and warped, the text itself may no longer be directly editable as text. If you need to edit the text content, you'll need to double-click the Smart Object thumbnail in the Layers panel to open it in a separate window, edit the text there, save, and then return to your main document. For optimal results with this method, it's often advisable to set a high text size before converting to a Smart Object, as this can help prevent the warp effect from appearing blurry.
When Illustrator Might Be a Better Fit
While Photoshop is an incredibly powerful tool for raster image editing and offers robust text manipulation capabilities, it's worth acknowledging that Adobe Illustrator is purpose-built for vector graphics. For tasks involving intricate logo design, complex text layouts, or when absolute precision in vector form is required, Illustrator often provides a more streamlined workflow. Illustrator excels at managing text and vector graphics, making it a superior choice for many logo and branding projects where text needs to be scaled infinitely without loss of quality or precisely manipulated along complex vector curves. If your primary focus is logo design or vector illustration, exploring text manipulation in Illustrator might be a beneficial step.
Choosing the Right Tool for Your Design Needs
In summary, Photoshop provides several effective methods for curving text, each suited to different scenarios:
- Warp Text Tool: Quick and easy for simple, preset distortions. Best for beginners or when speed is prioritized over precision. However, it can deform letterforms.
- Text on a Path (using Shape Tools or Pen Tool): The professional standard for creating text that follows a defined curve. It preserves text integrity and offers excellent control, especially for circular text, badges, or text that needs to hug a specific shape. This method allows for precise placement and is ideal for designs where text needs to be a distinct element that flows with the overall composition.
- Transform > Warp on a Smart Object: Offers the most creative freedom for complex, custom distortions and organic warping. It's powerful for achieving unique text effects that go beyond standard arcs.
By understanding and utilizing these different techniques, you can elevate your designs, ensuring your curved text not only looks good but also serves the overall visual narrative of your project, whether it's a badge, poster, or a more intricate graphic composition. Mastering these methods gives you the versatility to handle a wide range of design challenges and produce polished, professional results.