GIMP, a powerful and free image editing software, offers various methods for manipulating text, including the often-sought-after ability to make text follow a curved path. While the process might seem straightforward, users frequently encounter challenges, particularly concerning legibility and the management of resulting layers. This guide delves into the primary techniques for achieving curved text in GIMP, addressing common pitfalls and offering insights for a successful outcome.
Understanding the Core Challenge: Rasterization vs. Vector Paths
Before diving into specific GIMP tools, it's crucial to grasp the fundamental difference between rasterized text and vector paths. When you type text in GIMP, it's initially treated as a rasterized image - a grid of pixels. This means that direct manipulation of its shape, like bending or curving, can lead to distortion and a loss of clarity, akin to stretching a photograph. The "Curve Bend" filter, for instance, often falls into this trap, squishing the selection around the distorted area and compromising legibility.
Vector graphics, on the other hand, are defined by mathematical equations representing lines and curves. This allows for scaling and transformation without any loss of quality. GIMP's path tools operate on this vector principle, enabling precise control over shapes and lines. The key to achieving clean, curved text lies in leveraging GIMP's ability to bridge the gap between rasterized text and vector paths.
The Canonical Solution: Text Along Path
The most direct and recommended method for creating curved text in GIMP is by utilizing the "Text Along Path" function. This tool is specifically designed to take existing text and wrap it around a predefined vector path.
Step-by-Step Implementation:
Create Your Text: Begin by creating your desired text using the Text Tool. You can adjust the font, size, and color as needed. For the purpose of curving, the initial placement and alignment of this text layer are less critical than for the path itself. It's often beneficial to have the original text lined up vertically, serving as a reference.
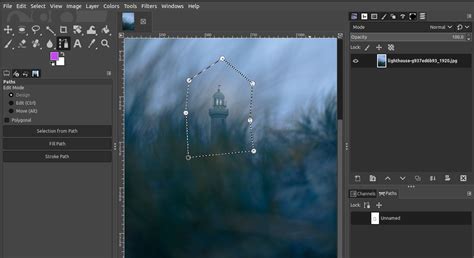
Create a Path: The next crucial step is to create a vector path that will dictate the curve of your text.
- Using the Banner Edge: If you are working with a design element like a banner, you can use its edge as a guide for creating the path. Select the Paths Tool (often represented by a pen icon). Click along the edge of the banner to create a series of nodes, forming a path that follows the desired curve. It's recommended to make this path slightly longer than your original text to allow for smooth curvature without the deformed text starting abruptly. The path essentially acts as a center line for your text.
- Manual Path Creation: Alternatively, you can draw a freehand path using the Paths Tool. Click and drag to create smooth curves or click to create sharp corners. The goal is to create a path that represents the desired trajectory for your text.
Convert Text to a Path (Optional but Recommended for some workflows): While "Text Along Path" can work directly with text, converting your text to a path first can offer more control in certain scenarios.
- Select your text layer.
- Navigate to Path > Object to Path. This converts the outlines of your letters into a vector path. This can be useful if you intend to further manipulate the individual letters' shapes after they are curved, though it's not strictly necessary for the primary "Text Along Path" function.
Apply Text Along Path:
- Ensure your text layer is selected.
- Navigate to Text > Text Along Path.
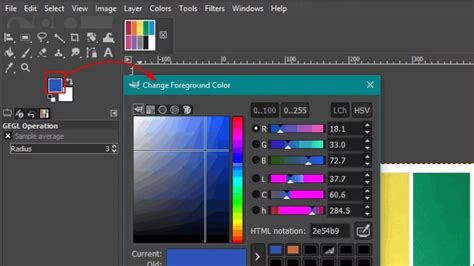
- GIMP will then attempt to apply the text to the currently active path. It's vital to ensure that the path you intend to use is indeed the active one. You can manage paths in the Paths Dialog (Window > Dockable Dialogs > Paths).
Addressing Common Issues with "Text Along Path":
A frequent point of confusion with the "Text Along Path" tool is the perceived lack of a dedicated layer for the curved text. When you use "Text Along Path," GIMP doesn't automatically create a new, distinct layer for the curved output. Instead, the curved text is essentially rendered "on the canvas" or associated with the path itself.
- Visibility: You might notice the curved text still visible even when all other layers are hidden. This is because the path itself might be influencing the rendering, or the text has been applied directly to the canvas in a way that bypasses typical layer stacking.
- Layer Management: To gain better control, it's often advisable to:
- Create a new, transparent layer before applying "Text Along Path." Name it something descriptive like "Curved Text."
- After using "Text Along Path," you might need to stroke the path onto this new layer if you want the curved text to exist as a distinct, editable layer of pixels. To do this:
- Ensure your "Curved Text" layer is active.
- Select the path you used for curving from the Paths Dialog.
- Go to Edit > Stroke Path. In the dialog, choose "Stroke line" and select "Solid color." You can then choose the foreground color (which will be the color of your text). This effectively renders the curved text as pixels on your chosen layer.
How to Easily Create Curved Text in GIMP | GIMP Basics Tutorial
Alternative Method: Envelope Deformation (with Caveats)
While "Text Along Path" is the preferred method, some users explore other options, such as the "Envelope Deformation" effect, which can be accessed via the Path Effect Editor.
- Convert Text to Path: As mentioned earlier, you first need to convert your text object into a path (Path > Object to Path). This is essential for this method.
- Open Path Effect Editor: Go to Path > Path Effect Editor.
- Apply Envelope Deformation: In the dialog, select "Envelope Deformation" from the "Apply new effect" dropdown.
- Edit on Canvas: Select the "Edit on Canvas" button. You can then use the Edit by Nodes tool to click on the path and manipulate its nodes, bending the text.
Why this method has caveats: The "Envelope Deformation" tool is powerful for distorting objects along a path, but it can be less intuitive for text compared to "Text Along Path." It essentially warps the existing path of the letters. This can lead to:
- Legibility Issues: Depending on the degree of deformation, the letters can become stretched, compressed, or otherwise distorted in a way that hinders readability. This is similar to the problems encountered with the "Curve Bend" filter.
- Less Direct Control: Managing the curve precisely can be more challenging as you are directly manipulating the letter outlines rather than guiding text along a separate path.
The user's experience of "squishing" the selection with the "Curve Bend" filter highlights this potential problem. While "Envelope Deformation" is more sophisticated, the principle of distorting existing outlines can still impact legibility if not used judiciously.
Best Practices for Legible Curved Text
Regardless of the method employed, maintaining legibility is paramount. Consider these best practices:
- Path Placement: Ensure the path you create is a smooth, gradual curve. Sharp angles or excessive bending will distort the text. The path should ideally be slightly longer than the text's linear equivalent to allow for the natural spacing of letters as they curve.
- Font Choice: Some fonts are more forgiving when curved than others. Simple, sans-serif fonts generally hold their shape better than highly decorative or condensed fonts.
- Text Size: Larger text can often accommodate curvature better than very small text, where distortions become more apparent.
- Layer Management: As discussed, creating a dedicated layer for your curved text (by stroking the path onto a new layer) provides the most control for further editing and ensures your curved text is a distinct element within your design.
- Guides: Use GIMP's guide system (View > Guides) to help align your original text and to mark the start and end points of your path, ensuring consistency.
- Active Layer Awareness: Always be mindful of which layer is active when performing operations. This is a common source of unexpected results in GIMP.
Beyond the Basics: Advanced Considerations
For more complex logo designs or intricate text manipulations, GIMP offers further possibilities:
- Combining Paths: You can combine multiple paths to create more elaborate shapes and text flows.
- Layer Masks: Once your text is curved and on its own layer, you can use layer masks to further refine its appearance, fading it in or out, or creating selective transparency.
- Filters and Effects: While avoiding filters that distort text directly, you can apply other filters (like drop shadows or glows) to the layer containing your curved text to enhance its visual impact.
The journey to mastering curved text in GIMP involves understanding the tools, their underlying principles, and common user experiences. By prioritizing the "Text Along Path" method and employing careful path creation and layer management, you can achieve professional-looking curved text that enhances your designs without sacrificing clarity.