Creating convincing grassy textures in Adobe Photoshop can elevate a digital artwork from a flat representation to a vibrant, lifelike scene. Whether you're a graphic designer, a digital artist, or a hobbyist looking to enhance your visual projects, understanding how to effectively add grass can be a game-changer. This tutorial will delve into various techniques, from leveraging custom brushes to employing filters and layer styles, offering a comprehensive approach suitable for beginners and experienced users alike.
The Power of Custom Brushes for Grass Creation
One of the most frequently recommended and highly effective methods for generating realistic grass in Photoshop involves the use of custom brushes. This approach allows for a high degree of control and variation, mimicking the organic nature of real-world vegetation. The fundamental idea is to create or utilize brushes that resemble individual blades of grass or small clumps, which can then be "painted" onto your canvas.
Crafting Your Own Grass Brushes
The process of creating a custom grass brush often begins with a simple shape. By resetting your foreground and background colors to their defaults (pressing 'D' on your keyboard), you can then manipulate a basic shape, such as an ellipse, to form a pointed tip resembling a blade of grass. Selecting this shape and saving it as a new brush preset within Photoshop's Brush Settings panel is the first step. Naming your brush, for instance, "Grass Brush 1," and ensuring the "Capture Brush Size in Preset" option is checked will allow you to retain the brush's characteristics.
Utilizing Pre-made and Default Brushes
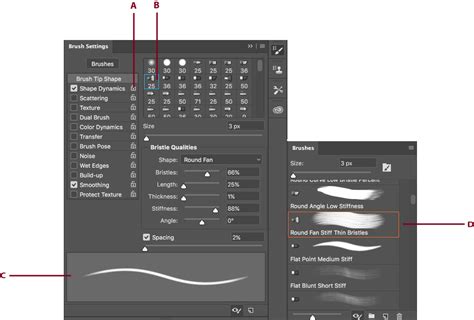
While creating custom brushes offers unparalleled control, Photoshop's default library often contains brushes that can be adapted for grass. Furthermore, numerous online resources offer pre-made grass brush packs that can be downloaded and installed. The key to achieving natural-looking results lies in understanding and manipulating the brush settings. Within the Brush Settings panel (Window > Brush Settings), you can significantly influence the appearance of your grass.
Scatter and Jitter for Variation
To avoid a repetitive and artificial look, the "Scatter" and "Jitter" settings within the Brush Settings panel are crucial. These parameters allow you to randomize the placement, size, and hue/saturation of your brush strokes. By adjusting the "Jitter" for hue and saturation, you can introduce subtle color variations between individual blades of grass, closely mirroring the natural diversity found in real prairies. Similarly, scatter settings control how spread out the brush marks are.
Size Dynamics and Pressure Sensitivity
The "Shape Dynamics" settings are also vital. For a more organic feel, enabling options that vary the size of the brush stroke based on factors like pen pressure (if using a graphics tablet) or a random factor can produce more convincing results. When using a pressure-sensitive tablet, varying the pressure applied can naturally alter the size and thickness of the grass blades, adding a layer of realism. Even with a mouse, you can manually adjust the brush size using the bracket keys [ and ] while painting to introduce variation.
Sampling Real-World Textures
A highly effective technique for achieving photorealistic grass is to sample directly from photographs of actual grass. By using an image of a prairie or lawn as a reference, you can use Photoshop's eyedropper tool to sample the colors and textures present. This sampled information can then be used to inform the creation of your custom brushes or to directly paint areas of your artwork, ensuring that the generated grass closely matches real-world appearances.
Beyond Brushes: Filters and Layer Styles for Grass Effects
While brushes are a cornerstone of grass creation in Photoshop, other tools and techniques can further enhance realism or provide alternative methods for achieving grass-like textures.
The Field Blur Filter
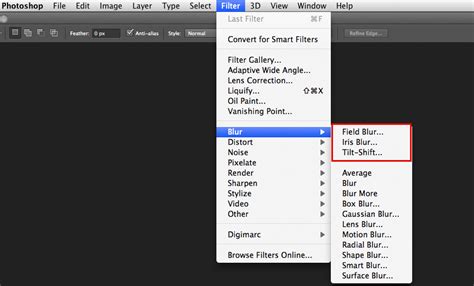
The "Field Blur" filter can be a surprisingly useful tool when combined with grass brushes. By creating a new layer for your grass, you can then apply a Field Blur effect (Filter > Blur Gallery > Field Blur). This filter allows you to selectively blur different parts of your image, which can help to soften the edges of painted grass, create a sense of depth, and integrate the grass more seamlessly into the overall scene. Adjusting the blur radius can simulate atmospheric perspective or the way distant grass appears less sharp.
Layer Styles and Patterns
Layer styles offer another avenue for creating grass effects, particularly when combined with patterns. For instance, you can create a grass pattern file (.pat) and then apply it as an overlay or a texture within a layer style. This can be particularly effective for creating large areas of grass with a consistent texture.
Creating Grass Text Effects
In some instances, the goal might be to create text that appears to be made of grass. This can be achieved by combining several techniques. Typing out your desired text, you can then use actions to automate the process of converting the text into a brush stroke, applying layer styles, and incorporating grass patterns. This involves creating a work path from the text selection, stroking that path with a grass brush, and then applying effects like color overlays and textures to the text layer.
Grass Pattern Presets
Photoshop's "Preset Manager" allows you to load and manage various pattern presets. By loading a grass pattern file, you can then easily access and apply it to your designs. These patterns can range from simple repeating textures to more complex, multi-layered representations of grass.
Advanced Techniques and Considerations
As you become more comfortable with the fundamental techniques, you can explore more advanced methods and pay attention to finer details that contribute to a truly convincing grass scene.
Replicating Specific Grass Types
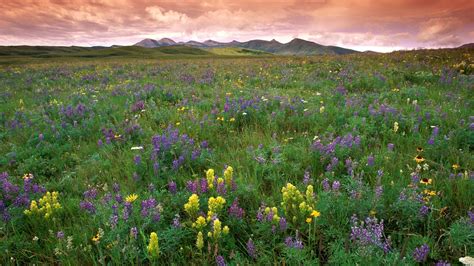
The user's experience with creating a "prairie" and mentioning "tall grass prairie" versus "short grass" highlights the importance of understanding the specific type of grass you aim to represent. Different environments, like the shortgrass prairies of Wind Cave National Park or Buffalo Gap National Grasslands, feature distinct grass species with unique characteristics in terms of height, color, and density. Replicating these requires careful observation and selection of appropriate brushes, colors, and painting techniques.
Integrating with Existing Elements
When adding grass to an existing image, it's crucial to consider how it interacts with other elements, particularly lighting and shadows. The direction and intensity of your light source will dictate where shadows fall. Incorrect shadow placement can immediately break the illusion of realism. Therefore, pay close attention to the existing shadows in your scene and ensure your newly added grass casts believable shadows accordingly.
The Role of Reference Images
The advice to "sample the real colors and textures from the picture" is invaluable. Using high-quality reference photographs of the specific type of grass you wish to depict is paramount. Analyze the subtle variations in color, the way light hits the blades, the density, and the overall form. This detailed observation will inform your brush choices, color palette, and painting technique.
Practice and Iteration
As one user noted, even with clear instructions, achieving professional-quality results "will take a lot of tweaking and practice." Photoshop is a powerful tool, and mastering its capabilities for complex tasks like realistic grass rendering requires patience and experimentation. Don't be discouraged if your initial attempts aren't perfect. Continuously refine your brushes, experiment with different settings, and analyze your results against your reference images.
Exploring Creative Grass Effects and Resources
Beyond the core techniques, there are numerous creative avenues and readily available resources that can aid in your grass creation endeavors.
Pre-made Grass Texture Packs
For those seeking a quick and effective solution, pre-made grass texture packs can be an excellent option. These often contain a variety of high-quality grass textures, sometimes in resolutions suitable for large-scale projects, such as banners, posters, or branding elements. Such packs can significantly speed up the workflow and provide a professional foundation for your designs.
Thematic Grass Packs
Some resources offer specialized grass packs tailored to specific themes or aesthetics. This might include variations like autumn grass, red grass, or even tropical grass effects. These thematic packs can be particularly useful for projects with a distinct mood or color palette.
Comprehensive Nature Element Collections
Certain asset collections go beyond just grass, offering a broader range of natural elements like leaves, flowers, and plants. These comprehensive packages can be invaluable for creating rich and detailed natural scenes, allowing for the seamless integration of various organic elements.
3D Lettering and Smart PSDs
For more advanced applications, such as creating impactful headers, posters, or flyers, 3D lettering packs can be employed. These often provide high-quality 3D renders of letters, sometimes with pre-applied effects like shadows and multiple color options. Smart PSD files within these packs can offer further customization, allowing you to easily apply various effects, including different grass textures, to your text or logos.
Seamless texture for pattern stamp and fill in Photoshop
By combining the power of custom brushes, thoughtful application of filters, and an understanding of real-world references, you can effectively add convincing and visually appealing grass to your Photoshop projects. The journey from a basic sketch to a lush, natural scene is a testament to the versatility of digital art tools and the dedication of the artist.