DaVinci Resolve has rapidly ascended in popularity, drawing the attention of both seasoned professional editors and enthusiastic hobbyists. This is largely attributable to its exceptionally capable free version and the continuous integration of innovative features, making the software remarkably versatile and far-reaching. Whether you are taking your inaugural steps into video editing or contemplating a transition from another editing suite, this DaVinci Resolve tutorial is designed to equip you with the foundational knowledge to navigate this excellent program swiftly. Through this straightforward DaVinci Resolve tutorial, you will progress from the initial launch of the software to the successful sharing of your completed video project. This guide will specifically concentrate on solo editing techniques and strategies to facilitate your initial progress.
Project Management and Setup
DaVinci Resolve employs a disk database for its project management system. Instead of managing individual project files scattered across your hard drive, your projects are consolidated and stored centrally. For the purposes of this DaVinci Resolve tutorial, project creation has been kept intentionally simple, focusing on a setup for individual use.
Upon launching DaVinci Resolve for the first time, you will be presented with the Project Manager page. From this interface, select the "New Project" option. Subsequently, assign a name to your project.
It is crucial to configure your Project Settings, which can be accessed by clicking the cog icon located in the lower-right corner of the interface. Within these settings, you will need to establish your Timeline Frame Rate. The default setting is 24 frames per second (fps), but it is generally advisable to adjust this to align with the majority of your footage, such as 23.976 fps or 25 fps. If you modify the timeline frame rate, ensure that the Playback Frame Rate and Video Format tabs are also updated to match these new settings. Should you be uncertain about the appropriate settings, do not be concerned; you will have another opportunity to adjust the frame rate during the media import process.
Importing and Marking Media
To commence the editing process, navigate to the "Cut" tab. Within the menu bar, select "File" > "Import" > "Import Media." This action will open a Finder window, allowing you to select your media files. Once imported, your media will be organized within the "Master Bin."
A critical step before beginning your edit is to mark your footage. This practice ensures that only the essential segments of your clips are brought onto the timeline, streamlining the editing workflow. To mark your footage, hover your mouse cursor over each clip's thumbnail and scrub through the video.

Press the "I" key on your keyboard to set an "in-point," designating the precise start of the footage you wish to utilize. Subsequently, press the "O" key to establish an "out-point," marking the desired end of the clip.
You can then click and drag the marked thumbnail directly onto the timeline to create an edit. Alternatively, double-clicking a shot will load it into the viewer for review, where the same "I" and "O" keyboard shortcuts can be employed to set in and out points.
Understanding the DaVinci Resolve Workspace
DaVinci Resolve is intelligently structured with distinct workspaces, each dedicated to a specific stage of the video editing workflow. These workspaces are accessible via tabs located at the bottom of the screen and include Media, Cut, Edit, Fusion, Color, Fairlight, and Deliver. For this foundational tutorial, our focus will be on the Media, Cut, and Edit pages.
The Media Page
The Media page serves as the central hub for importing and organizing all your audio and video assets. Its primary function is to prepare your media for the subsequent editing stages. The Media page is typically arranged as follows:
- Media Storage: Located in the top-left pane, this section displays your computer's file directory, enabling you to navigate through your drives and locate media files efficiently.
- Media Pool: The bottom-central pane is where your imported media is presented. You can create bins (essentially folders within DaVinci Resolve) to maintain a well-organized media library.
- Viewer: The Source Viewer, situated in the top-central pane, allows you to preview clips as you import and organize them.
The Cut Page
The Cut page is engineered to provide simplified tools for quickly assembling your video assets. It is particularly advantageous for rapid edits and shorter projects where intricate features are not a necessity. This page consolidates the essential tools required to construct a complete sequence from your raw media files.
Key elements of the Cut page include:
- Timeline: The main area of the Cut page, located at the bottom of the screen, where you will add, trim, and arrange your media clips. DaVinci Resolve features a dual timeline system: the upper timeline offers a project overview, while the lower timeline facilitates precise editing.
- Media Pool: In the top-left corner, this pane functions identically to its counterpart on the Media page. You can drag and drop clips from the Media Pool directly onto your timeline.
- Viewer: This video preview screen occupies a significant portion of the Cut page, allowing you to observe the real-time effects of your edits. You can toggle between "Source Tape" and "Timeline" modes to view your sequence as it develops.
- Toolbar: Positioned just above the Timeline, this toolbar contains a collection of icons representing basic tools for selecting, moving, and cutting clips within your Timeline.
- Transitions, Titles, and Effects: Located above the Media Pool pane, these buttons provide access to the Resolve library of transitions, titles, and effects, enabling you to apply them to enhance your video's professional appeal.
The Edit Page
The Edit page represents a fully equipped workspace tailored for professional video editing. It is here that most editors dedicate their time, utilizing a comprehensive suite of tools for refining footage, transitions, effects, and more.
Upon navigating to the Edit page, you will encounter familiar elements like the Media Pool and Timeline. New sections to note include:
- Source and Timeline Viewers: In contrast to the Cut page, the Edit page features two viewers. The Source Viewer on the left displays the clip you are preparing for editing, while the Timeline Viewer on the right showcases the sequence as it is being constructed in the Timeline.
- Editing Toolbar: Positioned directly above the Timeline, this toolbar offers various tools to assist with importing, trimming, and snapping clips together within your sequence.
- Inspector Panel: Located in the top-right corner, the Inspector panel provides a wide array of editing tools, effects, and transitions that can be applied to your clips. From here, you can adjust rotation, zoom, flip, and position. Furthermore, options for cropping, stabilizing, and applying lens corrections are readily available.
While this tutorial focuses on the Media, Cut, and Edit pages, as you gain proficiency, you can explore the advanced capabilities of the Fusion, Color, and Fairlight pages. These specialized workspaces empower you to enhance the visual and auditory aspects of your videos, with the added potential to leverage DaVinci Resolve LUTs and intro templates for further creative expansion.
Editing Workflow: Clips, Cuts, and Crops
Importing Media
DaVinci Resolve supports a broad spectrum of video and audio file formats, simplifying the media import process. The most straightforward method involves dragging and dropping your files directly into the Media Pool. On the Media page, navigate to your file locations via Media Storage and then drag the desired files into the Media Pool. Alternatively, you can import media directly from the Cut and Edit pages by right-clicking within the Media Pool and selecting "Import Media," followed by navigating to your files and clicking "Open."
Splitting Clips
Splitting clips allows you to create distinct segments within your footage, enabling you to isolate specific portions, remove unwanted content, and reorder your video segments. To split a clip on the Edit page, position the playhead at the desired split point in your sequence. Press the "B" key or click the "Blade Edit Mode" icon (resembling a razor blade) and then click within your sequence to execute the split. The Cut page also offers a "Split Clip" tool; simply move the playhead to the desired location and click the icon to create a break.
Cropping Footage
Cropping video allows you to eliminate unwanted edges, focus on a particular area of the frame, or adjust the aspect ratio. This can be achieved within the Edit page using the provided tools.
- Select the Clip: Ensure you are on the Edit page and select the clip in the timeline you wish to crop.
- Open the Inspector Panel: If not already visible, click the "Inspector" button in the top-right corner of the interface.
- Adjust Cropping Settings: Under the "Cropping" header, expand the settings and manipulate the sliders for "crop left," "right," "top," and "down" to achieve the desired crop.
- Reposition and Scale: To ensure the cropped footage fills the frame, utilize the "Position" tool within the "Transform" section to center the clip, and then use the "Zoom" tool to scale it appropriately.

Undoing and Redoing Actions
Correcting mistakes during the editing process is simplified through DaVinci Resolve's undo and redo functionalities. Keyboard shortcuts are available: Ctrl + Z (Windows/Linux) or Cmd + Z (Mac) to undo the last action, and Ctrl + Shift + Z (Windows/Linux) or Cmd + Shift + Z (Mac) to redo a previously undone action. For more extensive revisions, the "Edit > History" menu provides a detailed log of recent actions, allowing you to revert to a specific point in your editing history.
Enhancing Your Edits: Text, Transitions, and Effects
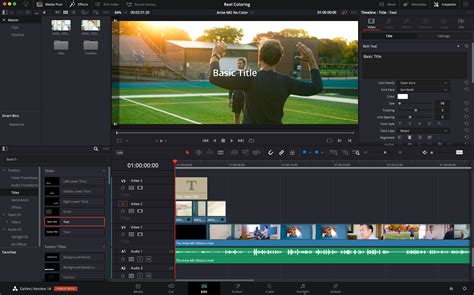
Adding Text
DaVinci Resolve offers a range of text customization options, from simple captions to intricate animations. On the Edit page:
- Import Media: If overlaying text on video, ensure your clips are already placed in the timeline.
- Access Effects Library: Select "Effects" in the top-left corner and navigate to "Titles" under the "Toolbox" category.
- Choose Text Effect: For basic text, drag and drop the "Text" effect onto the timeline above your video track. For more advanced customization, use the "Text+" option. Various preset title animations are also available.
- Edit Text: Select the text element on the timeline and use the Inspector panel to modify font, size, color, and other properties. The "Text+" effect provides additional controls for tracking, line spacing, color, shading, and animation.
Applying Transitions
While many video productions utilize basic transitions like fade to black or cross dissolve, DaVinci Resolve includes a selection of pre-built transitions.
- Access Effects Library: Click "Edit" on the ribbon toolbar and open the "Effects Library" panel in the top-left corner.
- Select Transition: Under "Video Transitions," locate "Cross Dissolve" and drag it onto the timeline between two video clips.
- Adjust Transition: The Inspector panel provides tools to fine-tune transition parameters, such as duration and easing, to match your project's mood.
Utilizing Effects and Plugins
DaVinci Resolve comes equipped with numerous high-quality plugins for adding effects to your videos. While some of the most advanced effects are exclusive to the paid Studio version (e.g., Surface Tracker and enhanced Resolve FX Depth Map introduced in version 18), the free version still offers a substantial library of effects to explore.
Within the Effects Library, navigate to "OpenFX." For instance, you can find and apply a "Vignette" effect. For applying an effect to the entire timeline, consider using an "Adjustment Clip" from "Effects Library > Effects."
The software can be further enhanced by incorporating templates and macros. From DaVinci Resolve 18 onwards, the proxy workflow has seen significant improvements, making the creation, management, and switching between proxy and full-resolution media more efficient. This is particularly beneficial for collaborative or remote projects.
Advanced Features and Workflows
Multicam Editing
While multicam editing can be somewhat complex for a beginner tutorial, DaVinci Resolve offers robust multicam tools. Versions 18 and later feature enhanced syncing options and improved proxy handling, which contribute to smoother multicam edits, especially in remote or collaborative environments.
How to use Multicam in DaVinci Resolve
Audio Editing with Fairlight
For more sophisticated audio manipulation, DaVinci Resolve provides the dedicated "Fairlight" tab. Recent updates to Fairlight include automation curve editing and FlexBus integration, significantly expanding its audio editing capabilities. You can import your own music by following the same media import procedure as for video files.
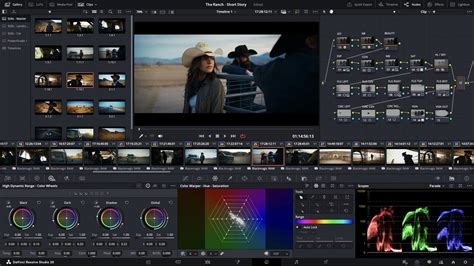
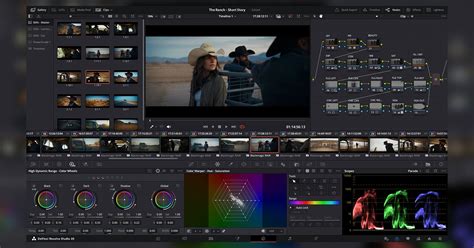
Color Correction and Grading
The "Color" tab, while potentially intimidating at first glance, offers straightforward basic features. As you gain confidence, you can explore advanced HDR tools and updated color warper features for enhanced precision in color grading.
To color-correct a shot:
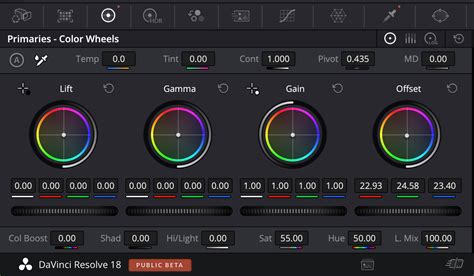
- Select the first clip on your Timeline. Each clip appears as a thumbnail in the middle Tool Belt.
- Utilize the "Black Balance" tool (crosshair with a black box) by selecting an area in your shot that should be black.
- If the shot is too dark, adjust the "Lift" slider beneath the trackball to restore detail.
- For highlights, use the "White Balance" tool (near the bottom left) on an area that should be white. If the shot is washed out, drag the "Gain" slider to recover detail.
- The "Sat" value controls the image's color saturation.
The "Magic Mask" tool now supports object selection and tracking, simplifying the isolation and adjustment of specific objects within a scene. While it can be used for object removal, this is a more advanced technique.
Exporting Your Project
Once you are satisfied with your edit, titles, transitions, music, and color grading, it's time to share your work. Return to the Cut page. Note that recent versions of DaVinci Resolve include cloud collaboration and sharing tools that you can explore. DaVinci Resolve 18 and later versions offer an expanded range of formats for direct export, which is particularly beneficial for social media creators. During the export process, a status window will display the render progress, and upon completion, your movie will be ready for distribution.
This tutorial has provided a solid overview of how to use DaVinci Resolve and guided you through creating your first project. The next step is to apply this knowledge and unleash your creative potential.
DaVinci Resolve for Professionals and Beginners
Video production has become an integral part of many photographers' workflows, either for expanding client services or for personal promotion. Blackmagic Design's DaVinci Resolve, a recognized industry standard for color grading, has progressively integrated robust editing capabilities. While high-end professional versions are available, a completely free version offers remarkable value. The combination of expanded functionality and an accessible price point has cemented its popularity. However, mastering its comprehensive features can present a learning curve; it is not a software that one can master by watching a single tutorial.
For those transitioning from layer-based systems like Photoshop and Premiere, adapting to DaVinci Resolve's node-based system for color correction can initially be challenging. Nevertheless, the real-time scopes (video equivalents of a histogram) in Resolve are exceptionally useful, offering continuous updates as you scrub or play through footage, a distinct advantage over some other applications. If you are new to DaVinci Resolve or have yet to try it, a thorough exploration is highly recommended.
Blackmagic Design offers certified training programs designed for both novice users and established professionals, aiming to cultivate creativity, enhance speed, and ensure project completion. These training resources delve into various aspects of the software, from editing and visual effects on the Edit page to advanced color grading on the Color page, and intricate audio mixing within Fairlight. The Fusion page is dedicated to creating cinematic visual effects and motion graphics, with tools for common compositing tasks and a true 3D workspace.
Official Blackmagic Design hands-on training guides provide practical exercises covering a wide range of functionalities, including cutting interviews, dramatic scenes, documentary material, and music videos. Separate guides focus on sound editing, sweetening, recording, mixing, and mastering, as well as detailed color correction techniques and core visual effects compositing tools. These guides enable users to create visual effects directly within DaVinci Resolve, eliminating the need for inter-application file transfers. For users of DaVinci Resolve Studio, advanced features like 3D camera tracking and Universal Scene Descriptor (USD) nodes further streamline the transition from 2D to 3D workflows.
The Training Partner Program by Blackmagic Design aims to collaborate with skilled training organizations and educational institutions, ensuring that trainers are passionate advocates with direct customer engagement. This network includes strategically chosen onsite training companies, online partners, and academic institutions.
DaVinci Resolve is lauded as Hollywood's preferred solution for editing, visual effects, motion graphics, color correction, and audio post-production across Mac, Windows, and Linux platforms.
Specialized Hardware for Enhanced Workflow
To complement the software's power, Blackmagic Design offers specialized hardware control surfaces designed to optimize the editing experience:
- DaVinci Resolve Editor Keyboard: This keyboard features a large search dial with a clutch and includes essential editing, trimming, and timecode keys, all within a premium metal design. An editor panel specifically designed for multi-cam editing, ideal for news cutting and live sports replays, allows for extremely fast camera selection and editing.
- DaVinci Resolve Mini Panel: This compact panel provides quick access to essential editing functions.
- DaVinci Resolve Micro Panel: A smaller, more portable option for on-the-go adjustments.
- DaVinci Resolve Advanced Panel: This premium color panel offers comprehensive control for cinematic image creation, including refined color grading and windowing capabilities.
- Fairlight Desktop Console: Designed for sound engineers facing tight deadlines, this console offers incredibly fast audio editing. Used by Hollywood and broadcasters, these large consoles simplify mixing complex projects with numerous channels and tracks. The console can be configured with legs at a 0º or 8º angle for different working surface preferences.
- Fairlight Stereo/5.1/Dolby Atmos Modules: These modules provide quick access to virtually every Fairlight feature.
- Fairlight Custom Modules: Blank 1/3rd wide bays allow for custom console configurations by adding extra sections.
The combination of DaVinci Resolve's powerful software and its dedicated hardware control surfaces provides a highly efficient and creative environment for video post-production.