In the dynamic world of social media, a compelling visual can be the deciding factor in capturing audience attention. For businesses and individuals alike, the ability to create high-quality, engaging content for platforms like Facebook is paramount. While various tools exist, Adobe Photoshop remains a powerful and versatile solution for crafting professional-grade graphics. This tutorial delves into the intricacies of designing effective Facebook posts using Photoshop, offering a comprehensive guide from initial setup to final export, ensuring your content not only looks professional but also resonates with your target audience.
Understanding Facebook's Visual Requirements
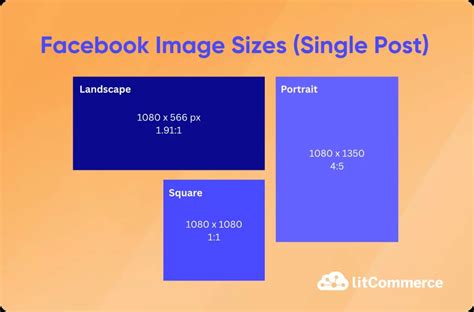
Each social media platform, including Facebook, has specific image size requirements that dictate how your visuals will appear. Adhering to these dimensions is crucial for maintaining image quality and ensuring your content is displayed as intended across various devices. For horizontal posts, a common recommendation is to aim for dimensions of 1200px by 630px. This aspect ratio ensures that your images are neither too cropped nor too small when viewed in the Facebook feed. Understanding these specifications is the first step in designing graphics that are optimized for the platform.
The Power of Photoshop for Social Media Graphics
Photoshop is an industry-standard image creation and editing software that offers unparalleled flexibility and control. While it can seem overwhelming to new users due to its extensive array of tools and features, its capabilities for social media design are immense. Photoshop allows you to customize images to such a degree that your brand can appear professional, creative, and uniquely identifiable. The software operates on a system of layers, which can be visualized as "transparent sheets of glass." This layered approach enables you to build complex compositions by stacking images, text, and graphic elements, with each layer editable independently. Transparent layers allow elements beneath to show through, while opaque layers block light, controlling the visibility of underlying content.
The concept of "opacity" refers to the degree to which something blocks light. Photoshop filters offer automated ways to alter the appearance of an image, applying a range of stylistic changes with ease. Layer styles, on the other hand, are specific effects that can be applied to individual layers, such as shadows, glows, or bevels, adding depth and polish to your designs. Resizing in Photoshop involves changing the dimensions of your canvas or individual elements, while transformation encompasses a broader range of manipulations like rotating, skewing, scaling, or altering perspective. The most current version available is Adobe Photoshop Creative Cloud (CC), which operates on a subscription model, offering monthly plans for access to the program.
Getting Started: Setting Up Your Photoshop Document
The initial step in creating your social media graphic involves setting up a new Photoshop document with the correct dimensions. For Facebook posts, as mentioned, 1200px by 630px is a widely accepted standard. When creating a graphic for the web, it is essential to ensure you are working in RGB color mode, as this is the color model used for digital displays. This setting ensures that your colors will render accurately on screen.
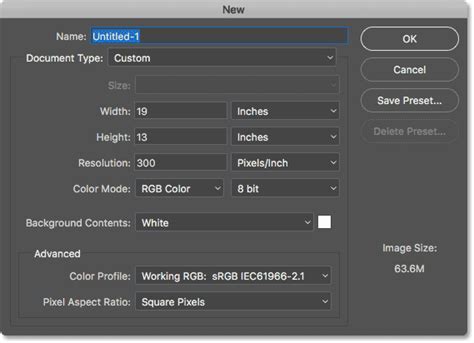
To create a new document, navigate to "File" > "New." In the dialog box that appears, you will input your desired width and height (1200 pixels by 630 pixels), and set the resolution. For web graphics, a resolution of 72 pixels per inch (PPI) is generally sufficient. You can also set these dimensions from the outset when you first create your document, ensuring you're working with the correct canvas size from the beginning.
Importing Your Background Image
Once your document is sized appropriately, the next step is to select the photo you wish to use as your background. Navigate to "File" on the toolbar, and then click on "Place." You will be presented with two options: "Place Linked" and "Place Embedded."
- Place Linked: This option imports the image file from its original location. The image remains a separate file, and any changes made to the original image outside of Photoshop will be reflected in your document. However, if the original image file is moved or deleted, the link will break, and the image will not display correctly in your Photoshop project. This is useful for maintaining smaller file sizes for your Photoshop document.
- Place Embedded: This option embeds the image directly into your Photoshop file. The image becomes part of the Photoshop document, and its file size will increase accordingly. Embedded images are self-contained within the .PSD file, meaning you don't need to worry about external file dependencies.
Choose the option that best suits your workflow, then navigate to the image you want to use, select it, and click "Place." The photo will now appear in your open Photoshop document. If you don't have your own photography, consider purchasing a bundle of stock photos. Resources like the "Feminine & Neutral Stock Bundle" by Garlic Friday Design or the "Juniper Social Media Pack" from the 46&2 Collection offer professional imagery suitable for various projects.
Enhancing Your Design: Text and Graphic Elements
With your background in place, you can begin adding textual and graphic elements to convey your message.
Adding Text to Your Design
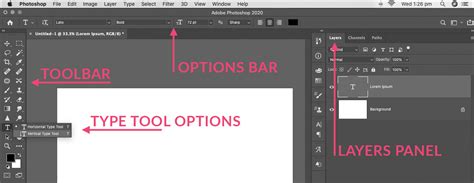
To add text, select the horizontal type tool from the left-hand toolbar; it is represented by a "T" icon. Once selected, you can go to the tool options bar at the top of the Photoshop interface. Here, you can choose your desired font, font size, and color. Click on the design where you want to add text, and begin typing.
After typing your text, you can further refine its appearance. You can adjust the font by selecting a different typeface from the font menu in the tool options bar. For fine-tuning the spacing between lines of text, you can modify the "leading" value.
Incorporating Shapes and Layer Styles
To add visual interest or to create a backdrop for your text, you can add colored shape layers. Select "Layer" > "New" > "Layer." Give your new layer a descriptive name, then click "OK." Next, choose a shape tool from the left toolbar - the rectangular marquee tool is a common choice for creating boxes or backgrounds. Click and drag on your canvas to create the desired shape. Releasing the mouse button will render the shape on its new layer. You can then fill this shape with color, adjust its opacity, or apply layer styles to add effects like drop shadows, outlines, or gradients, making your text more legible and your design more dynamic.
Creative Use of White Space
Don't underestimate the power of white space (or negative space) in your design. Allowing elements to breathe can make your graphic feel cleaner, more professional, and easier to digest. Experiment with the placement of your text and graphics, ensuring that the composition is balanced and visually appealing.
Advanced Techniques: Smart Objects and UI Templates
For a more streamlined and efficient design process, especially when creating multiple social media assets or ensuring consistency across different platforms, leveraging smart objects and pre-designed UI templates can be incredibly beneficial.
Utilizing Facebook UI Demo Templates
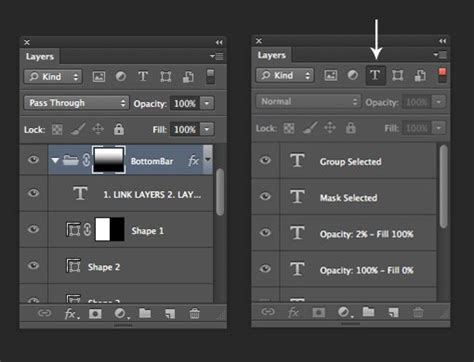
Adobe provides resources, such as a "blank document ready to paste in your own artwork" from a file named 4 - FB_UI_DEMO_2018.psd. These templates are designed to simulate how your content will appear across different devices and placements on Facebook. Within these templates, specific layers are designated as "smart objects" - these are typically highlighted in purple. These smart object layers are the designated areas where you will insert your own custom artwork. You generally do not need to edit the layers contained within the subfolders of these smart objects; instead, you'll edit the smart object itself.
Designing and Previewing Profile Images
To preview your profile image, you would typically open a specific exercise file like 1 - FB PROFILE IMAGE_EXERCISE.psd. This file often contains a masked folder. Enabling the layer mask within this folder allows you to see how your profile image will be cropped into a circular format.
To incorporate your designed profile image into the UI demo template, you would double-click the top '1 - PROFILE IMAGE' smart object layer in the UI demo template's layers panel. This action opens the smart object in a new tab. You can then paste or drag your designed profile image into this new tab, ensuring it is correctly placed within the masked folder. Once you close this tab, your updated profile image will automatically preview across all simulated devices in the UI demo template. If further adjustments are needed, you can return to the profile image template, make tweaks, and the changes will propagate to the demo template. To see the full square image before the circular mask is applied, you can right-click on the 'CIRCLE MASK' folder in the UI demo template and disable the layer mask.
Designing and Previewing Profile Header Images
Similarly, for profile header images, you would use a template like 2 - FB PROFILE HEADER_EXERCISE.psd. When working with the blank UI demo template, you'll notice a series of "safe areas" indicated in the layers panel for the profile header. These safe areas are crucial for ensuring that your text and graphics remain legible on all devices, especially mobile. Content placed within the 'MOBILE' safe zone is most likely to be visible across the widest range of screen sizes. You would double-click the '2 - PROFILE HEADER IMAGE' smart object layer in the UI demo template, open it in a new tab, and then place your designed header image within it. Closing the tab will update the preview in the UI demo template.
Designing and Previewing Post Images
For regular post images, the UI demo template usually includes smart object layers labeled '3 - POST 1' and '4 - POST 2'. Double-clicking either of these smart object layers will open them in new tabs, ready for your content. You can then copy and paste your designed post graphics into these smart object layers or drag them in accordingly. Once you close these tabs, your post images will update in the UI demo template, allowing you to see how they appear in a simulated Facebook feed environment.
Smart Objects in Photoshop - Day 16
Exporting Your Finished Design
Once you are satisfied with your graphic, the final step is to save it in appropriate formats for Facebook.
Saving for Editing and Final Output
To save your work in a way that allows for future edits, navigate to "File" > "Export As." Choose to save the file in a Photoshop format (e.g., .PSD) with layers checked. This ensures that you can reopen the file later and make any necessary modifications.
After saving the layered Photoshop file, go back to "Save As" and save the design as a JPG. JPG is a widely compatible image format suitable for web use and is ideal for uploading to Facebook.
Efficient Exporting with Artboards
For those creating multiple social media graphics, Photoshop CC offers advanced features that can significantly speed up the export process. You can create a large artboard containing several social media graphics at once. Then, using the "Export As" or "Quick Export" features, you can export all these graphics simultaneously in different sizes and with specific file names. To do this, select "File" > "Export" > "Quick Export As." Here, you can choose your preferred file format (like JPG or PNG) and specify a destination folder for your exported assets. This feature is particularly useful for batch exporting graphics optimized for various platforms or different post types.
Adobe Express: An Alternative for Faster Content Creation
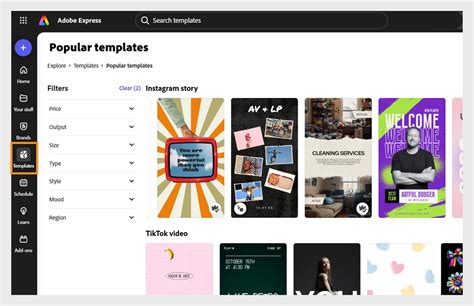
While Photoshop offers extensive control, Adobe Express (formerly Adobe Spark) provides a more accessible and streamlined approach to creating social media content, especially for those who are "always on the move." Adobe Express offers a free plan that includes thousands of templates, hundreds of Adobe Stock images, photo editing tools, and various effects.
The platform's online editor allows users to easily duplicate or add new pages to a project by hitting the "+ Add" button, facilitating the creation of multiple posts. You can establish a theme for your designs by using a consistent selection of photos, icons, logos, and personalized fonts, making your content feel authentic to your brand. Adobe Express also includes a Content Scheduler, allowing users to schedule up to two posts per month to go live at a time of their choosing.
Adobe Express also excels at resizing graphics for various social media destinations in seconds. This ability to quickly adapt designs for platforms like Instagram, in addition to Facebook, saves considerable time and effort. Any new or existing project can be transformed into a shareable template, further enhancing efficiency. For marketers and content creators looking to produce fast, high-quality content without the steep learning curve of Photoshop, Adobe Express is a compelling option.
Testing and Iteration: Understanding Your Audience
Regardless of the tool you use, the ultimate goal is to create content that resonates with your audience. It is essential to test what kind of posts your audience responds to most. Try sharing image posts with detailed captions, graphic posts with bold text, or infographics, and analyze which formats generate the most engagement. Understanding your audience's preferences through this iterative process will help you refine your content strategy and improve the effectiveness of your social media presence.
The ability to identify your brand aesthetic and choose designs that align with it is crucial. By consistently applying your brand's visual identity, you build recognition and trust. Ultimately, elevating your social media presence hinges on the creation of well-crafted, engaging images that not only capture attention but also communicate your message effectively.
The landscape of social media marketing is constantly evolving, and with it, the demand for visually appealing content. Whether you choose the intricate control of Photoshop or the user-friendly speed of Adobe Express, mastering the creation of compelling Facebook post templates is a valuable skill that can significantly impact your brand's visibility and engagement. By understanding the technical requirements, utilizing the right tools, and continuously analyzing audience response, you can ensure your social media presence stands out in a crowded digital space.