Achieving visually appealing rounded corners in InDesign is a common design requirement, adding a touch of sophistication and softness to layouts. While the concept might seem simple, mastering the various techniques to achieve precisely the desired effect, especially when aiming for a fully circular corner, requires understanding InDesign's robust toolset. This guide will delve into the intricacies of rounding corners, from basic applications to more advanced manipulations, empowering designers to elevate their work.
The Direct Approach: Rounding Rectangles and Squares
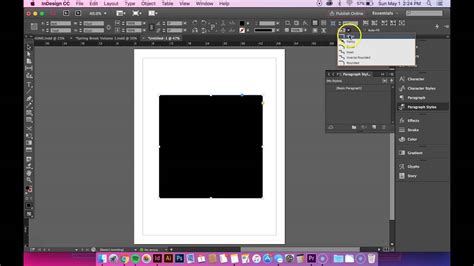
For standard rectangular and square frames, InDesign offers an intuitive, direct method for rounding corners. When a rectangular frame is selected with the Selection Tool, a distinctive yellow square (or diamond, depending on the context) appears near the upper right-hand corner. This visual cue is your gateway to manipulating corner aesthetics.
Clicking and dragging this yellow box inward towards the center of the frame reveals diamond-shaped handles at each corner. Dragging these diamonds allows you to adjust the curvature of the corners. The further you drag them towards the center, the more pronounced the rounding becomes. This method is excellent for quick, visual adjustments.
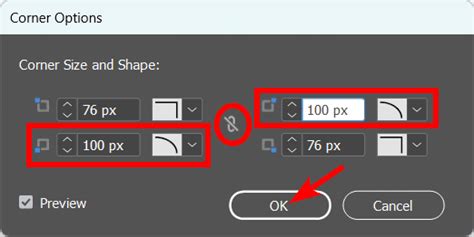
For those who prefer a more precise control over the rounding, the "Corner Options" dialog box is the go-to solution. Accessible via the Object menu (Object > Corner Options…), this panel provides a dedicated interface for fine-tuning corner effects. Here, you can specify exact values for the corner radius and choose from various corner styles, including rounded, inverse rounded, chamfered, and fancy.
The "Make All Settings The Same" icon, often depicted as a chain link, is crucial for ensuring uniform rounding across all corners. When active, adjusting one corner affects all others equally. Disabling this link provides the flexibility to modify individual corners independently, allowing for asymmetrical designs or selective rounding.
A common point of confusion arises when users attempt to achieve a fully circular, "CSS border-radius: 50%" effect. Setting the corner radius to 100mm, or any value significantly larger than half the object's dimension, will result in the corner radius being capped at 25% of the shortest side of the object. This limitation is inherent to the way InDesign calculates corner rounding for standard shapes. To achieve a truly circular corner on a square, the radius needs to be exactly half the width or height of the square. For instance, on a 100mm x 100mm square, a corner radius of 50mm will create a perfectly circular corner.
Beyond Rectangles: Rounding Corners on Polygons and Custom Shapes
The direct yellow box method is exclusive to rectangles and squares. When working with other polygons like triangles, hexagons, or custom shapes created with the Pen Tool, the approach shifts. While the yellow box is absent, the "Corner Options" dialog box remains a powerful tool.
When applied to non-rectangular polygons, the "Corner Options" dialog box functions similarly, allowing you to set a specific corner radius and style. However, a key difference emerges: you generally cannot round individual corners on these shapes using this method alone. The options typically apply uniformly to all corners or to specific sets of corners based on their sequential order.
For advanced control over individual corners on any path, including polygons and custom shapes, InDesign offers a valuable scripting solution. Within the Scripting panel (Window > Utilities > Scripts), you'll find an "Application" folder containing sample scripts for both AppleScript and JavaScript. These scripts provide granular control, enabling you to round or bevel selected corners with remarkable precision.
The scripting interface often mirrors the "Corner Options" dialog box, offering similar radius and style settings. Additionally, scripts introduce an "offset" option for adjusting the size of the corner effect. Crucially, the "Pattern" dropdown menu within these scripts opens up a world of possibilities. Beyond the default "all points," you can select options like "first point," "last point," "second point," "third point," "odd points," and "even points."
Applying these "odd" and "even" point patterns is particularly useful for complex shapes like stars. The "odd points" pattern affects the inner points of a star, while the "even points" pattern modifies the outer points, allowing for intricate and customized corner treatments. This scripting approach unlocks the ability to round any corner on any path, offering a level of flexibility that surpasses manual methods.
Creating Triangles and custom shapes in InDesign
Advanced Corner Treatments and Considerations
The ability to manipulate corners extends beyond simple rounding. InDesign's "Corner Options" and scripting capabilities allow for a range of decorative effects. You can create chamfered edges, inverse rounded corners, or even more elaborate ornamental designs. These effects can be applied with or without a stroke, offering versatility in visual styling.
When applying stroke effects to rounded corners, particularly with the "fancy" corner options, the stroke can introduce additional visual elements. For instance, a 1-point stroke can accentuate the curvature or add a subtle outline to the rounded corner.
It's also important to consider how corner effects interact with other design elements, such as text wrap or frame insets. Modifying the corner radius or stroke can influence how text wraps around a frame, potentially creating a more refined or stylized visual flow. Adjusting the corner options can also affect the perceived size and shape of the object, which might require adjustments to frame insets to maintain proper spacing and layout.
The "Corner Options" dialog box and the scripting panel are powerful tools that can be applied to virtually any path or shape created in InDesign, including those drawn with the Pen Tool or derived from imported vector graphics. The key is to understand that while the direct manipulation methods are shape-dependent, the "Corner Options" dialog and scripting offer universal control.
Workflow Integration and Best Practices
For designers working with consistent branding or repetitive design elements, applying corner effects as a style can be highly beneficial. While directly setting a corner effect as a paragraph or character style isn't a built-in feature, you can create a master page with pre-formatted frames that include the desired corner effects. Alternatively, using Object Styles can provide a more robust solution for applying consistent corner treatments across multiple objects.
When utilizing the "Corner Options" dialog, remember to experiment with the different corner types. "Rounded" is the most common, but "Inverse Rounded," "Beveled," and "Fancy" can offer unique aesthetic qualities. The "Fancy" option, in particular, can be customized with strokes to create intricate decorative elements.
For complex shapes or precise adjustments, leveraging InDesign's built-in scripts is a highly recommended practice. Familiarizing yourself with the scripting panel and the available scripts can significantly enhance your workflow and open up new design possibilities.
It is worth noting that while InDesign's corner rounding is powerful, Adobe Illustrator offers a different and arguably more sophisticated corner rounding process. Understanding the nuances of each application can help designers choose the most efficient tool for specific tasks.
Ultimately, mastering rounded corners in InDesign involves a combination of understanding the direct manipulation tools, the "Corner Options" dialog, and the advanced capabilities offered by scripting. By exploring these methods, designers can achieve a wide spectrum of rounded corner effects, from subtle softening to elaborate decorative enhancements, thereby elevating the visual appeal and professionalism of their InDesign layouts.