The Liquify filter in Adobe Photoshop stands as one of the application's most potent and versatile tools, offering users the ability to manipulate images in ways that can appear truly magical. It allows for subtle enhancements, dramatic distortions, and creative alterations, transforming ordinary photographs into extraordinary visuals. This tutorial delves into the intricacies of the Liquify filter, providing a step-by-step guide to harnessing its power for both practical retouching and imaginative artistic expression.
Understanding the Power of Smart Objects and Smart Filters
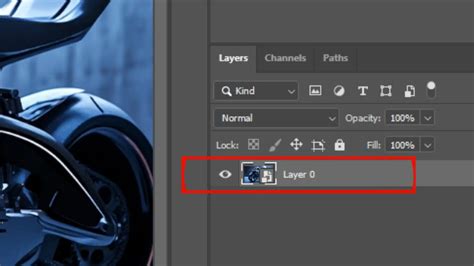
Before diving into the mechanics of the Liquify filter, it's crucial to grasp the concept of non-destructive editing. When you apply a filter directly to a regular pixel-based layer, the changes are permanent and destructive. This means you cannot go back and alter those modifications later without starting from scratch. To circumvent this limitation and ensure you don’t permanently change the original pixel information of a photo, the best practice is to convert your layer into a Smart Object. This is achieved by navigating to Filter > Convert for Smart Filters. By working with Smart Objects, you enable the use of Smart Filters, which allows you to re-edit your Liquify changes at any time, making the entire process non-destructive. This is particularly important when dealing with complex edits or when you might need to revisit and refine your work later.
Navigating the Liquify Workspace
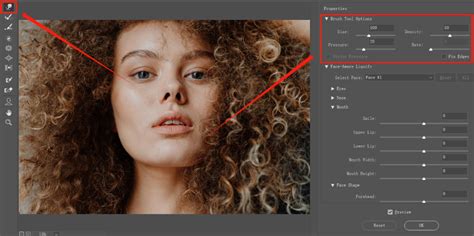
Once your layer is a Smart Object, you can access the Liquify filter by going to Filter > Liquify. This action opens a dedicated workspace, which functions much like an independent utility within Photoshop. This workspace is divided into two primary areas: the tool panel on the left, which houses the various editing tools, and the options panel on the right, which provides adjustable settings for the selected tool. The Liquify filter interface is designed to be intuitive, offering a range of tools that allow you to push, pull, twirl, shrink, magnify, and reconstruct pixels.
The Liquify filter works by applying a special mesh over your photo. As you modify the image using the tools, this mesh is also modified, providing a visual representation of your edits. The interface also offers helpful features like Show Mask, which displays any painted mask, and Show Backdrop, allowing you to see the unedited version of your photo for comparison.
Core Tools within the Liquify Filter
The Liquify filter is equipped with a variety of tools, each designed for specific manipulation tasks. Understanding these tools is key to effectively utilizing the filter.
Forward Warp Tool (W): This is the go-to tool within the Liquify Filter and the default tool when the workspace opens. It's a brush that allows you to 'push' and 'pull' the pixels that you paint over. This tool is incredibly versatile and can be used for a wide range of adjustments, from smoothing wrinkles to reshaping objects. The direction you move the brush determines the direction in which the pixels are pushed.
Reconstruct Brush and Reconstruct Dialog: The Reconstruct Brush and its associated dialog might be considered some of the best parts of the Liquify Filter. Think of Reconstruct as a flexible undo option. Did you liquify too much, but don’t want to undo everything and start from scratch? The Reconstruct tool allows you to gradually decrease the degree of changes, restoring pixels to their original state. This is invaluable for correcting mistakes or for fine-tuning edits. You can access this by selecting the Reconstruct Tool (R) or by using the Reconstruct button in the dialog.
Freeze Mask Tool (F): This tool allows you to paint over areas of the image that you want to protect from being affected by other Liquify tools. It essentially creates a mask, preserving specific parts of your image while you work on others.
Twirl Clockwise Tool (C) / Twirl Counterclockwise Tool (C): As the name suggests, this tool "twirls" a part of the image, creating a swirling effect.
Pucker Tool (S): This tool shrinks the selected area, useful for making features appear smaller or more refined.
Bloat Tool (B): This tool magnifies the selected area, effectively making it larger.
Push Left Tool: This tool works like a snowplow, pushing the content of the selection to the left edge of the brush. Imagine that the direction you're moving in is the front of the snowplow-then it will be easy for you to find the left side.
Face-Aware Liquify: If your photo contains a human face, Photoshop should be able to recognize its features and let you modify them individually. This powerful option is perfect for portraits, allowing you to adjust eyes, mouths, noses, and faces with simple sliders.
Essential Techniques for Effective Liquifying
Achieving natural and convincing results with the Liquify filter requires a combination of understanding the tools and employing smart techniques.
Brush Size and Control
A fundamental aspect of using the Liquify filter effectively is managing your brush size. To avoid unwanted effects, it's recommended to always work with a brush size that is about the same size as the area you’re working with. In general, it’s best to aim for larger brushes for broader adjustments and smaller brushes for finer details. The keyboard shortcuts [ (decrease brush size) and ] (increase brush size) are invaluable for quickly adjusting the brush on the fly. Short, concentrated brush strokes are much harder to blend into an image than well-controlled, gradual movements.
Remember, painting over the edges of your subject with the Liquify Tool will also warp the background. Therefore, careful attention to detail and brush control is paramount.
Density and Pressure Settings
The Liquify filter's right-hand panel offers crucial settings that control how your brush interacts with the image.
- Density: This defines which part of the brush affects the selected area the strongest. A higher density means a stronger effect within the brush's radius.
- Pressure: This setting controls the brush distortion strength. A lower pressure value will result in subtler, less impactful changes, allowing for more gradual manipulation.
These settings are analogous to the hardness and opacity of other Photoshop brushes. Experimenting with these values is key to achieving nuanced results. For instance, when using the Forward Warp Tool, setting pressure to 100% will move a lot of pixels at once, while a lower pressure allows for finer control. Density, on the other hand, changes the brush edge strength, similar to a brush's hardness.
Undo and Reconstruct Options
Mistakes are inevitable, especially when exploring a powerful tool like Liquify. Fortunately, Photoshop provides robust undo options.
- Undo (Ctrl+Z / Cmd+Z): This standard Photoshop function allows you to step back through your recent actions, undoing individual brush strokes or modifications.
- Redo (Ctrl+Shift+Z / Cmd+Shift+Z): If you undo too many steps, you can use the redo function to bring those changes back.
- Reconstruct Tool (R): As mentioned earlier, this tool is your safety net. You can use it to paint over areas that have been over-modified, restoring them to their original state. Alternatively, you can hold down the
Alt(orOptionon Mac) key while using the Forward Warp tool to achieve a similar reconstructive effect. - Reconstruct Dialog: This dialog box allows you to incrementally undo changes by adjusting a slider, offering precise control over the degree of restoration.
Masking for Precision
When applying modifications, it's easy to affect parts of the image that you'd rather keep as they are. This is where masking comes in. The Freeze Mask Tool allows you to paint over areas you want to protect, ensuring they remain untouched by subsequent Liquify operations. You can also invert and hide masks to refine your workflow.
Practical Applications: From Subtle Retouching to Creative Effects
The Liquify filter is incredibly versatile, finding application in a wide array of editing scenarios.
Enhancing Portraits and Facial Features
One of the most common uses of the Liquify filter is in portrait retouching. While it’s crucial to use these tools responsibly and ethically, especially when it comes to altering body shapes or facial features, subtle modifications can significantly enhance a subject's appearance.
- Adding a Smile: Photoshop's Liquify filter can make anyone smile. By selecting the
Face-Aware Liquifyoption, you can easily adjust the corners of the mouth upward. You can then refine the shape of the lips, ensuring symmetry and a natural curvature. The Smooth Tool can be used to blend these changes seamlessly. - Enhancing Eyes: Eyes are often considered the windows to the soul, and subtle enhancements can make a big difference. You can gently lift the upper eyelids with the Forward Warp Tool, or use the Bloat Tool at a small size to slightly enlarge the irises, adding a sparkle and making the subject appear more alert. The Dodge Tool can be used with a low exposure to lighten irises, and the Sharpen Tool can enhance details.
- Subtle Body Contouring: In some cases, subtle modifications might be necessary to create a more complementary silhouette or correct minor imbalances in clothing. The key here is subtlety and distinction, ensuring that the changes remain natural and do not over-smooth the image.
Image Reshaping and Special Effects
Beyond portrait retouching, the Liquify filter is a powerful tool for creative image manipulation and special effects.
- Reshaping Objects: You can use the Forward Warp Tool to subtly alter the shape of objects, such as making a garment fit better or adjusting the proportions of an item.
- Creating Distortions: For artistic purposes, the Twirl, Pucker, and Bloat tools can be used to create unique and surreal visual effects.
- Example: Transforming a Lioness: A demonstration of the Liquify filter's capabilities involves transforming an image of a lioness. By using the Freeze Mask Tool to protect the muzzle, then the Pucker Tool to make it smaller, followed by the Forward Warp Tool to adjust the head shape, ears, and eyebrows, one can achieve a significantly altered result. The Patch Tool can then be used to hide any suspicious "seams" created by the edits.
Best Practices and Final Touches
To ensure your Liquify edits look professional and natural, consider these best practices:
- Work Slowly and Carefully: Avoid making drastic changes in a single pass. Employ small brush strokes and gradual adjustments.
- Use Smart Objects: Always convert your layer to a Smart Object before applying Liquify to maintain non-destructive editing capabilities.
- Refine Edges: After making initial adjustments, edges can sometimes appear rough. Use tools like the Smooth Tool to blend changes seamlessly.
- Balance the Face: Ensure that any facial adjustments result in a symmetrical and natural-looking appearance.
- Zoom Out Frequently: Regularly zoom out to assess the overall impact of your edits on the entire image.
- Practice Regularly: Like any powerful tool, mastering Liquify requires practice. Experiment with different tools, settings, and images to hone your skills.
Saving and Sharing Your Work
Once you are satisfied with your edits, click OK in the Liquify dialog to apply the changes. It's essential to save your work correctly. Always save a copy in PSD format, which preserves all layers and allows for future editing. If you intend to use the image in other applications like InDesign, the PSD file can be imported directly. Sharing your enhanced photos can brighten someone's day, and the Liquify filter provides a fun and effortless way to add a touch of creativity and polish to your images.
The Liquify filter is a testament to Photoshop's evolving capabilities, offering a powerful yet accessible way to refine and reimagine photographs. By understanding its tools, employing smart techniques, and practicing consistently, users can unlock a world of creative possibilities and achieve professional-level results.