Clip Studio Paint offers powerful tools for artists seeking to add dynamic distortion and expansive views to their work. Among these, the fisheye perspective ruler and the dedicated fisheye lens filter provide unique ways to manipulate visual space, mimicking the effect of looking through a wide-angle lens. This tutorial delves into the functionalities of these tools, exploring their applications for creating immersive and impactful illustrations.
Understanding Fisheye Perspective and Its Visual Impact
The concept of fisheye perspective is rooted in how we perceive the world, but it extends this perception to create exaggerated visual effects. Unlike our typical binocular field of view, which is around 114 degrees horizontally and 150 degrees vertically, a fisheye lens captures a much wider, often hemispherical, panorama. Imagine standing on the side of a road; a fisheye view would allow you to see both the house in front of you and potentially the road stretching out behind you, all within a single frame. This distortion is what gives fisheye images their characteristic curved lines and a sense of immense depth or even a fish-like visual field.
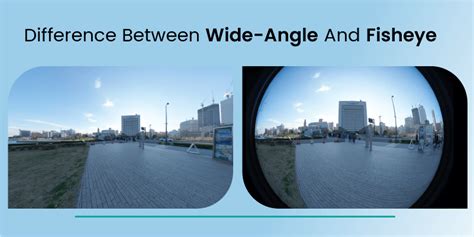
The fisheye effect can be achieved through different perspective systems, notably 5-point and 6-point perspective. Traditional perspectives, like 2-point and 3-point, are commonly used for more conventional scenes. However, 5-point perspective, with its 180-degree visual field, offers a significant expansion of the canvas, creating a symmetrical feel akin to looking through a peephole. 6-point perspective, an extension of 5-point perspective with an additional focal point, allows for a full 360-degree view, flattening this spherical visual field onto a 2D surface. This creates a truly immersive experience, where one can perceive both the front and back of a scene simultaneously, a sensation more natural to creatures with eyes positioned laterally, like birds or fish.
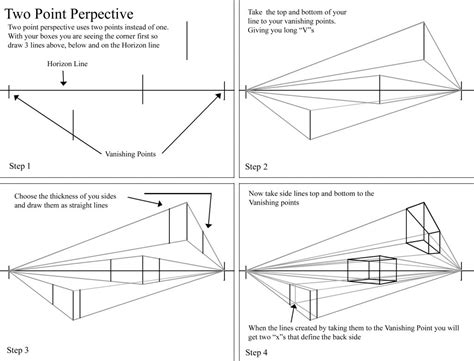
While 6-point perspective can be initially challenging to grasp, its ability to introduce greater depth and a sense of movement makes it invaluable for dynamic compositions. The horizon and focal points become critical elements in guiding the viewer's eye. For instance, using 6-point perspective can transform a static scene into one with a palpable sense of motion, as if wind is present, especially when depicting elements like running cars or expansive skies.
Implementing Fisheye Perspective with the Ruler Tool
Clip Studio Paint's dedicated Fisheye Perspective Ruler tool simplifies the creation of these expansive views. Introduced in version 2.0, this tool allows artists to directly manipulate perspective lines to achieve the desired distortion.
To begin, select the perspective ruler on your canvas using the [Object] tool. This action will reveal the [Tool Property] palette, where you can find the [Fisheye perspective] option. Activating this setting transforms the ruler into a fisheye perspective guide.
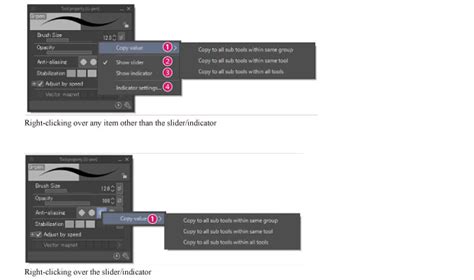
The size of the entire fisheye perspective ruler can be adjusted using the [Field of view] setting. This parameter directly influences the degree of curvature and the breadth of the visual space depicted. Smaller field of view values will result in more pronounced distortion, while larger values will produce a less extreme fisheye effect.
Once the ruler is in place, you can meticulously adjust the guide lines and vanishing points. This fine-tuning is crucial for aligning the perspective with your artistic vision. By strategically placing these points, you can guide the viewer's eye and emphasize specific elements within your composition.
A useful feature for maintaining consistency is the ability to fix the eye level. Within the [Perspective ruler] sub tool's [Tool Property], you can toggle [Fix eye level] on. This ensures that the horizon line remains stable, even as you manipulate other perspective elements, which is particularly helpful when drawing complex scenes or characters within a distorted environment.
The initial setup of the fisheye ruler might require some practice. It's common to find that the initial size of the circular guide might be slightly off - either too large or too small. However, persistence and experimentation with the [Field of view] and manual adjustments will lead to mastery. If you find the grid lines distracting, Clip Studio Paint offers the flexibility to hide them, allowing you to focus on the underlying perspective structure without visual clutter.
The primary benefit of using the fisheye perspective ruler is its ability to create visually arresting distortions. For example, by curving vertical elements like columns, you can effectively draw more attention to a central character or focal point. This technique is highly effective in creating a sense of scale and drawing the viewer's gaze towards the intended subject. In such compositions, background elements, like buildings, can be rendered with intricate detail using brushes, further enhancing the depth and realism of the distorted scene.
Leveraging the Fisheye Lens Filter for Post-Processing Effects
Beyond the ruler tool, Clip Studio Paint also provides a direct [Fish-eye lens] filter, accessible through the [Filter] menu under [Distort]. This filter offers a more immediate way to apply fisheye distortion to existing artwork or specific selections.
To use the filter, select the layer containing the image you wish to distort. Navigate to [Filter] > [Distort] > [Fish-eye lens]. This action will open a dialog box where you can control the distortion parameters. A red cross (X) will appear on the canvas, indicating the center of the distortion effect while the dialog box is open.
Within the dialog box, you can adjust the [Distortion size] of the lens. This controls the overall intensity of the fisheye effect. You can also specify the [Range] and the [Vertical/Horizontal ratio] of the transformation. These settings allow for precise control over how the distortion is applied, enabling you to fine-tune the curvature and aspect ratio to match your desired aesthetic.
A significant advantage of the filter is its ability to be applied selectively. If you create a selection area before applying the filter, the distortion effect will only impact the pixels within that selected region. This is incredibly useful for applying the fisheye effect to specific elements of an artwork without altering the entire canvas.
Practical Applications and Artistic Considerations
The fisheye perspective, whether achieved through the ruler or the filter, is a powerful tool for conveying specific emotions and enhancing visual storytelling. It can be used to:
- Emphasize Focal Points: By curving lines that lead away from the center, you can draw the viewer's attention to the subject placed there. This is particularly effective for highlighting characters, important objects, or dramatic expressions.
- Create a Sense of Immersion: The wide field of view can make the viewer feel as if they are present within the scene, experiencing the environment directly.
- Convey Dynamic Action: The inherent distortion can add a sense of movement and energy to a drawing, making static scenes feel more alive.
- Illustrate Expansive Environments: For landscapes, cityscapes, or even abstract spaces, fisheye perspective can capture a vast amount of visual information, creating a sense of grandeur or overwhelming scale.
When drawing with 5-point or fisheye perspective, it's often recommended to start with basic shapes like cubes, cylinders, and rectangles. This helps in understanding how objects will conform to the curvilinear lines of the perspective before adding finer details. As you become more comfortable, you can then detail these shapes and integrate them into the environment.
The use of atmospheric perspective, where foreground elements are darker and background elements are lighter and less detailed, can further enhance the sense of depth created by fisheye effects. This technique, when combined with the exaggerated perspective, can lead to incredibly compelling and realistic-looking scenes, despite the inherent distortion.
It's important to remember that perspective, in general, is a tool to evoke feelings and enhance the narrative of an artwork. The fisheye lens, with its unique distortions, brings its own set of emotional qualities to a drawing. Whether it's a feeling of unease, wonder, or dynamic energy, the fisheye effect can be a potent artistic choice.
The choice between the fisheye perspective ruler and the fisheye lens filter often depends on the workflow and the desired outcome. The ruler tool offers more control during the initial drawing process, allowing for the construction of entire scenes with the fisheye effect built-in. The filter, on the other hand, is excellent for applying the effect as a post-processing step, making it ideal for adjustments or for adding the distortion to pre-existing artwork.
The fisheye perspective in Clip Studio Paint, whether through the dedicated ruler or the distort filter, provides artists with a versatile set of tools to break away from conventional perspectives. By understanding the principles behind wide-angle distortion and mastering the application of these features, artists can unlock new possibilities for creating visually striking and deeply engaging illustrations.