Navigating the complexities of image editing in Adobe Photoshop often leads to a quest for efficiency, especially when dealing with intricate selections and masks. While pixel-based masks are commonplace, they can be a source of frustration, leading to less-than-perfect results due to their inherent pixelation. For those seeking a higher degree of precision and scalability, the Vector Mask feature in Photoshop offers a powerful, yet often underutilized, alternative. This tutorial delves into the practical application of Vector Masks, focusing on how to automate their creation using Artificial Intelligence, specifically Adobe Sensei, and Photoshop Actions, thereby streamlining a process that can otherwise be quite time-consuming.
Understanding Vector Masks vs. Layer Masks
Before diving into the automation process, it's crucial to grasp the fundamental differences between Vector Masks and Layer Masks. Layer Masks, as many Photoshop users are familiar with, are pixel-based. This means they operate on a grid of pixels, and when you scale an image with a pixel-based mask, the mask scales with it, potentially leading to a loss of quality and jagged edges.
In contrast, Vector Masks are built upon mathematical lines and curves, known as paths. This vector-based nature is their defining characteristic and primary advantage. Because they are defined by mathematical equations rather than pixels, Vector Masks are resolution-independent. This means you can scale them up or down indefinitely without any degradation in quality, ensuring consistently clean and smooth edges. When a Vector Mask is applied to a layer, the area within the defined path is revealed, while everything outside the path is hidden. This offers unparalleled precision for creating sharp, well-defined cutouts.
The Manual Creation of Vector Masks
Traditionally, creating Vector Masks in Photoshop involves a more manual approach, primarily utilizing the Pen Tool. The Pen Tool is the cornerstone for creating vector paths, and Photoshop offers several variations to suit different needs, including the Freeform Pen Tool for drawing organic shapes and the Magnetic Pen Tool for tracing edges.
Method 1: Using the Menu Bar
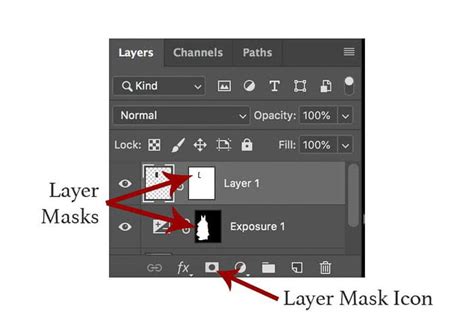
One method to create a Vector Mask involves navigating through the menu bar. After opening your project and selecting the object you wish to isolate, you would typically use the Pen Tool to draw a path around it. Once the path is complete, you can convert this path into a Vector Mask. The result is that your object appears to be cut out from the background, and a gray mask thumbnail, representing the Vector Mask, will appear next to the current layer in the Layers panel.
Method 2: Directly Through the Layers Panel
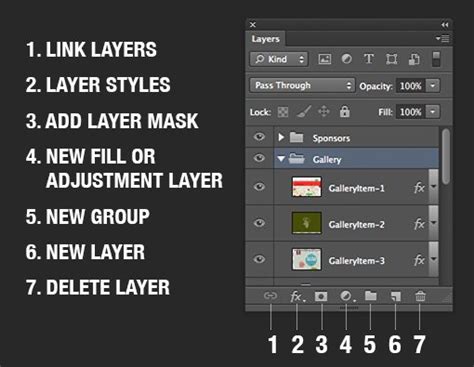
An alternative and often quicker method for creating a Vector Mask is directly through the Layers panel. After ensuring your desired layer is selected, you can locate the "Add mask" option at the bottom of the Layers panel. By holding down the Ctrl key (or the Command key on a Mac) and clicking on this add mask icon, you can directly create a Vector Mask on your selected layer. This bypasses the need to first create a path and then convert it, offering a more streamlined manual workflow.
The Power of Vector Graphics
The superiority of Vector Masks stems directly from the principles of vector graphics. Unlike raster graphics (which are pixel-based), vector graphics are composed of mathematical points, lines, and curves. This fundamental difference means that vector graphics do not have inherent pixels, allowing them to be scaled to any size without losing any quality. This is particularly beneficial for tasks such as logo design, illustration, and, in this context, creating precise image cutouts that can be repurposed across various media and resolutions.
The most notable feature of Vector Masks is their inherent precision. When you use the Pen Tool to define a Vector Mask, you are creating sharp, clean lines. Any modifications you make to the shape of the vector path will not affect the underlying image quality. This is a significant advantage over pixel-based masks, where edits can often introduce artifacts or blurriness.
Automating Vector Mask Creation with AI and Actions
While manual creation offers precision, it can be incredibly time-consuming, especially for complex subjects with intricate details. This is where the power of Artificial Intelligence (AI), specifically Adobe Sensei, and Photoshop Actions comes into play, enabling automated vector mask creation.
Leveraging Artificial Intelligence (Adobe Sensei)
Adobe Sensei is Adobe's AI and machine learning platform that powers many of Photoshop's intelligent features. In the context of masking, Sensei can analyze an image and intelligently identify subjects and backgrounds, making selections with remarkable accuracy. This automated selection process forms the foundation for creating Vector Masks efficiently.
Photoshop Actions for Workflow Automation
Photoshop Actions are a powerful tool for automating repetitive tasks. An Action records a series of steps performed in Photoshop and can be replayed later to execute those same steps on different images or at different times. By combining AI-powered selections with Photoshop Actions, the creation of Vector Masks can be reduced from a lengthy manual process to a single click.
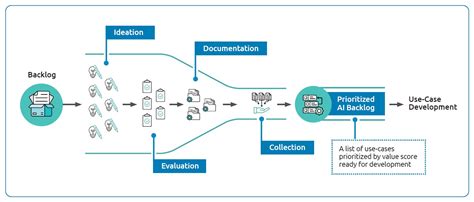
The workflow typically involves:
- Making an AI-powered selection: Using features like "Select Subject" or "Object Selection Tool," which leverage Adobe Sensei to automatically identify and select the primary subject in an image.
- Converting the selection to a Vector Mask: Once a precise selection is made, this selection can be directly converted into a Vector Mask.
- Recording the process as an Action: All these steps are recorded within a Photoshop Action.
By creating and saving this Action, you can then apply it to any new image. Photoshop will automatically make the AI-powered selection and then convert it into a Vector Mask, saving significant time and effort.
The "Selections and Masking Mastery Course"
For those who wish to delve deeper into the nuances of selections and masking in Photoshop, resources like the "Selections and Masking Mastery Course" are invaluable. Such comprehensive courses typically offer extensive, step-by-step lessons, structured modules, downloadable practice files, and custom tools, all designed to equip users with advanced masking techniques. Jesús Ramirez, a renowned digital graphics expert and founder of the Photoshop Training Channel, is known for creating such in-depth educational content that helps users master Photoshop's capabilities.
Modifying and Converting Masks
Once a Vector Mask is in place, you have the flexibility to refine it. If you need to adjust the mask's shape, you can once again utilize the Pen Tool. By selecting the Vector Mask in the Layers panel, you can then use the Pen Tool (or press the 'A' key to quickly access it) to modify the existing path or draw new segments. As emphasized, because Vector Masks are based on vectors, these modifications do not compromise the image's quality.
Editing Vector Mask Properties
To further refine the Vector Mask, you can double-click on the Vector Mask thumbnail in the Layers panel. This action opens the Properties panel, where you can adjust various attributes of the mask, such as its density and feathering, albeit in a vector-aware manner.
Switching Between Mask Types
Photoshop also offers the flexibility to convert between different mask types. If you find yourself needing the pixel-editing capabilities of a Layer Mask after creating a Vector Mask, you can convert it.
To convert a Vector Mask to a Layer Mask:
- Select the Vector Mask in the Layers panel.
- Right-click on the Vector Mask thumbnail.
- Choose "Rasterize Layer Mask." This will convert the vector path into a pixel-based mask, allowing you to use brushes with black, white, and gray to edit it.
Conversely, if you have a Layer Mask and wish to convert it into a Vector Mask to leverage its scalability and precision:
To convert a Layer Mask to a Vector Mask:
- Hold down the Ctrl key (or the Command key on a Mac) and click on the Layer Mask thumbnail in the Layers panel. This creates a selection based on the Layer Mask.
- Navigate to the "Paths" panel.
- At the bottom of the Paths panel, click on the "Make work path from selection" icon. This will create a work path from your selection.
- With the work path active, you can then convert it into a Vector Mask by going to the Layers panel, ensuring your layer is selected, and then clicking the "Add mask" icon (or using the Ctrl/Cmd + click method on the add mask icon while the path is active). Alternatively, you can go to Layer > Vector Mask > Current Path.
Photoshop - Combining Masks and Vector Masks on the same Layer
Tips for Effective Vector Mask Usage
To maximize the benefits of using Vector Masks in Photoshop, consider these practical tips:
- Precision is Key: Always remember that vector graphics are about sharp, clean lines. Use the Pen Tool with deliberate anchor points and smooth curves to achieve the best results. Avoid excessive anchor points, which can make paths harder to manage and edit.
- Use Shorter Paths: For complex shapes, it's often more manageable to break down your Vector Mask into shorter, simpler paths rather than one long, intricate path. This makes editing and refining easier.
- Combine Vector and Layer Masks: Don't feel limited to using only one type of mask. In many complex workflows, a combination of Vector Masks for sharp, scalable elements (like product edges) and Layer Masks for softer, more organic blending (like atmospheric effects) can yield superior results. You can achieve this by converting a Vector Mask to a Layer Mask when needed, or by creating separate masks of each type on different layers.
Enhancing Your Photoshop Workflow with TourBox
For digital artists and designers who spend a significant amount of time in Photoshop, workflow efficiency is paramount. Tools like the TourBox console are designed to streamline these repetitive tasks. This specialized console allows for quick adjustments of brush sizes, seamless switching between tools, and effortless zooming, among other functions. By dedicating specific buttons and dials to common Photoshop commands, TourBox can significantly speed up the editing process, making it a valuable addition for anyone looking to optimize their Photoshop experience.
By understanding and implementing the techniques for creating and automating Vector Masks, coupled with efficient hardware solutions, users can achieve professional-level results with greater speed and precision.