The creation of digital art often hinges on the precision and expressiveness of the tools employed. For artists working within the ibisPaint X application, mastering the art of custom brush creation can unlock a new level of artistic freedom, particularly when aiming to depict textures like fur. This tutorial delves into the intricate process of designing and implementing your own fur brush, transforming the way you render soft, detailed surfaces in your digital artwork.
Understanding the Building Blocks of Brush Creation
At its core, creating a custom brush in ibisPaint involves manipulating several key settings that dictate how the brush behaves on the canvas. These fundamental components work in concert to define the visual output of your digital strokes.
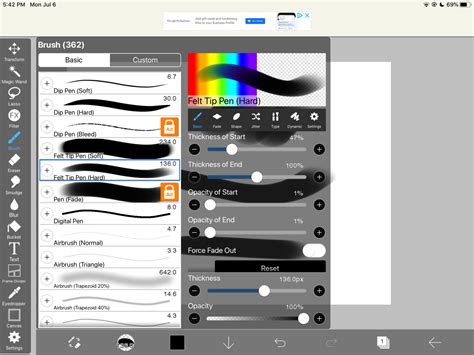
The Brush Pattern is the foundational element, defining the shape of the brush tip. This pattern is repeated along the path of your stroke, forming the visual texture. Think of it as the stamp that gets pressed down repeatedly. The settings for this are found in the [Shape] tab, under [Brush Pattern].
Complementing the brush tip's shape is the Texture. This setting, located in the [Type] tab under [Texture Pattern], adds a paper-like grain or surface quality to your brush strokes. This is crucial for mimicking the feel of real-world media and can significantly enhance the believability of your fur.
The Blurring Shape, managed within the [Fade] tab, controls how the brush stroke tapers off. This setting determines the "fade" or "blur" effect at the edges of your stroke, influencing how soft or sharp the transition is.
Selecting the Right Brush Type and Template
ibisPaint offers distinct types of brush patterns to cater to different creative needs. The choice of type significantly impacts how your custom brush will function.
The [Brush Pattern (Mono)] option is designed for creating monochrome brush patterns. The resulting image can be used with brushes that produce single-color strokes. This is a straightforward method for creating patterns that will be tinted by the currently selected color.
Conversely, [Brush Pattern (Color)] allows for the creation of patterns that incorporate multiple colors. When you choose this type, the initial settings of the brush are influenced by the selected template. ibisPaint provides various templates, and selecting one that closely matches your desired brush outcome is recommended. For instance, if you aim to create a brush that functions like a stamp, setting the type to [Brush Pattern (Color)] and the template to [Star] is a good starting point. This template, when used with the color pattern option, can produce interesting stamp-like effects.
The Power of Pattern Editing: Bringing Your Vision to Life
The [Edit Pattern] function is where the magic truly happens. Selecting this option allows you to draw directly on the canvas, and whatever you create becomes your brush pattern. This direct manipulation provides immense creative control.
When you are in the process of creating a [Brush Pattern (Mono)] or [Brush Pattern (Color)], it’s possible that the pattern shape might not be immediately visible in the test drawing, appearing instead as a simple line. This usually indicates an issue with the Thickness or Spacing settings. If you encounter this, the first step should be to try increasing the Thickness. The maximum brush thickness can be adjusted within the [Settings] menu. Fine-tuning these parameters is essential for ensuring your custom pattern is rendered correctly.
Once you are satisfied with your created brush pattern, you can upload it to your gallery. By selecting [Back to My Gallery], the brush pattern image is automatically uploaded to the server, making your new brush ready for use. Upon confirmation (selecting OK), the brush you used for test drawing will be added to the [Custom] tab within the Brush Window. It's worth noting that there's a limit to the number of original brush patterns you can import from other users, so creating your own is a valuable skill.
Simplifying Brush Creation: Leveraging Existing Brushes
Creating a brush pattern entirely from scratch can sometimes be a daunting task. A more accessible approach for many artists is to start by customizing an existing brush that they already favor. By tweaking the settings of a familiar brush, you can adapt it to your specific needs and then register it as a custom brush. This iterative process of modification and registration allows for gradual refinement and can lead to highly personalized and effective tools.
Harnessing the Potential of Color Brush Patterns
When developing brush patterns, the Brush Pattern (Color) option offers the ability to create patterns with multiple colors. The key to how these colors behave lies in the interplay between the [Color of Brush Pattern Image] and the [Color Currently Selected] when you use the brush. Essentially, the original colors within your pattern image are transformed based on the color you choose in real-time.
Furthermore, you can define a [Base Color] for your color brush pattern. This base color is set within the Pattern Editing Mode via a [Base Color Button] and plays a crucial role in determining how the colors within your brush pattern will appear when the brush is applied. The principle is to select a base color that is representative of the dominant hues in your pattern. For example, if your brush pattern is predominantly red, setting the base color to red will yield the most accurate color representation. Similarly, if the pattern is mostly blue, setting the base color to blue is advisable.
Let's illustrate this with an example. Imagine you create a canvas with the [Brush Pattern (Color)] type. You then set the [Base Color] by using the eyedropper tool to pick a representative color from your pattern - say, the yellow of a sunflower. Now, when you test this brush and select yellow as your current color, you will see a yellow sunflower rendered. This effectively creates a customizable sunflower brush.
The interaction between the base color and the selected color is governed by hue shifts. Consider changing the brush color from red (our initial base color example) to green. This represents a hue shift. If you further change the brush color from red to blue, the difference in hue between red and blue is also a specific degree of shift. It's important to remember that these color transformations occur within the constraints of the original brush pattern image's vibrancy. The image drawn on the canvas will never appear more vivid than the original brush pattern image itself. Therefore, maintaining a good balance of brightness and saturation in your original pattern is key.

Advanced Techniques for Fur Texture
To effectively create fur brushes, consider the following advanced techniques and considerations:
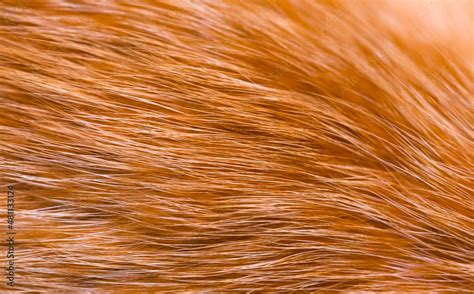
- Brush Pattern Shape: For fur, you'll want a pattern that isn't a single solid shape. Think about creating small, irregular tufts or strands that can be repeated. You can achieve this by drawing fine lines, dots, or slightly irregular blobs in the pattern editor. The spacing between these elements in the pattern is critical. Too close, and you'll get a solid mass; too far, and you'll have gaps.
- Texture Overlay: The
[Texture Pattern]is your best friend for adding depth to fur. Experiment with subtle textures that mimic the grain of paper or canvas. A fine noise texture can add a subtle realism that a flat color brush lacks. - Blurring Shape for Softness: Fur is rarely sharply defined. Use the
[Blurring Shape]to create soft edges. A gradual fade is often ideal for blending fur strands and creating a sense of volume. - Color Dynamics: When using
[Brush Pattern (Color)], think about how the base color and selected color interact. For realistic fur, you might want to create a pattern with subtle variations in tone. Setting a base color that represents the mid-tone of the fur and then using slightly darker or lighter selected colors can create depth. - Stamp Brushes for Undercoat: For creating a dense undercoat, consider using a stamp-like brush. The
[Star]template with[Brush Pattern (Color)]can be a good starting point. By adjusting the density and color of the stamp, you can build up a soft foundation upon which to layer individual fur strands.
Iterative Refinement for Realistic Fur
The process of creating the perfect fur brush is often iterative. Don't be discouraged if your first attempts aren't exactly what you envisioned.
- Start with a Simple Pattern: Begin with a basic shape that suggests a strand of fur or a small clump.
- Adjust Spacing and Thickness: Experiment with the
[Spacing]and[Thickness]settings in the[Shape]tab. For fur, you'll likely want a moderate spacing to avoid a solid line and a thickness that is not too overwhelming. - Incorporate Texture: Apply a subtle
[Texture Pattern]to add realism. - Refine Blurring: Use the
[Blurring Shape]to soften the edges and create a natural flow. - Test and Modify: Draw with your brush on a test canvas. Observe how it behaves. Does it look too solid? Too sparse? Too sharp? Go back into the
[Edit Pattern]mode and make adjustments. Perhaps you need to add more detail to the pattern, change the spacing, or modify the blur. - Consider Color Variations: If you're using a color brush, play with the
[Base Color]and how different selected colors interact with your pattern. You might need to create multiple variations of the brush for different fur colors and shades.
Beyond the Basics: Thinking About the Implications
The ability to create custom brushes like those for fur extends beyond mere aesthetic enhancement. It impacts workflow efficiency, artistic control, and the overall narrative potential of a piece.
- Efficiency: A well-crafted fur brush can drastically reduce the time spent rendering fur. Instead of painstakingly drawing each strand, you can lay down realistic texture with a few strokes. This frees up mental energy for focusing on form, lighting, and composition.
- Artistic Control: Custom brushes give you unparalleled control over the final look. You're not limited by pre-set options; you can design a brush that perfectly matches your stylistic vision. This is particularly important for unique species or stylized fur.
- Narrative Potential: The texture of fur can communicate a lot about a character or creature. Is it sleek and well-groomed, or wild and matted? A custom brush allows you to imbue your artwork with these subtle narrative cues. For instance, a brush with a very tight, uniform pattern might suggest a short, dense coat, while a brush with more irregular, wispy elements could depict longer, shaggier fur.
Exploring Further: Video Tutorials for Visual Learners
For those who learn best by seeing the process in action, dedicated video tutorials can be incredibly beneficial. Watching an experienced artist navigate the ibisPaint interface, demonstrate pattern creation, and apply custom brushes can provide insights that are difficult to convey solely through text.
How to make CUSTOM BRUSHES in ibisPaint X! (13.0 Update)
By understanding and applying these principles, artists can move beyond generic brush tools and unlock the full potential of ibisPaint for creating stunningly realistic and expressive digital fur. The journey of creating a custom brush is a testament to the power of digital art tools and the artist's ability to shape them to their will.