In the dynamic world of digital image editing, Adobe Photoshop reigns supreme, offering an extensive suite of tools designed for both precision and creative expression. Among its most indispensable features are adjustment layers, a cornerstone of non-destructive editing that empowers users to refine images without irrevocably altering the original pixel data. This tutorial delves into the fundamental concepts and practical applications of Photoshop adjustment layers, aiming to elevate your image manipulation skills and unlock new creative possibilities.
Understanding the Power of Non-Destructive Editing
At its core, non-destructive editing means that your original image remains untouched. Unlike traditional image adjustments that directly modify pixels, adjustment layers function as overlays. These layers sit above your image layers and apply a wide spectrum of color and tonal alterations-such as brightness, contrast, hue, saturation, and more-without directly impacting the underlying pixels. This approach is invaluable for the editing process, allowing for experimentation, iterative refinement, and the complete removal or modification of changes at any stage.
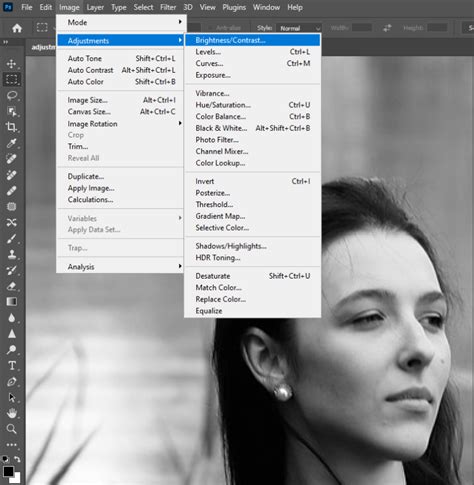
The primary distinction between using the "Image → Adjustments" command and employing adjustment layers lies in the latter's ability to operate on separate layers. The "Image > Adjustments" commands directly alter the pixel data of the selected layer, making them destructive. Adjustment layers, conversely, offer the unparalleled advantage of being modifiable at any time. This flexibility is crucial for workflows where revisions are common or when experimenting with different looks.
Creating Your First Adjustment Layer
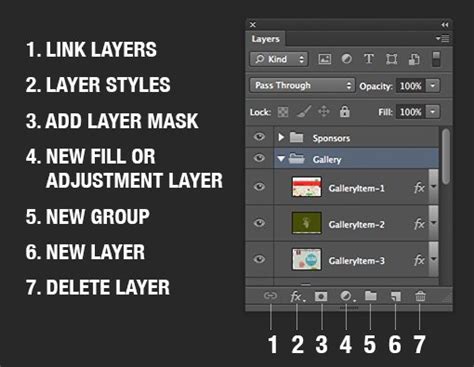
Initiating the use of adjustment layers is a straightforward process. Within Photoshop's interface, locate the Layers panel. At the bottom of this panel, you will find an icon that resembles a half-filled circle. Clicking this icon, labeled "Create new fill or adjustment layer," reveals a menu. With the exception of the first three options, which relate to fill layers, the remaining selections are all dedicated to creating various adjustment layers. Alternatively, adjustment layers can be accessed via the "Layer" menu, then "New Adjustment Layer," or through the dedicated "Adjustments" panel, which can be opened from the "Window" menu if it's not already visible.
When you add an adjustment layer, a new layer appears above your image, and a corresponding "Properties" panel opens, specific to the selected adjustment type. This panel is where you will fine-tune the parameters of your chosen adjustment.
A Spectrum of Adjustment Layers: Enhancing Your Images
Photoshop offers a rich and diverse collection of adjustment layers, each designed to address specific editing needs. Understanding their individual functions is key to leveraging their full potential.
Brightness/Contrast
This fundamental adjustment layer allows for straightforward modifications to the overall tonal range of your image. You can increase or decrease the image's brightness and adjust its contrast levels to achieve the desired mood and impact.
Levels
The Levels adjustment layer provides a more granular control over the tonal values of an image. It enables you to precisely set the black point, white point, and midtones. By manipulating these points, you can deepen shadows, brighten highlights, and correct overall exposure issues, thereby enhancing the image's dynamic range and clarity.
Curves
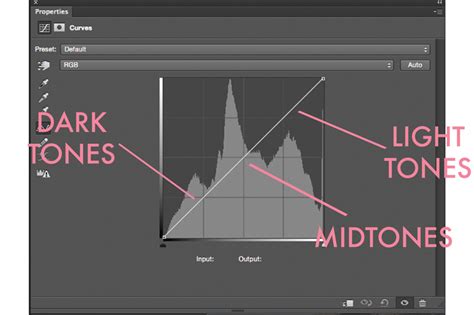
Considered one of the most powerful and precise tools for tonal editing, the Curves adjustment layer offers unparalleled control. It presents a graph where the x-axis represents the original tonal values and the y-axis represents the adjusted values. By creating points along this diagonal line and manipulating them, you can selectively adjust specific tonal ranges. For instance, creating an "S" curve-by lifting a point in the highlights and lowering a point in the shadows-can dramatically increase contrast and add depth to an image.
Exposure
This adjustment layer offers three sliders-Exposure, Offset, and Gamma-to fine-tune the overall brightness and tonal distribution of your image, akin to controlling the exposure settings of a camera.
Vibrance and Saturation
These adjustments are crucial for color enhancement. The Vibrance adjustment subtly boosts the intensity of less saturated colors while leaving already saturated colors largely unaffected, preventing unnatural skin tones. The Saturation slider, on the other hand, increases the intensity of all colors uniformly. While useful, applying high saturation to an entire image can reduce the overall tonal range, so it's often more effective to target specific colors or use Vibrance for a more nuanced enhancement.
Hue/Saturation
This layer allows for extensive manipulation of an image's colors. You can shift the hue (the actual color), adjust the saturation (intensity), and lighten or darken specific color ranges, offering precise control over the color palette.
Color Balance
When dealing with color casts or seeking to impart a specific color mood, the Color Balance adjustment layer is indispensable. It allows you to adjust the mixture of colors in your image, enabling you to correct unwanted color casts or creatively tint your photograph. It is a highly effective tool for non-destructively adjusting color balance.
Black & White
This adjustment layer provides a simple yet effective way to convert color images into monochromatic versions. It offers various presets and fine-tuning options to achieve the desired grayscale aesthetic.
Photo Filter
Mimicking the effect of placing a colored filter in front of a camera lens, the Photo Filter adjustment layer applies a color tint to your image. Options like "Preserve Luminosity" help maintain tonal detail while intensifying the filter's effect through the "Density" slider.
Channel Mixer
The Channel Mixer offers advanced control over color manipulation. It allows you to mix the color information from different color channels (Red, Green, Blue) to create tinted or grayscale images. You can also use it to create more sophisticated color conversions to grayscale.
Color Lookup (LUT)
This adjustment layer utilizes pre-packaged "looks" or lookup tables (LUTs) to remap the colors in your image, offering a quick way to apply specific cinematic or stylistic color grades. Options like 3DLUT File, Abstract, and Device Link provide different methods for loading and applying these looks.
Threshold
The Threshold tool converts an image into a stark black and white representation. It sets all pixels above a certain brightness level to white and all pixels below that level to black, effectively creating a high-contrast, graphic effect. This can be particularly useful when applied to a selected area, such as a specific object within an image.
Gradient Map
This adjustment layer maps the colors of an image to a custom gradient. It replaces the grayscale values of the image with colors from the selected gradient, offering a powerful way to create stylized and artistic effects. You can choose from a variety of built-in gradients or create your own in the gradient editor.
Selective Color
The Selective Color adjustment layer provides a highly targeted approach to color correction. It allows you to adjust the amount of primary colors (Cyan, Magenta, Yellow, Black) within specific color ranges (Reds, Yellows, Greens, Cyans, Blues, Magentas, Whites, Neutrals, Blacks) without affecting other colors in the image. This is incredibly useful for fine-tuning specific hues without altering the overall color balance.
These examples represent just a fraction of the capabilities inherent in Photoshop's adjustment layers. Each tool offers a depth of control that can be explored further to achieve sophisticated editing results.
Advanced Techniques: Clipping Masks and Smart Filters
Clipping Masks for Targeted Adjustments
A common challenge when working with multiple layers is applying an adjustment to only a specific part of your image. This is where clipping masks become invaluable. By applying a clipping mask to an adjustment layer, you confine its effect solely to the layer directly beneath it. This is a fundamental technique in graphic design, often used in conjunction with vector shapes that act as containers for images.
To create a clipping mask, you can either:
- Select the adjustment layer, open the "Properties" panel, and click the "clip" button (often represented by a small arrow pointing down).
- Hold down the
Alt(Windows) orOption(Mac) key and hover your cursor between the adjustment layer and the layer you want to affect. A small downward-pointing arrow will appear; click to create the clipping mask.
This ensures that your adjustments precisely target only the intended layer, preventing unintended alterations to other elements in your composition.
Smart Objects and Smart Filters
For the ultimate in non-destructive editing, converting a layer to a Smart Object before applying adjustments is highly recommended. Right-clicking on a layer and selecting "Convert to Smart Object" transforms it into a special type of layer that preserves its source content.
When you apply adjustments to a Smart Object, they are registered as "Smart Filters." This offers several key advantages:
- Endless Re-editing: You can double-click on a Smart Filter at any time to reopen its adjustment dialog and make further modifications.
- Layer Independence: Smart Filters are inherently linked to the Smart Object, meaning they move with the layer if you reposition it. This avoids the issue of losing adjustments if layers are rearranged without careful management.
- Non-Destructive Nature: Just like adjustment layers, Smart Filters do not permanently alter the pixel data of the original layer.
- Filter Control: You can easily toggle Smart Filters on and off, change their blending modes, and adjust their opacity directly within the Layers panel.
While adjustment layers are powerful on their own, using them in conjunction with Smart Objects and clipping masks provides a robust framework for complex and iterative image editing workflows.
Photoshop Image Adjustments vs Adjustment Layers
Working with Multiple Layers and Adjustments
When dealing with multi-layered documents, managing adjustments effectively is crucial. Colin Smith from PhotoshopCAFE highlights a common scenario: an adjustment layer applied by default affects all layers beneath it. To isolate the adjustment to a specific layer, the clipping mask technique, as described above, is essential.
Another consideration is layer organization. If you move layers around without grouping them or converting them to Smart Objects, you risk losing the intended effect of your adjustment layers. A robust strategy involves either grouping related layers and adjustments together or converting individual elements that require specific adjustments into Smart Objects.
The TourBox Advantage
For those seeking to streamline their Photoshop workflow, hardware controllers like the TourBox offer a significant advantage. With TourBox, users can assign the creation of specific adjustment layers to dedicated buttons, allowing for swift access and application. The precision and efficiency gained from such a tool can surpass the capabilities of traditional keyboard shortcuts alone, enabling faster iteration and a more fluid creative process.
Historical Context and Evolution
The concept of non-destructive editing through adjustment layers has been a cornerstone of Photoshop's success since its early days. The very first version of Photoshop, released in 1990, included fundamental adjustments like Curves, Levels, Hue/Saturation, and Color Balance. The continuous development and expansion of these features have solidified Photoshop's position as the industry standard for image manipulation.
Conclusion
Adjustment layers are an indispensable feature for any Photoshop user, from beginners to seasoned professionals. They embody the principle of non-destructive editing, offering unparalleled flexibility and control over image appearance. By mastering the various types of adjustment layers and understanding techniques like clipping masks and Smart Objects, you can significantly enhance your image editing skills, achieve more sophisticated results, and maintain a clean, organized, and editable workflow. The journey into the world of Photoshop adjustment layers is one of continuous learning and creative exploration, promising to unlock new levels of visual storytelling.
tags: #add #adjustment #layer #in #photoshop