The creation of the American flag, often perceived as a simple arrangement of stars and stripes, is in reality governed by a surprisingly intricate set of specifications. This tutorial aims to demystify the process of designing an accurate and visually appealing American flag within Adobe Photoshop, drawing upon the foundational principles of vexillology and graphic design. While the initial thought might be that it's "just some stars and stripes," a deeper dive reveals a wealth of technical details that contribute to the flag's iconic status.
Understanding the Foundation: Official U.S. Flag Specifications
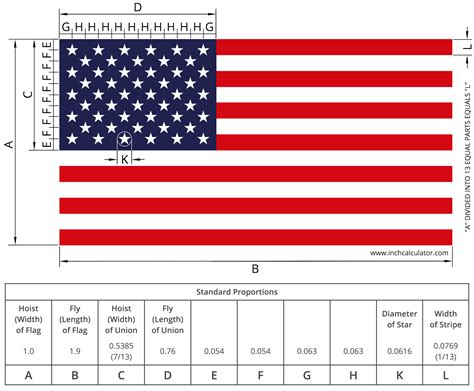
Before diving into Photoshop, it is crucial to grasp the official specifications that define the United States flag. These guidelines ensure uniformity and adherence to historical and legal standards. The actual specifications of the U.S. flag are extensive and meticulously detailed, far beyond a casual understanding. These technical specifications are the bedrock upon which any accurate digital representation must be built. Understanding these rules is paramount for any designer aiming for authenticity.
The proportions of the flag are precisely defined. The hoist (vertical dimension) should be 1 unit, and the fly (horizontal dimension) should be 1.9 units. The canton, the blue rectangle containing the stars, has a hoist of 7/13 of the flag's hoist and a fly of 0.76 units. The width of each stripe is 1/13 of the flag's hoist. The diameter of each star is 4/5 of the width of a stripe. These precise measurements are not arbitrary; they stem from a long history of flag design and legislation.
Setting Up Your Photoshop Canvas and Guides
The first step in creating an accurate American flag in Photoshop involves setting up your document with the correct dimensions and establishing precise guides. Begin by creating a new document with a resolution suitable for your intended use (e.g., 300 DPI for print, 72 DPI for web). A common aspect ratio to work with, based on the official specifications, is a width of 19 units and a height of 10 units if you were to use a scale where the hoist is 10 and the fly is 19. However, for easier calculation of stripes, working with a height divisible by 13 is beneficial. For instance, a canvas height of 1300 pixels with a width of 2470 pixels (1300 * 1.9) provides a good working scale.
Once your canvas is ready, the next logical step is to set the guides based on the above specifications. Use the "View > New Guide" or "View > New Guide Layout" options to establish these critical lines.
- Horizontal Guides: Divide the canvas height by 13 to determine the position of each stripe. For a 1300px height, each stripe will be 100px tall. Place horizontal guides at 100px, 200px, 300px, and so on, up to 1200px.
- Vertical Guides: The fly is 1.9 times the hoist. If your hoist is 1300px, your fly will be 2470px. Place a vertical guide at 2470px from the left edge.
- Canton Guides: The canton's hoist is 7/13 of the flag's hoist. So, for a 1300px hoist, the canton's height is (7/13) * 1300px = 700px. Place a horizontal guide at 700px from the top. The canton's fly is 0.76 units. If your hoist is considered 1 unit (1300px), then the canton's fly is 0.76 * 1300px = 988px. Place a vertical guide at 988px from the left edge.
These guides will act as your precise framework, ensuring that every element of the flag is placed according to regulation.
Constructing the Stars and Stripes
With the guides in place, you can now begin creating the visual elements of the flag. The 13 stripes alternate in color, starting with red at the top and bottom. There are 7 red stripes and 6 white stripes.
Creating the Stripes:The simplest method for creating the stripes is to use the Rectangle Tool.
- Select the Rectangle Tool.
- Ensure the fill color is set to either red or white, and the stroke is set to "None."
- Starting from the top, draw a rectangle that snaps to the guide for the first stripe. Its width should span the entire fly of the flag.
- Duplicate this rectangle and move it down to snap to the next stripe guide.
- Continue this process, alternating colors between red and white, until all 13 stripes are created. Ensure the stripes fill the entire area of the flag, extending to the right edge.
Designing the Blue Canton:The blue canton is a critical element. It occupies the upper hoist portion of the flag. Based on the specifications, it covers the top 7 stripes and extends 0.76 of the flag's fly.
- Select the Rectangle Tool again.
- Set the fill color to the specified shade of blue (Pantone 281 C is often cited, but in RGB this is approximately R:0, G:32, B:91).
- Draw a rectangle that precisely aligns with the guides you set for the canton. It should extend from the top edge down to the 7th stripe guide and from the left edge to the vertical guide marking the canton's fly.
- Once the blue rectangle is in place, you can delete the individual stripe layers that fall beneath the canton.
Placing the Stars:This is often the most challenging part due to the precise arrangement required for the 50 stars. The stars are arranged in 9 rows, alternating between 6 stars and 5 stars. There are 4 rows of 6 stars and 5 rows of 5 stars. The stars are arranged in a specific grid pattern within the blue canton.
A common and effective method for creating the stars is to use a star shape from a font.
- Select the Text Tool.
- Choose a font that has a readily available star character (e.g., Wingdings, Webdings, or even a standard font if you can find a suitable star glyph).
- Initial Placement and Sizing: Initially, I didn’t really draw anything. Highlight, fill. Highlight, fill. Now this was tough. I felt the best method for this was to use a star from a font. I didn’t see how I was going to be able to make everything squeeze together. I started getting a little closer once I increased the font size. But I still wasn’t even close to perfect symmetry.
- Fine-Tuning the Star: At this point I finally thought I had it. I changed the font to 121 points, set the tracking to 52 and leading to 200. These specific values are crucial for achieving the correct spacing and scale of the stars relative to each other and the canton. However, these values are highly dependent on the canvas size and font used. The key is to adjust the font size, tracking (the spacing between characters), and leading (the spacing between lines of text) until the stars fit perfectly within the grid.
- Arranging the Stars: Once you have a single star correctly sized and spaced, you can duplicate it and arrange the copies to form the 9 rows. For the alternating rows, you will need to offset every other row by half a star's width to achieve the staggered pattern. This requires careful manual placement or the use of Photoshop's alignment tools.
Achieving Perfect Symmetry and Detail
The journey to a perfectly symmetrical flag often involves meticulous adjustments. The initial placement of elements might seem adequate, but upon closer inspection, subtle errors and inconsistencies can emerge. This is where the "walk in the park" perception quickly fades, replaced by the reality of precise design.
The challenge of making everything "squeeze together" is a common hurdle. This involves not just the size of the stars but also their precise positioning relative to the edges of the canton and to each other. Photoshop's grid and snapping features, combined with careful use of the transform tools (Scale, Skew, Distort), are invaluable here.
The exact values for font size, tracking, and leading are not universal. They are specific to the canvas dimensions and the chosen font. The process of finding these values is iterative. You adjust, zoom in, check against the guides and specifications, and adjust again. This is where the designer's patience and attention to detail are truly tested.
Beyond the Visual: The Philosophy of Design
This project, while focused on a specific graphic, offers profound insights into the broader field of design. Today I learned so much about the design process. It really allowed me to give designers an all-new respect. I thought this project was honestly going to be a walk in the park. Today I learned that design isn’t about art, it is about the user. It is about standards. There is way more to design than just design. There is so much research.
This sentiment highlights a crucial aspect of professional design: it is not merely about aesthetic choices but about adherence to established standards, user needs, and functional requirements. The American flag, with its strict specifications, serves as an excellent case study for this principle. It demonstrates that even seemingly simple designs are built upon a foundation of research, technical understanding, and a commitment to accuracy.
The iterative process of refinement, where one might spend "another 8 hours on this project if I wanted to get every last detail correct down to the pixel," underscores the dedication required to achieve a truly professional result. This level of detail is what separates a casual graphic from a meticulously crafted representation.
Finalizing Your Design and Resources
The flag is finally complete. I wanted to cry. I was proud to be an American at this point. Even more, an American designer. No matter how long I look at this, I find errors and inconsistencies. This feeling of accomplishment, coupled with a critical eye for perfection, is characteristic of a dedicated designer.
I’m very pleased with the end result of this. The journey of creating an accurate American flag in Photoshop, from understanding the historical specifications to meticulously placing each star, is a rewarding experience. It equips designers with a deeper appreciation for the standards that govern iconic symbols and the technical skills required to reproduce them faithfully.
For those looking for a ready-made, high-resolution representation, a full-screen American Flag desktop wallpaper in 1920 x 1080 resolution is available for free download, no strings attached. This allows users to appreciate the result of such a detailed design process without needing to undertake the entire tutorial themselves, while also serving as a reference point for accurate flag design.
tags: #american #flag #background #for #photoshop