For photographers who find themselves frequently tweaking images in Adobe Photoshop after initial raw conversions in Lightroom or other converters, Photoshop Actions can be a game-changer. While it's technically sound to perform as much editing as possible within a raw converter, the allure of Photoshop's "blank canvas" and familiar workflow often pulls users in. This is particularly true for those who, like many, are deeply accustomed to its capabilities. Photoshop Actions provide a powerful method to expedite repetitive tasks, allowing for quick yet natural photo enhancements that are broadly suitable for publication. This article delves into several useful Photoshop Actions, curated and adapted to offer efficient and impactful edits without resorting to dated stylistic effects like 1970s film looks or light leaks.
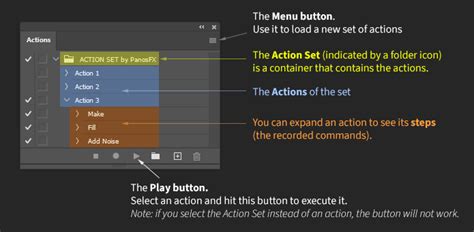
Before diving into specific actions, a practical tip for managing them is essential. Once you've recorded or downloaded your desired Actions, consider switching your Actions panel to "Button Mode." This mode transforms each action into a clickable button, making them far more accessible and eliminating the need to scroll through lists to find the one you need. The underlying purpose of exploring these actions is to reveal clever techniques within Photoshop that can be integrated into your own custom actions. By understanding the mechanics behind these tools, you gain the ability to replicate, adapt, or even improve upon them to achieve even better or different results.
The Art of Saturation Masking for Enhanced Color
The introduction of the "vibrancy" slider in Photoshop significantly reduced the reliance on saturation masks for many users. However, saturation masks still hold considerable value, especially for targeted color adjustments. The fundamental purpose of a saturation mask is to selectively apply an effect to either the most or least saturated areas of an image, depending on whether the selection is inverted. This capability remains potent for creating a saturation boost action.
An inverse saturation mask, specifically, can target the least saturated regions of a photograph with greater emphasis. It's important to be mindful, however, that there's a potential for clipping the RGB channels with this method, which could lead to overexposure or underexposure and a loss of detail. To mitigate this, a technique involving the Alt key (or Option key on a Mac) when adjusting sliders can be employed. Holding down Alt while manipulating the sliders can split them into two, allowing you to move the inner halves to values such as 70 and 160. This action effectively feathers the selection, preventing harsh transitions in tonal areas and ensuring a more natural integration of the effect.
If, after applying an action, you find the effect too pronounced or too subtle, the "unblend" function is your friend. Simply press Ctrl/Cmd + Z to undo the blending of the layers, adjust the saturation value as needed, and then reapply the blend. This iterative process allows for fine-tuning the saturation boost to perfectly match your aesthetic preferences and the specific needs of the image.
Injecting Contrast: Mid-Tone and Highlight Emphasis
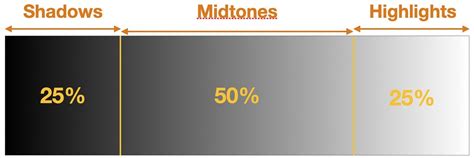
One particularly useful action focuses on injecting contrast specifically into the mid-tone and highlight areas of an image, while deliberately leaving the shadow regions untouched. This targeted approach to contrast enhancement also has the beneficial side effect of intensifying colors within those affected areas. While it can be challenging to fully appreciate the nuances in a direct side-by-side comparison, examining the image closely might reveal crisper highlights and a subtle increase in mid-tone saturation, particularly on the left side of the example image provided.
To achieve this, the process often involves leveraging the Channels palette. By clicking on the RGB channel while holding down the Ctrl/Cmd key, you create a selection based on the overall tonal information. Subsequently, navigating to the blending modes within the Layers palette and selecting "Soft Light" can produce the desired effect. This method offers a controlled way to add punch and depth to an image without crushing the blacks or introducing unwanted artifacts in the shadows.
Revealing Texture: Contrast That Protects Shadows
Another action, similar in principle to the previous one, also falls under the umbrella of contrast adjustments but with a key difference: it effectively protects the shadow areas. The visual outcome of this action is a more pronounced revelation of textural detail compared to a straightforward contrast adjustment. It achieves this by emphasizing edges and subtle shifts in tone across the image.
This type of action is exceptionally beneficial for breathing life into flat images, imparting a greater sense of depth and sharpness. It excels at giving photographs that desirable "pop." A sophisticated technique often employed here involves "Blend If" modifications, specifically within the "Underlying Layer" settings. This refinement is crucial for avoiding the "grunge" effect that can sometimes make excessive application of the "Clarity" slider look unsightly. By carefully controlling the underlying layer blend, you can ensure that the increased textural detail is applied harmoniously, without introducing harshness.
5 Guaranteed Tricks to Match Subject & Background! - Photoshop Tutorial
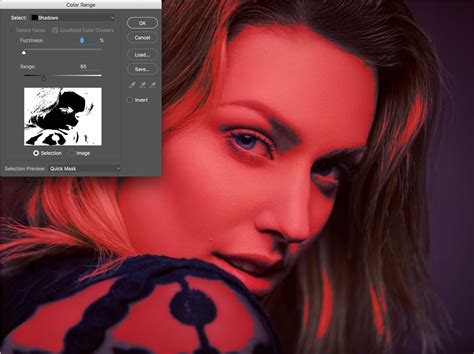
Taming Noise: Targeted Reduction with Channel Masks
In recent years, the "Auto" button in Lightroom and Adobe Camera Raw (ACR) has seen significant improvements, making it a compelling alternative starting point for many edits. The results from these auto-adjustments can often resemble a mild HDR effect, bringing out detail in both highlights and shadows. However, a common challenge when recovering shadow detail is the inevitable introduction or exacerbation of noise. The extent of this noise can vary considerably depending on the camera and its specific settings.
To combat this, a Noise Reduction Action can be created using a channel mask. This allows for the precise targeting of the darkest areas of an image, where noise is typically most noticeable. While the conventional approach to noise reduction involves adjusting settings on a per-photo basis, the flexibility of Photoshop Actions allows for the creation of multiple noise reduction presets tailored to different camera profiles or shooting conditions. This means you can have a dedicated action for high-ISO shots from your full-frame camera and another for lower-ISO shots from your APS-C sensor, for instance.
Controlled Sharpening with Luminosity Masks
Sharpening, at its core, is a contrast adjustment. It works by making adjacent pixels brighter and darker based on their tonal values, thereby creating the visual illusion of sharpness. A highly effective method for controlling the application of sharpening is through the use of a luminosity mask. This type of mask dynamically adjusts the amount of edge contrast applied, scaling it based on the brightness or darkness of the area in the image.
The beauty of a luminosity mask lies in its subjective nature and its ability to work harmoniously with the image's content. By applying sharpening proportionally less to darker areas (often visualized as deep red when the mask is active), you ensure that noisy shadow regions, which are generally undesirable to sharpen, receive minimal attention. This prevents the amplification of noise and maintains a cleaner appearance in the shadows.
To implement this, you would typically go to the Channels palette and click on the "Save selection as channel" icon. Then, returning to the Layers palette, with your "Sharpen" layer selected, you would click the "Add layer mask" icon. This associates the luminosity-based selection with the sharpening effect, ensuring it's applied intelligently and aesthetically.
Troubleshooting and Customization of Photoshop Actions
Occasionally, Photoshop Actions may encounter issues and cease to function correctly, sometimes requiring a restart of the application. These are often minor glitches, but it's good to be aware of potential workarounds.
The power of Photoshop Actions lies not only in their ability to automate tasks but also in their adaptability. If a downloaded or recorded Action doesn't yield the desired results, don't hesitate to modify it. You can delete specific steps, add new ones, adjust existing settings, or refine the overall outcome to better suit your personal style and the specific needs of each photograph. The goal is to create a workflow that is both efficient and produces results you are happy with.
The journey of mastering Photoshop Actions is one of continuous learning and experimentation. By understanding the underlying principles of tools like saturation masks, luminosity masks, and blend modes, you can move beyond simply applying presets and begin to craft custom solutions that elevate your photography. This article aims to inspire you to explore the more powerful and nuanced features within Photoshop and integrate them into your creative process through the efficiency of Actions.
A World of Free and Premium Photoshop Actions
For those looking to expand their collection of Photoshop Actions, numerous resources are available. Websites like FixThePhoto offer a substantial library of free Photoshop Actions, catering to photographers across various genres. These actions are designed to transform hours of manual editing into a few simple clicks, eliminating the need to repeat the same editing stages for a desired effect.
These free actions are generally compatible with a range of Photoshop versions, including CS 4-6 and Photoshop CC. The installation process is straightforward: download and unzip the .ATN file, launch Photoshop, navigate to the Window menu and select Actions, then choose "Load Actions" and locate your downloaded file. Once installed, your actions will appear in the Actions panel, ready to be played with a simple click of the play button.
For those seeking more curated and often specialized effects, premium services like Envato Elements offer a vast array of Photoshop Actions. These can range from artistic transformations like watercolor paintings and pencil sketches to stylistic effects such as vintage looks, retro designs, and even animated GIF creation. Popular categories include:
- Artistic Transformations: Watercolor effects, oil painting emulations, pencil sketches, and even emulating the styles of famous artists like Vincent van Gogh.
- Stylistic Effects: Vintage film looks, retro 80s poster designs, old propaganda styles, and cartoon effects.
- Creative Effects: Double exposures, abstract art generation, neon effects with bokeh and lightning, and infrared photography simulations.
- Professional Retouching: Actions designed for professional retouching, portrait enhancements, and color grading.
- Unique Effects: Cloud effects, snow and ice simulations, and digital film looks.
When selecting actions, consider the resolution of your photographs, as some actions, like watercolor effects, work best with high-resolution images. The sheer variety available means there's an action to suit almost any creative vision, from adding a subtle film grain to completely transforming an image into a work of art.

The Importance of Understanding the Underlying Tools
While readily available Photoshop Actions can significantly speed up your workflow, a deeper understanding of the tools and techniques they employ is invaluable. Knowing how a saturation mask works, for instance, allows you to troubleshoot why an action might be producing undesirable results or how to fine-tune its intensity. Similarly, understanding the principles of luminosity masks empowers you to create your own custom sharpening or contrast actions that are perfectly tailored to your images.
The "Blend If" feature, as mentioned, is another powerful tool that many actions utilize. By mastering "Blend If" settings, you can exert granular control over how layers interact, preventing harsh transitions and ensuring a natural integration of effects. This level of control is what separates a generic edit from a professional, polished final image.
The author of this piece, Glenn Harper, brings a wealth of experience as a writer and photographer, with nearly two decades of his work being licensed and syndicated globally. His early engagement with photography magazines in the UK further solidified his deep understanding of image manipulation and workflow optimization. His preference for Photoshop, even when Lightroom can perform many tasks, highlights the platform's unique flexibility and the creative freedom it offers.
Ultimately, Photoshop Actions are not a replacement for skill and understanding, but rather a powerful enhancement to them. They serve as a bridge between complex editing processes and the desired final output, allowing photographers to achieve stunning results more efficiently and consistently. Whether you're downloading free actions or investing in premium sets, the key is to use them as a springboard for creativity and a tool to refine your unique photographic vision.