In the ever-evolving landscape of digital art and photography, efficiency and consistency are paramount. Photoshop Actions have emerged as a powerful tool for achieving both, allowing users to automate repetitive tasks and apply complex effects with a single click. While the market is flooded with pre-made action sets promising miraculous transformations, understanding how to create and utilize these automated sequences offers a deeper level of control and customization, ultimately saving significant time and enhancing creative output. This guide delves into the fundamentals of Photoshop Actions, from their basic creation to advanced organizational strategies, empowering both novice and experienced users to leverage this indispensable feature.
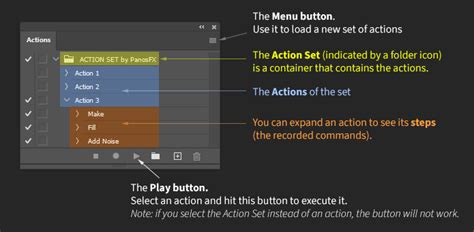
The Power of Automation: What are Photoshop Actions?
At their core, Photoshop Actions are recorded sequences of commands and steps that can be replayed on any image. Think of them as a digital recipe, meticulously documenting every adjustment, filter, and tool application performed by the user. This recorded process can then be executed with a single click, applying the exact same transformation to a new image. The feature has been a staple in Photoshop since 1996, meaning it's available across virtually all versions of the software, making it a universally applicable tool for enhancing post-processing workflows.
The utility of Actions extends far beyond simple effects. They can be employed for a multitude of tasks, including:
- Resizing images: Quickly adjust dimensions for web or print.
- Applying effects: Implement complex stylistic looks, color grading, or artistic filters.
- Saving files: Automate the process of exporting images in specific formats and settings.
- Batch processing: Apply the same sequence of edits to an entire collection of images, ensuring uniformity.
For photographers who edit large batches of images or consistently perform the same techniques, Actions can drastically speed up their workflow. For instance, a photographer might create an Action to sharpen images, which includes steps to create a new layer for sharpening, desaturate it, apply a High Pass filter, set the blend mode to "Overlay," and then rename the layer for clarity and opacity adjustment. This single Action can shave considerable time off editing sessions.
Creating Your First Photoshop Action: A Step-by-Step Introduction
Embarking on the journey of creating your own Photoshop Actions is a straightforward process that can yield significant time savings. The fundamental principle involves recording each task you perform within Photoshop.
Getting Started with Recording
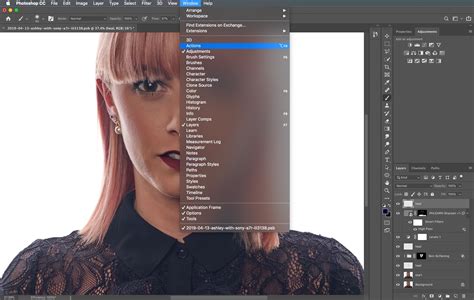
- Open the Actions Panel: Navigate to
Window > Actionsor pressAlt + F9(Windows) orCmd + F9(Mac) to open the Actions panel. - Create a New Action Set (Optional but Recommended): To keep your Actions organized, it's beneficial to group them. Click the folder icon at the bottom of the Actions panel to create a new set. Name it something descriptive, like "My Custom Edits."
- Create a New Action: With your desired Action Set selected (or if you're not using sets, within the default "Default Actions" set), click the "Create new action" button (the plus sign icon) at the bottom of the Actions panel.
- Name Your Action: A dialog box will appear. Give your Action a clear and descriptive name. For example, if you're creating an action for sharpening, name it "Sharpen Image." You can also assign a function key and color for easier access and identification later.
- Begin Recording: Click the red "Record" button (a circular icon). From this point forward, every action you take in Photoshop will be recorded.
- Perform Your Desired Steps: Execute the exact sequence of edits you want your Action to perform. For instance, to create an Action that duplicates the background layer and applies a "crushed blacks" effect:
- Duplicate the background layer (Layer > Duplicate Layer or
Cmd/Ctrl + J). - Create a Curves Adjustment Layer (Layer > New Adjustment Layer > Curves).
- In the Curves panel, raise the shadows, lower the darker midtones, and then bring the midtones back to their original position.
- Rename the Curves layer to "Crushed Blacks" for clarity.
- Duplicate the background layer (Layer > Duplicate Layer or
- Stop Recording: Once you have completed all the desired steps, click the "Stop" button (a square icon) at the bottom of the Actions panel.
Your newly created Action is now ready to be used. To apply it to another image, simply open that image, select your Action from the Actions panel, and click the "Play" button (the triangle icon).
Self-Sufficiency is Key
A crucial aspect to remember when creating Actions is that they must be "self-sufficient." This means that everything the Action needs to perform its task must either be present when you initiate the Action or be created by an earlier step within the Action itself. If an Action relies on a specific layer that isn't created within the Action, or if it expects a certain document state that isn't guaranteed, it may fail to execute correctly or produce unexpected results.
Advanced Techniques and Practical Applications
While the basic recording process is simple, the depth and complexity of Photoshop Actions are virtually limitless.
Sharpening with Control
One of the most practical uses of Photoshop Actions is for controlled sharpening. As mentioned, an Action can be set up to create a sharpening layer that can then be masked or have its opacity adjusted. This provides a non-destructive way to sharpen, allowing for fine-tuning after the Action has been applied.
The typical process for such an Action involves:
- Creating a new layer at the top of the document that captures all visible layers.
- Desaturating this new layer to prevent sharpening from affecting color.
- Applying the "High Pass" filter. The radius can be adjusted (e.g., around 2.5), and users can experiment with this value.
- Setting the layer's blend mode to "Overlay."
- Renaming the layer to something like "Sharpening" for easy identification.
This allows the user to then adjust the opacity of the sharpening layer to achieve the desired level of sharpness without overdoing it.
Cinematic "Crushing the Blacks"
The "crushing the blacks" technique is a popular cinematic look that enhances contrast and depth. An Action can automate this process by:
- Duplicating the background layer for a non-destructive workflow.
- Creating a Curves Adjustment Layer.
- Within the Curves, subtly raising the shadows, lowering the darker midtones, and then adjusting the midtones back to their original position to maintain overall brightness while deepening shadows.
- Renaming the adjustment layer to "Crushed Blacks."
This Action can be applied instantly to any image, providing a consistent starting point for a dramatic look.
Batch Actions for Large Projects
For photographers and designers working with extensive image sets, the ability to create batch Actions is invaluable. This allows a single Action to be applied sequentially to an entire folder of images. This is particularly useful when aiming for a cohesive visual style across a gallery, such as for a wedding album or a product catalog. By creating an Action tailored for a specific collection, one can ensure that all images share the same "feel" and aesthetic.
Shortcuts for Lightning-Fast Access
While Actions themselves automate tasks, assigning keyboard shortcuts can further streamline their execution.
- Locate the Action: In the Actions panel, find the specific Action you want to assign a shortcut to.
- Access Action Options: Double-right-click on the Action's name.
- Assign Function Key: In the "Action Options" dialog box, you'll find a "Function Key" section. Select a function key (e.g., F2, F3) and optionally choose a modifier key (e.g., Shift, Ctrl, Cmd).
- Confirm and Save: Click "OK." If the chosen shortcut conflicts with an existing one, Photoshop will warn you. Confirm the change if you wish.
The assigned shortcut will then appear next to the Action's name in the Actions panel, serving as a constant reminder. Many users organize their frequently used shortcuts logically, such as assigning F2 to an "eye" adjustment because we have two eyes, and F3 to a "teeth" adjustment.
Organizing and Managing Your Actions
As your collection of Photoshop Actions grows, effective organization becomes essential to avoid the frustration of sifting through a lengthy list.
Naming and Labeling
Clearly naming each Action is the first step. Double-clicking on an Action's name allows you to edit it. This ensures that when you scan your Actions panel, you can quickly identify the purpose of each recorded sequence.
Grouping Actions into Sets
The folder icon at the bottom of the Actions panel allows you to create Action Sets. To group existing Actions, select the first Action, hold down Shift, and select the last Action in the desired range. Then, click the folder icon. This creates a collapsible group, making the Actions panel much more navigable. This is especially helpful for creating sets tailored to specific projects or types of edits.
Duplicating and Modifying Actions
Sometimes, you may want to modify an existing Action without altering the original.
- Duplicate an Action: Select the Action you wish to copy. Go to the Actions panel menu (the small arrow in the top-right corner) and select "Duplicate." This creates an exact copy that you can then edit or rename.
- Duplicate Action Sets: You can also duplicate entire Action Sets using the same duplication method.
Exporting and Importing Actions
To share your Actions with colleagues, friends, or to use them on a different computer, you need to export them.
- Select the Action Set: In the Actions panel, select the Action or Action Set you want to export.
- Save Actions: Go to the Actions panel menu and select "Save Actions…".
- Name and Save: A dialog box will appear, allowing you to name the Action file. Ensure the filename has the
.atnextension. Choose a location to save the file.
To install Actions on another computer or in a different Photoshop instance:
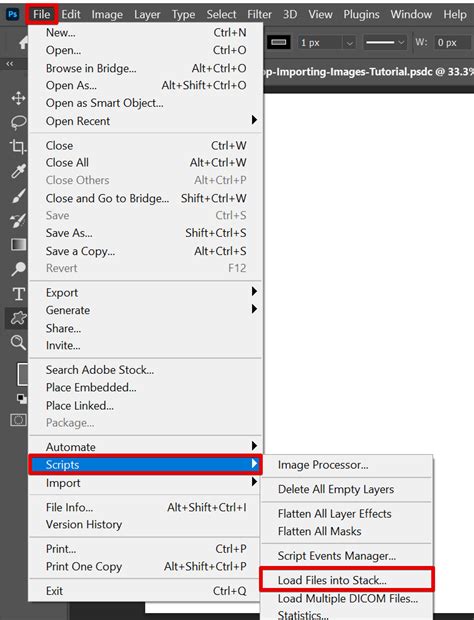
- Open the Actions Panel: Go to
Window > Actions. - Load Actions: Click the Actions panel menu and select "Load Actions…".
- Locate and Select: Browse to the location where you saved your
.atnfile, select it, and click "Load." The Action or Action Set will appear in your Actions panel.
How to create and use Photoshop Actions
Beyond the Basics: Exploring the Depth of Actions
The potential applications of Photoshop Actions are vast. They can be used to create intricate artistic effects, apply subtle enhancements, or even animate photos. For graphic designers, text Actions can transform ordinary lettering into eye-catching designs with effects like melted gold or wood grain.
While many pre-made action sets are available for purchase, understanding the creation process allows for unparalleled customization. Many resources offer specialized Actions, from oil paint and watercolor effects to cartoon filters and sketch conversions. For portrait photographers, skin-smoothing Actions can drastically reduce retouching time while delivering professional results.

It's important to note that the quality of free Actions can vary. While they can be a great starting point, professionally curated Action sets, often found on platforms like Envato Elements, tend to offer higher quality, more sophisticated effects, and better organization. These often work in a non-destructive manner, preserving the original image layer while applying edits through adjustment layers and smart objects.
The "Button Mode" Advantage
For those who prefer a more streamlined interface, Photoshop's Actions panel offers a "Button Mode." Accessed via the Actions panel menu, Button Mode replaces the tree-like structure with clickable buttons for each Action. This simplifies the process of playing Actions, requiring only a single click. The buttons at the bottom of the Actions panel are hidden in this mode, further decluttering the workspace.
Conclusion: A Powerful Tool for Every Creative
Photoshop Actions are more than just a time-saving gimmick; they are a fundamental tool for any digital artist or photographer looking to enhance efficiency, maintain consistency, and explore creative possibilities. Whether you're applying a sophisticated cinematic look, automating a repetitive sharpening task, or applying a consistent style to an entire gallery, Actions empower you to achieve professional results with unprecedented speed. By investing a little time in learning to create and manage your own Actions, you unlock a powerful workflow enhancement that can transform your creative process.