Adding page numbers to your Adobe InDesign documents is a fundamental yet often misunderstood aspect of professional layout design. Whether you're crafting a multi-page magazine, a detailed brochure, a comprehensive book, or any publication requiring clear navigation, correctly implemented page numbering is crucial for readability and a polished final product. This guide aims to demystify the process, offering a step-by-step approach to adding, formatting, and managing page numbers in InDesign, ensuring your documents are both functional and aesthetically pleasing.
The Foundation: Understanding Parent Pages
The cornerstone of automatic page numbering in InDesign lies within Parent Pages, formerly known as Master Pages. Think of a Parent Page as a template that dictates elements appearing on multiple pages of your document. Any text, graphics, or, crucially, page number markers applied to a Parent Page will automatically propagate to every document page that is linked to that specific Parent Page. This not only saves a significant amount of time but also ensures consistency and automatic updates should you add or delete pages later in your workflow.
When you work with Parent Pages, you're essentially creating a master layout. If your document is set up for facing pages (like a book or magazine), your Parent Pages will also appear as spreads, allowing you to place elements on both the left (verso) and right (recto) pages simultaneously. It's vital to understand that elements placed on Parent Pages are generally locked on the document pages, preventing accidental modification.
Layers and Parent Pages: A Synergistic Approach
For optimal document management, it's highly recommended to utilize InDesign's layer system in conjunction with Parent Pages. Layers act as containers for different types of content, allowing you to organize and control their visibility and stacking order. A common best practice, as suggested by InDesign experts, is to arrange layers from bottom to top in the following order: Background, Images, Text, and finally, Page Numbers/Headers/Footers. Placing page numbers on a top layer ensures they are always visible and not obscured by other design elements.
Step-by-Step: Adding Page Numbers to Your Document
Adding page numbers in InDesign is a straightforward process once you grasp the logic of Parent Pages.
1. Accessing the Pages Palette
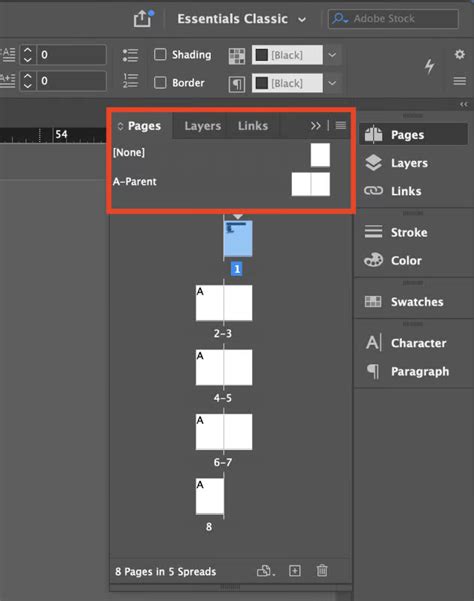
Begin by opening the Pages palette. If it's not already visible in your workspace, navigate to Window > Pages. This palette displays thumbnails of your document's pages and its associated Parent Pages. Parent Pages are typically labeled with letters (e.g., A-Parent, B-Parent), indicating different master page layouts.
2. Selecting and Editing a Parent Page
To add page numbers, you need to work on the Parent Page. Double-click the thumbnail of the Parent Page you wish to modify (usually "A-Parent" for a new document). This will bring the selected Parent Page spread into your main document view. Ensure that "A-Parent" is highlighted in the Pages palette to confirm you are working on the correct master page.
3. Creating the Page Number Placeholder
With the Parent Page active, select the Type Tool (T) from the toolbar. Click and drag to draw a small text box on the Parent Page where you want your page numbers to appear. This text box will serve as the placeholder for your automatic page number.
4. Inserting the "Current Page Number" Marker
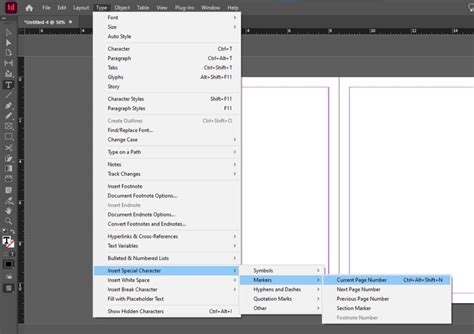
With the text box selected, go to Type > Insert Special Character > Markers > Current Page Number. You will see an "A" appear within your text box. This "A" is not a literal letter but a dynamic marker that InDesign will replace with the actual page number when the Parent Page is applied to document pages.
5. Formatting the Page Number
The "A" marker is treated as text, meaning you can format it like any other text element. Use the Paragraph Style panel or the Character panel to change the font, font size, color, and alignment to match your document's design aesthetic. Experiment with different fonts and sizes to find what best complements your layout. For instance, on a right-hand (recto) page, you might right-align the text frame to maintain a consistent distance from the page edge, especially as your page numbers grow into double digits.
6. Applying to Facing Pages
If your document uses facing pages, you'll likely want page numbers on both the left and right pages of a spread. Simply copy the text frame containing the "Current Page Number" marker from one page of the Parent Page spread to the other. Use InDesign's smart guides to help you align the text frames precisely.
7. Adding Text Around the Page Number
You can also include static text alongside your dynamic page number. For example, you might want to add the word "Page," an abbreviation like "pg," or even the document's title before or after the page number marker. Simply expand the text frame to accommodate the additional text and type it in. Remember, you cannot manually type the letter "A" to achieve this; it must be the special "Current Page Number" marker.
Advanced Customization and Control
Beyond the basic insertion, InDesign offers powerful options for customizing page numbering to suit specific project requirements.
Skipping Page Numbers on Specific Pages
A common scenario is needing to exclude page numbers from the first page of a document, such as a cover or title page. By default, InDesign starts numbering from page 1. To circumvent this, you need to create a new section.
Creating and Managing Sections
- Select the Page: In the Pages palette, select the page where you want your numbering to begin. For instance, if page 1 is the cover and you want page 2 to be numbered "1," select page 2.
- Open Section Options: Right-click on the selected page and choose
Numbering & Section Options.... - Start New Section: In the dialog box, check the
Start Page Numbering atbox and enter the desired starting number (e.g., 1). You can also choose to include a section marker or prefix here. ClickOK.
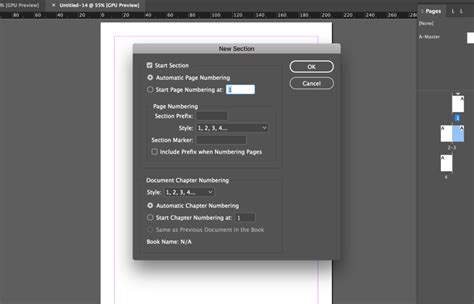
This action effectively creates a new section. If you choose to start numbering at "1" on a page other than the document's first page, InDesign might display a warning indicating that the document already has a section starting from page 1. To avoid this, you might need to adjust the numbering style of the first section as well.
Changing Page Numbering Styles
InDesign supports various numbering styles beyond the standard Arabic numerals (1, 2, 3). You can opt for Roman numerals (i, ii, iii), uppercase or lowercase letters (A, B, C or a, b, c), or even custom variations.
To change the style:
- Select the First Page of the Section: In the Pages palette, select the page that initiates the section whose numbering style you want to change.
- Access Options: Right-click and choose
Numbering & Section Options.... - Choose Style: From the
Page Numbering Styledropdown menu, select your preferred format. ClickOK.
This change will apply to all pages within that section.
Adding Section Markers and Prefixes
For longer documents, especially those divided into chapters or distinct parts, you can use Section Markers and Section Prefixes to provide additional context.
- Section Marker: This allows you to assign a specific name or identifier to a section. In the
Numbering & Section Optionsdialog box, you can edit theSection Markerfield. You can then insert a "Section Marker" placeholder (Type > Insert Special Character > Markers > Section Marker) onto your Parent Page, typically before the page number marker, to display this identifier. - Section Prefix: A prefix is a short text string that appears before the page number (e.g., "EN-" for English sections, or chapter numbers like "Chapter 1-"). To add a prefix, edit the
Section Prefixfield in theNumbering & Section Optionsdialog box and ensureInclude Prefix when Numbering Pagesis checked.
How to Add Page Numbers & Sections in InDesign (Tutorial)
Beyond the Basics: Further Possibilities
The Parent Page functionality extends beyond just page numbers. You can add headers, footers, running page titles, and other consistent design elements. Text variables can be used to insert dynamic information like the current date, file name, or even the text of a specific paragraph style found on the page.
Overriding Parent Page Items
While Parent Page items are generally locked, there are times you might need to modify or remove them from a specific document page. To do this, you can override Parent Page items. Right-click on the specific page in the Pages palette and select Override All Parent Page Items. This unlocks all elements from the Parent Page on that specific document page, allowing you to delete or edit them individually. Alternatively, you can select specific items on the Parent Page and override them by holding Ctrl+Shift (Windows) or Cmd+Shift (Mac) while clicking on the element on the document page.
Multiple Parent Pages
InDesign allows you to create and manage multiple Parent Pages within a single document. This is incredibly useful for publications with distinct sections that require different master layouts or numbering schemes. You can assign different Parent Pages to different document pages by dragging the desired Parent Page thumbnail onto the document page thumbnail in the Pages palette.
Conclusion: Efficiency and Professionalism
Mastering page numbering in Adobe InDesign, particularly through the effective use of Parent Pages and sections, is not merely a technical exercise; it's a pathway to creating more organized, professional, and user-friendly documents. While it may seem like a few initial steps, the time saved and the consistency achieved in the long run make it an indispensable skill for anyone working with multi-page layouts in InDesign. By understanding the underlying logic, you can confidently tackle complex numbering requirements, ensuring your publications are not only visually appealing but also structurally sound and easy to navigate.