Drawing realistic and stylized hair can be a significant challenge for digital artists. Often, the pre-existing brush sets, no matter how extensive, may not precisely match the vision for a particular project. This is where the power of custom brush creation in Procreate truly shines, offering a personalized solution to achieve the desired hair effects. Creating a custom hair brush in Procreate is a fantastic way to add a personal touch to your digital artwork, allowing for unparalleled control and unique stylistic expression.
Understanding Hair Types and Their Representation
Before diving into brush creation, it's crucial to acknowledge the diverse nature of human hair. Understanding these variations can inform how you design your brushes. Hair can be broadly categorized into several basic types, each with distinct characteristics:
- Type 1: Straight Hair: Characterized by a lack of natural curl or wave, appearing smooth and sleek.
- Type 2: Wavy Hair: Exhibits a gentle, S-shaped curve, falling between straight and curly.
- Type 3: Curly Hair: Features distinct, well-defined curls and spirals.
- Type 4: Kinky (or Coily) Hair: Tightly coiled or zigzagged strands, often with a more delicate structure.

Recognizing these fundamental categories allows artists to tailor their brush strokes and textures to accurately represent different hairstyles, from the smooth flow of straight hair to the voluminous bounce of curly locks.
Leveraging Procreate's Default Hair Brushes
While the allure of custom brushes is strong, Procreate offers a solid starting point with its built-in hair brushes. To access these, open your brush list and navigate to the "Materials" brush set. Here, you'll typically find brushes such as "Fine Hair," "Flowing Hair," and "Short Hair." Each of these brushes possesses unique characteristics and can be used individually or in combination to achieve a variety of effects. Experimenting with these defaults is an excellent way to understand how different brush settings translate into visual results and to identify areas where a custom brush might offer a distinct advantage.
The Art and Science of Custom Brush Creation
Creating your own hair brush is a process that beautifully blends artistic intuition with technical understanding. It might take a few attempts to achieve the perfect result, but the outcome is a personalized tool that can significantly elevate your digital artwork.
Step-by-Step Custom Brush Creation
Initiate a New Canvas: Open Procreate and create a new canvas. The dimensions aren't critical for brush creation itself, but a reasonably sized canvas will provide ample space to draw your brush shape.
Define the Brush Shape:
- Navigate to the "Shape" tab within the Brush Studio.
- Here, you have two primary options:
- Draw Directly: You can meticulously draw your desired brush shape directly onto the canvas. For hair brushes, a tapered or pointed shape often works best, mimicking the natural flow and thinning of hair strands.
- Import an Image: Alternatively, you can import an image of a hair strand, a collection of strands, or a texture that you wish to use as the basis for your brush shape. Ensure the imported image is clean and clearly defines the form you want.
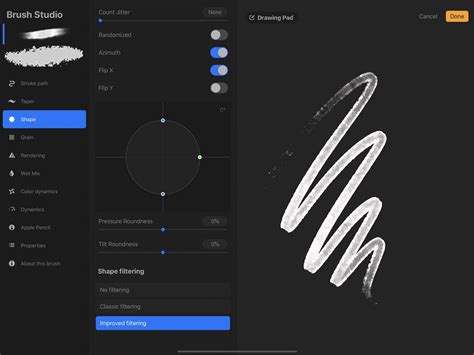
Apply Grain and Texture:
- Move to the "Grain" tab. This setting determines the texture that will repeat along the stroke length of your brush.
- You can select a pre-existing texture from Procreate's library or import your own. For hair, subtle textures can add realism, while bolder ones can create stylized effects. The grain will repeat based on its settings, influencing the perceived density and texture of the applied stroke.
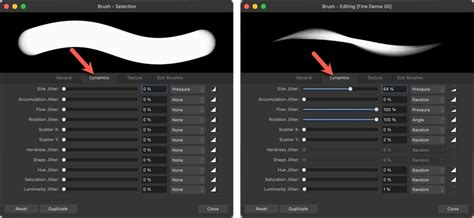
Fine-Tune Dynamics:
- The "Dynamics" tab is crucial for making your brush feel natural and responsive.
- Opacity and Flow: Adjust the 'Opacity' and 'Flow' settings here. Lowering these values can create softer, more translucent strokes, essential for building up hair layers gradually.
- Size and Opacity Jitter: Experiment with 'Size' and 'Opacity' dynamics. Enabling 'Pen Pressure' for these settings allows your brush to respond more naturally to the varying pressure you apply with your stylus. For instance, lighter pressure could result in thinner, more transparent strokes, while heavier pressure yields thicker, more opaque lines, mimicking the way hair strands vary in thickness and visibility.
Test and Refine:
- After adjusting your settings, it's imperative to test your brush thoroughly. Draw various strokes on your canvas, experimenting with different pressures, speeds, and angles.
- Observe the results closely. Are you achieving a natural hair-like feel? Do the strokes blend well? If the brush doesn't look or feel right, don't hesitate to go back and adjust your settings. This iterative process of tweaking and testing is key to perfecting your custom brush.
Name Your Brush: Once you're satisfied with your creation, give your brush a memorable and descriptive name. This will make it easy to find and use later within your brush library.
Customizing Existing Brushes for Enhanced Control
Beyond creating entirely new brushes, you can also significantly enhance Procreate's default brushes or any brushes you've imported. Customizing your Procreate brushes offers greater control over how they function, enabling you to fine-tune their features to meet your specific artistic requirements and style.
To customize an existing brush, simply tap on the brush within your brush library to access the Brush Studio. Here, you can play around with the various sliders and settings across all the tabs (Shape, Grain, Dynamics, Rendering, etc.) to modify its behavior. You can change the brush size, shape, opacity, flow, spacing, jitter, and much more. This level of customization allows you to adapt brushes for specific tasks, such as creating fine, wispy strands, thick, coarse locks, or even stylized hair textures.
Tips for Realistic and Stylized Hair Rendering
Mastering hair rendering in Procreate involves more than just having the right brushes; it also requires understanding fundamental drawing principles and applying them effectively.
Considering Form and Structure
First and foremost, always consider the general form and structure of the head and face while sketching out the type and style of hair you wish to draw. This foundational understanding is crucial for depicting how the hair will naturally sit on the head and how it will interact with other facial features. If you're unfamiliar with portrait anatomy, dedicated courses can provide invaluable guidance on this aspect of digital art.
✏️ A Gentle Guide to Drawing Faces (EASY Step-by-Step Tutorial)
The Power of Long, Sweeping Strokes
When drawing hair, aim to use long, sweeping strokes rather than quick, jagged ones. This technique applies even to the wildest of hairstyles, helping to create a sense of flow and elegance. These longer strokes can better capture the natural direction and curvature of hair strands, contributing to a more believable and dynamic appearance.
Combining and Layering Brushes
Don't limit yourself to a single brush. A highly effective strategy is to combine different Procreate hair brushes during your drawing process. Once you've gathered a selection of brushes that you like, experiment with layering and blending them to achieve varied and complex effects. For instance, you might use a fine, delicate brush to lay down the initial strands of hair, then switch to a larger, more textured brush to add volume and body. You can also utilize different brushes to introduce highlights and shadows, or to apply distinct layers of color and hue, building up a rich and multi-dimensional look. To learn how to import new brushes into Procreate, exploring previous tutorials can be very beneficial.
Mastering Hair Shading
Shading is instrumental in giving hair the illusion of volume, making it appear more three-dimensional and fuller. Procreate's brushes, whether default or custom, can be used with various shading techniques. Consider employing cross-hatching for a more illustrative look, stippling for a textured effect, or gradient shading for smooth transitions. Experimenting with different brushes and shading methods will allow you to achieve varying impacts and depths within your hair renderings.
There are numerous approaches to shading hair, and exploring different processes can be highly rewarding. Detailed video tutorials often showcase specific workflows and techniques that can be adapted to your own style.
The Evolving Landscape of Digital Hair Artistry
It's important to remember that hair brushes are just one component within the broader toolkit for drawing hair. The ideal technique will ultimately be determined by your unique artistic style, the aesthetic you aim to accomplish, and the specific subject matter. By consistently practicing, experimenting with different brushes and settings, and continually learning new techniques, you can develop your own distinct and highly effective methods for drawing hair in Procreate. The journey of mastering digital hair artistry is ongoing, with endless possibilities for creativity and innovation. For those seeking to deepen their expertise, exploring resources on rendering hair, mastering shadowing, and perfecting hair color in Procreate can provide further avenues for growth and skill enhancement.