Photos often capture moments we cherish, but sometimes unwanted text or distracting elements can detract from the visual appeal of a great image. Fortunately, Adobe Photoshop, a powerful and versatile image editing software, offers a range of effective tools and features designed to help you seamlessly remove text and other unwanted objects. Whether you're a seasoned professional or a beginner venturing into digital image manipulation, Photoshop's user-friendly interface makes these techniques accessible. This guide will walk you through various methods for removing text from your photos, drawing upon expert insights and practical steps to achieve professional-looking results.
Preparing Your Image for Editing
Before diving into the text removal process, it's crucial to prepare your image correctly to ensure you don't inadvertently alter your original file.
Opening Your Image in Photoshop
There are several straightforward ways to open an image in Photoshop:
- From Your File Explorer: You can right-click on your image file, select "Open with," and then choose "Photoshop" from the list of available applications.
- From the Photoshop Welcome Screen: Upon launching Photoshop, you can click the "Open" button on the welcome screen and navigate to your image file.
- From Within Photoshop: Once Photoshop is open, you can access the menu bar at the top of the screen. Click on "File" and then select "Open." This will bring up a dialog box where you can locate and select your image.
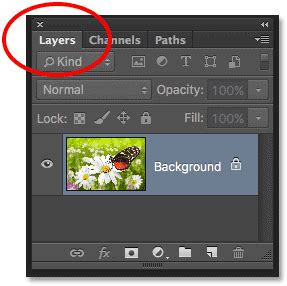
Creating a Duplicate Layer
To safeguard your original image, it is highly recommended to work on a duplicate layer. This way, any edits you make will not affect the original file.
- Duplicate the Layer: After opening your image, locate the "Layers" panel, typically found on the right side of the Photoshop interface. Right-click on the background layer and select "Duplicate Layer." Alternatively, you can press
Ctrl + Jon Windows orCommand + Jon a Mac. - Observe the Layers Panel: You will now see two layers in your Layers panel, both containing the same image. Your original image is safely preserved on the "Background" layer.
- Rename the New Layer (Optional): To keep your layers organized, you can give the duplicated layer a new name. Right-click directly on "Layer 1" (or whatever the duplicated layer is named) and select "Rename." This helps avoid confusion during the editing process.
Selecting the Text for Removal
The first step in removing text is to accurately select the letters you want to eliminate. Photoshop offers several tools that can help with this, especially when the text has a high contrast with its background.
Using the Object Selection Tool
The Object Selection Tool is an intelligent tool that can automatically detect and select objects within your image.
- Locate the Tool: In the toolbar on the left side of the Photoshop window, find the Object Selection Tool. Its icon typically resembles a mouse cursor in front of a box.
- Activate the Tool: Click on the Object Selection Tool icon to activate it. You can also use the keyboard shortcut
W. - Make a Selection: With the Object Selection Tool active, you can either draw a rough rectangle or lasso around the text you want to remove. Photoshop will then attempt to automatically identify and select the object within that area.
Utilizing the Quick Selection Tool
The Quick Selection Tool is another powerful selection option that works like a brush, allowing you to "paint" your selection onto the image.
- Find the Tool: The Quick Selection Tool icon resembles a brush painting a circle. It's usually located near the Object Selection Tool in the toolbar.
- Activate the Tool: Click on the Quick Selection Tool icon.
- Select the Text: Click and drag your cursor over the letters you wish to remove. As you drag, Photoshop will intelligently select areas with similar colors and textures.
- Adding to a Selection: If you need to add more areas to your current selection, simply hold down the
Shiftkey while using the Quick Selection Tool. - Subtracting from a Selection: To remove a part from an existing selection, click the icon at the top that resembles a square with a smaller square cut out of it, and then paint over the area you wish to deselect.
Expanding the Selection
Once you have a preliminary selection of the text, it's often beneficial to expand this selection slightly. This ensures that when Photoshop attempts to fill the area, it has a small buffer of surrounding pixels to work with, leading to a more seamless blend.
- Access the Select Menu: With your text selected, navigate to the "Select" menu in the Photoshop menu bar.
- Choose "Modify": From the "Select" menu, hover over "Modify."
- Select "Expand": Choose the "Expand" option.
- Enter Pixel Value: A dialog box will appear, asking you to enter the number of pixels to expand the selection by. For most images, starting with 3 pixels is a good baseline. The optimal value can depend on the resolution of your photo; you don't want to expand too far out, as this might incorporate unwanted background elements into your selection.
Removing Text with Content-Aware Fill
Content-Aware Fill is one of Photoshop's most sophisticated tools for removing unwanted elements, including text. It uses artificial intelligence to analyze the surrounding pixels and intelligently fill the selected area.
- Apply Content-Aware Fill: With your text area (including the expanded selection) active, right-click on the image. From the context menu, select "Content-Aware Fill."
- Alternatively, you can go to
Edit > Content-Aware Fill.
- Alternatively, you can go to
- Review the Preview: Photoshop will open a dedicated workspace for Content-Aware Fill. On the right side, you'll see a preview of how the fill will look. On the left, you'll see the original image with a green overlay indicating the areas Photoshop is sampling from. You can use the brush tool within this workspace to refine the sampling area if needed, telling Photoshop which areas to consider or ignore when generating the fill.
- Confirm the Fill: Once you're satisfied with the preview, click "OK" to apply the changes.

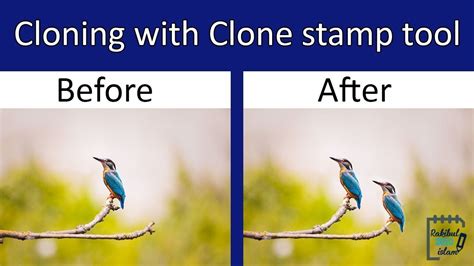
Refining the Results with the Clone Stamp Tool
Even with the power of Content-Aware Fill, there might be subtle imperfections or remaining artifacts from the text. The Clone Stamp Tool is an invaluable resource for meticulously cleaning up these areas.
Understanding the Clone Stamp Tool
The Clone Stamp Tool works by allowing you to sample pixels from one part of an image and paint them onto another. This is perfect for replicating textures and colors to seamlessly cover up the remnants of removed text.
- Locate the Tool: The Clone Stamp Tool icon resembles a rubber stamp. It's typically found in the toolbar. You can also use the shortcut
Alt + S(orOption + Son Mac). - Select a Brush: In the menu bar at the top, choose a soft-tipped brush. This will help in blending the cloned areas more naturally.
- Set Brush Properties: Adjust the brush's flow rate to be between 10% and 30% for most jobs. This allows for more gradual application of the cloned pixels, aiding in a smoother blend. Set the opacity to around 95% initially.
- Define a Source Point: Position your cursor over an area of the background that is as close as possible to the lettering you want to cover. Hold down the
Altkey (orOptionkey on a Mac) and left-click. This action samples the pixels from this location, designating it as your "source."- Important Considerations for Sampling:
- Proximity: Be careful not to sample too close to the text you're trying to erase. If your source is too near, you risk simply copying parts of the text itself.
- Background Consistency: Ensure your source area has similar lighting, color, and texture to the area you're painting over. If your source is too far away, the colors or patterns might not match, making the camouflage obvious.
- Important Considerations for Sampling:
- Paint Over the Text: Left-click and drag your cursor over the remaining text artifacts. As you paint, the pixels from your defined source point will be copied onto the selected area.
- Small Sections: It's best to paint in small sections rather than dragging the mouse in large strokes. This meticulous approach ensures a more professional and less blotchy result.
- Re-sampling: You will likely need to re-sample your source point frequently as you move across the text to maintain consistency with the background.
- Aligned vs. Unaligned: By default, the Clone Stamp tool is set to "Aligned." This means that the source point moves relative to your brush as you paint. If you stop painting and start again, the source point will continue from where it left off. If you deselect "Aligned" (in the options bar at the top), the source point will reset to its original position each time you stop painting. For covering text, "Aligned" is often preferred as it allows for a continuous flow of sampled pixels. However, if you find yourself needing to reset the source frequently, uncheck "Aligned."
Alternative Tools for Text Removal
Photoshop offers several other tools that can be effective for text removal, depending on the complexity of the image and the nature of the text.
Spot Healing Brush Tool
The Spot Healing Brush Tool is a quick and easy option for removing small blemishes or text elements.
- Locate the Tool: Its icon resembles a band-aid.
- Activate and Use: Select the Spot Healing Brush Tool and simply paint over the text you want to remove. Photoshop automatically analyzes the surrounding pixels and blends them to cover the selected area. This tool is particularly effective for smaller text or minor imperfections.
Healing Brush Tool
Similar to the Spot Healing Brush, the Healing Brush Tool also blends sampled pixels with the surrounding area, but it gives you more control.
- Locate the Tool: It's usually grouped with the Spot Healing Brush Tool.
- Sample and Paint: You'll need to manually define a source point by holding
Alt(orOptionon Mac) and clicking on a clean area of the background, similar to the Clone Stamp Tool. Then, paint over the text. The Healing Brush will blend the sampled texture and color with the destination area.
Generative Fill (Newer Versions of Photoshop)
For users with recent versions of Photoshop, the AI-powered Generative Fill feature offers a cutting-edge approach to object and text removal.
- Select the Text: Use any of your preferred selection tools (Lasso, Marquee, Quick Selection, etc.) to select the text area.
- Access Generative Fill: Click on the "Generative Fill" button that appears in the contextual taskbar, or go to
Edit > Generative Fill. - Enter a Prompt: In the prompt box, you can simply leave it blank to remove the selected object, or you can type a prompt like "remove text" or "fill with background."
- Generate: Click "Generate." Photoshop will use its AI to analyze the surrounding area and create several variations for filling the selected space.
Remove Objects Seamlessly In Photoshop [Clean Results]
Addressing Text on Separate Layers
In some multi-layered files, such as PSD or PDF documents, text might exist on its own layer above the background image. This scenario can simplify the removal process.
- Locate the Text Layer: In the Layers panel, identify the layer that contains the text. It might be explicitly named "Text" or similar.
- Delete or Edit the Layer:
- To simply remove the text: You can select the text layer and press the
Deletekey, or drag it to the trash icon at the bottom of the Layers panel. - To edit the text: You can double-click on the text layer thumbnail to activate the Type Tool and edit the text content directly.
- To simply remove the text: You can select the text layer and press the
- Layer Styles: If the text has a specific style applied (like an outline or shadow), these are often controlled via Layer Styles. You can access these by double-clicking on the right side of the layer name in the Layers panel. This will open the Layer Style dialog box, where you can modify or remove effects like "Stroke" (for outlines) or "Drop Shadow."
Important Considerations and Best Practices
- Patience is Key: Removing text, especially when aiming for a flawless result, can be time-consuming. Be prepared to invest time, particularly if you are new to Photoshop or relying heavily on tools like the Clone Stamp.
- Save Frequently: Regularly save your work to avoid losing progress.
- Save as a New File: Always save your edited image with a new file name. This ensures that your original image remains untouched and you have a backup. You can do this by going to
File > Save Asand choosing a different filename or location. - Understand Tool Limitations: While Photoshop offers powerful tools, the success of text removal often depends on the complexity of the background. Busy or highly detailed backgrounds can be more challenging to work with than simple, uniform ones.
- Seek Expert Advice: If you encounter persistent difficulties, online forums like the Photoshop Gurus forum can be excellent resources for seeking advice from experienced users.
By mastering these techniques, you can confidently remove unwanted text from your photographs, enhancing their visual appeal and ensuring your images convey exactly the message you intend.