Photoshop offers a vast array of filters designed to transform and enhance your images. While traditional filters can be powerful, they often come with the drawback of being destructive, meaning they permanently alter pixel data. However, Photoshop's introduction of Smart Filters has revolutionized this aspect of image editing, allowing for non-destructive application and editing of filter effects. This guide delves into the intricacies of applying filters in Photoshop, with a strong emphasis on the advantages and functionalities of Smart Filters, while also touching upon other filter application methods.
The Power of Smart Objects: The Foundation for Smart Filters
At the heart of applying filters non-destructively lies the concept of Smart Objects. When you attempt to apply a standard filter to a type layer, Photoshop will prompt you with a warning. This dialog box informs you that the type layer needs to be either rasterized or converted to a Smart Object before the filter can be applied. Rasterizing the text would convert it into pixels, making it no longer editable as text. To preserve editability and enable non-destructive filtering, the recommended approach is to convert the layer to a Smart Object.
Upon choosing "Convert To Smart Object," the type layer undergoes a transformation. The layer's thumbnail in the Layers panel, which previously displayed a simple "T" icon, will now showcase the actual content of the layer. Crucially, a small Smart Object icon will appear in the lower right of this thumbnail. This icon signifies that the layer has been converted into a Smart Object, a container that holds your original layer's data and allows for flexible editing. The original type layer still exists, but it is now nested within this Smart Object.
Applying Filters as Smart Filters: A Non-Destructive Workflow
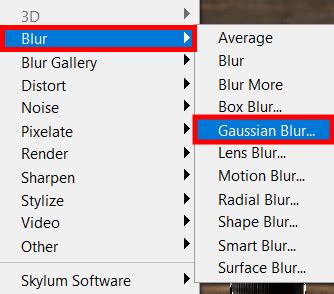
Once a layer is a Smart Object, any filter applied to it automatically becomes a Smart Filter. Let's illustrate this with the Gaussian Blur filter. After converting the type layer to a Smart Object, applying Gaussian Blur will open its dialog box. Here, you can adjust parameters like the Radius. For instance, setting the Radius to around 6 pixels will apply a blur effect.
The true magic of Smart Filters is revealed when you decide to modify the filter's settings after its initial application. If you had rasterized the text and applied Gaussian Blur directly, the filter's effect would be permanent and uneditable. However, because Gaussian Blur was applied to a Smart Object, Photoshop automatically designates it as a Smart Filter.
This non-destructive nature is the primary benefit of Smart Filters. They are not permanently applied to the pixel data. Instead, Photoshop displays a live preview of how the layer appears with the current filter settings.
Editing Smart Filters: Flexibility at Your Fingertips
Smart Objects in Photoshop: Why you should use them & how to edit smart objects in Photoshop 2021
The ability to edit Smart Filters after they've been applied is a game-changer. To re-open a Smart Filter's dialog box and adjust its parameters, simply double-click on the filter's name in the Layers panel. This action re-opens the dialog box, presenting the settings that are currently in use. For example, if you initially set the Radius to 6 pixels, double-clicking will bring up the Gaussian Blur dialog with the Radius set to 6.
It's important to understand that this editing process is not about applying a new layer of the filter on top of the old one. Photoshop is not applying a 20-pixel blur on top of a previous 6-pixel blur. Instead, you are modifying the existing filter's parameters. For example, if you adjust the Radius to 20 pixels, the blur becomes significantly stronger. Conversely, changing it to a subtle 2 pixels results in a much less pronounced effect. This level of control would be impossible with traditional, destructive filters.
The undo functionality also reflects this non-destructive workflow. When you edit a Smart Filter's settings, the command in the Edit menu might read "Undo Edit Filter Effect" rather than "Undo [Filter Name]." This is because Photoshop considers adding a filter and editing its settings as distinct steps. Undoing this action reverts the filter to its previous state, for instance, returning from a 2-pixel blur to a 20-pixel blur without needing to manually re-open the dialog box.
Managing Smart Filter Visibility and Removal
Smart Filters offer additional features for managing their effects. You can easily hide a filter's effect without deleting or undoing it. To the left of a Smart Filter's name in the Layers panel, you'll find a small eyeball icon. Clicking this icon toggles the visibility of the filter's effect. This is incredibly useful for quickly comparing the image with and without a particular filter applied.
If you decide that a Smart Filter is no longer needed, it can be removed entirely. Right-clicking (Windows) or Control-clicking (Mac) on the filter's name in the Layers panel will bring up a context menu, from which you can select "Delete Smart Filter." The non-destructive nature of Smart Filters makes experimentation with different effects risk-free, as you can always hide, edit, or delete them if the results are not satisfactory.
Applying Multiple Smart Filters and Controlling Their Order
The power of Smart Filters extends to applying multiple filters to a single Smart Object. For instance, after applying Gaussian Blur, you might want to add a Motion Blur to the text. Since the layer is already a Smart Object, applying the Motion Blur filter will automatically add it as another Smart Filter below Gaussian Blur in the Layers panel.
A key aspect of managing multiple Smart Filters is their order of application. Photoshop applies these filters from the bottom up. This order can significantly impact the final appearance of the effect. For example, if Motion Blur is applied first and then a Ripple filter, the ripple effect might be visible on the motion blur streaks. However, if the Ripple filter is applied first (meaning it's listed below Motion Blur in the Layers panel), and then Motion Blur is applied, the blur streaks will not exhibit the ripple effect.
You can easily reorder Smart Filters by clicking and dragging them within the Layers panel. This allows you to experiment with different combinations and achieve a desired aesthetic. For instance, dragging the Ripple filter below Motion Blur will change the order of operations, leading to a different visual outcome.
You can add further filters, such as the Wind filter, to the same Smart Object, stacking them in the desired sequence. Each added filter becomes a new Smart Filter, listed in the Layers panel. At any point, you can:
- Reorder filters: Drag and drop them to change the application sequence.
- Edit settings: Double-click a filter's name to re-open its dialog box.
- Toggle visibility: Click the eyeball icon to hide or show a filter's effect.
- Adjust blending: Double-click the Blending Options icon next to a filter's name to modify its blend mode and opacity.
Even with multiple Smart Filters applied, the text within the Smart Object remains fully editable. The only minor adjustment in workflow is that you cannot directly click on the text in the document with the Type Tool to edit it. Instead, you would double-click the Smart Object thumbnail to open its contents in a separate tab, edit the text there, save the changes, and then return to your main document to see the updated filter effects.
Blending Options for Smart Filters: Enhanced Control
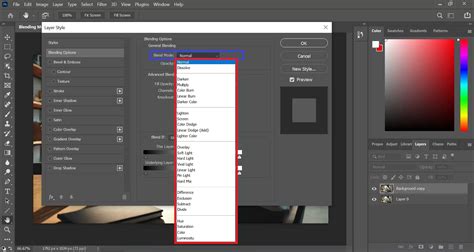
Smart Filters offer an advanced level of control through their own blending options, separate from the layer's blending options. For each Smart Filter, there's a Blending Options icon located to the right of its name in the Layers panel. Clicking this icon opens a dialog box similar to the Layer Properties, allowing you to adjust the filter's blend mode and opacity.
This feature enables you to blend the filter's effect with the content of the Smart Object in unique ways. For example, changing the Motion Blur filter's blend mode to "Overlay" and adjusting its opacity can create a subtle blurring effect that interacts creatively with the underlying text. You can even combine the filter's blending options with the Smart Object's layer blending options for even more complex results.
Consider the scenario where the Motion Blur filter is blended using "Overlay" with the type, and then the entire Smart Object is set to "Overlay" with the background. This creates a layered effect where the blur is applied to the text, and then the combined result is blended with the background. This level of control is unparalleled with traditional filters.
Smart Filter Layer Masks: Isolating Effects
One of the most powerful features of Smart Filters is their built-in layer mask. Directly above the list of Smart Filters in the Layers panel, you'll find a mask thumbnail. This mask, typically white by default, controls the visibility of the applied Smart Filters. Areas filled with white on the mask reveal the filter's effect, while areas filled with black conceal it.
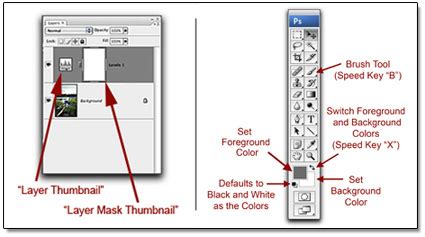
This mask allows you to selectively apply filter effects to specific parts of your text or image. For instance, you could choose to hide the Gaussian Blur effect from certain words within a text layer, making them appear sharp while the rest of the text remains blurred. To achieve this, you would select the layer mask, fill the desired area with black using Photoshop's Fill command or painting with a black brush, and then deselect the area.
It's important to note that this mask applies to all Smart Filters applied to that Smart Object collectively. You cannot mask individual Smart Filters within a Smart Object. However, you can paint on this filter mask to control where the combined effect of all applied Smart Filters is visible. For more advanced masking, you can create selections within the Channels panel and load them as masks for your filter effects, allowing for precise control over the application of your filters.
Beyond Smart Filters: Other Methods of Applying Filters
While Smart Filters are the premier method for non-destructive filtering, Photoshop offers other ways to apply filters, each with its own use cases.
The Filter Gallery: Previewing and Experimenting
The Filter Gallery provides a visual playground for exploring Photoshop's extensive filter library. It allows you to see a preview of how a particular filter will affect your image before committing to the application. Within the gallery, you can not only preview individual filters but also see icons representing their effects, speeding up the process of finding the right tool.
Crucially, the Filter Gallery allows for the application of multiple filters in sequence and offers some level of layer-based manipulation. You can adjust filter settings directly within the gallery and even apply them to specific selections within your image. This makes the Filter Gallery an excellent starting point for experimentation, especially when you're unsure of the exact filter or settings to use. The ability to zoom in and out of the image within the gallery further aids in evaluating the filter's impact.
Adjustment Layers: Photo Filters for Color Grading
Photoshop's adjustment layers offer a dedicated tool for color manipulation, including "Photo Filters." These filters are essentially color presets that can dramatically alter the mood and atmosphere of an image. When you apply a Photo Filter adjustment layer, you can choose from a range of presets or select a custom color using the Color Picker.
It's important to remember that adjustment layers affect all layers below them in the layer stack. This means a Photo Filter applied at the top of your layer stack will influence every layer beneath it. You can also adjust the "Preserve Luminosity" setting, which controls how the filter impacts the brightness of the image. Photo Filters are particularly useful for quickly adding a specific color cast or correcting color imbalances in your photos.
Standard Filter Application (Destructive)
While not recommended for critical edits due to their destructive nature, standard filter application still exists. This involves selecting a pixel-based layer and applying a filter directly from the Filter menu. The effect permanently alters the pixels of that layer. This method is best reserved for situations where you are certain about the effect and do not anticipate needing to make further adjustments to the filter's parameters.
Understanding Filter Compatibility and Limitations
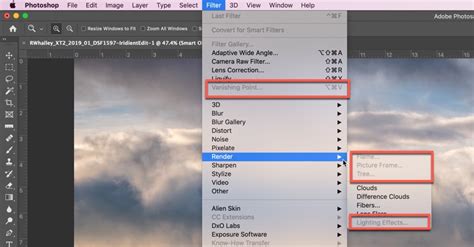
Most Photoshop filters can be applied as Smart Filters, provided the layer is a Smart Object. However, there are a few exceptions. Filters such as Lens Blur, Flame Picture Frame, Trees, and Vanishing Point are not compatible with Smart Filters. When working with Smart Objects, you can expand or collapse the view of applied Smart Filters by clicking the triangle next to the Smart Filter icon in the Layers panel.
In summary, mastering Photoshop filters, particularly through the use of Smart Filters and Smart Objects, is fundamental to a flexible and efficient non-destructive editing workflow. This approach empowers you to experiment freely, refine your creative vision, and achieve professional-quality results without compromising the integrity of your original image data.