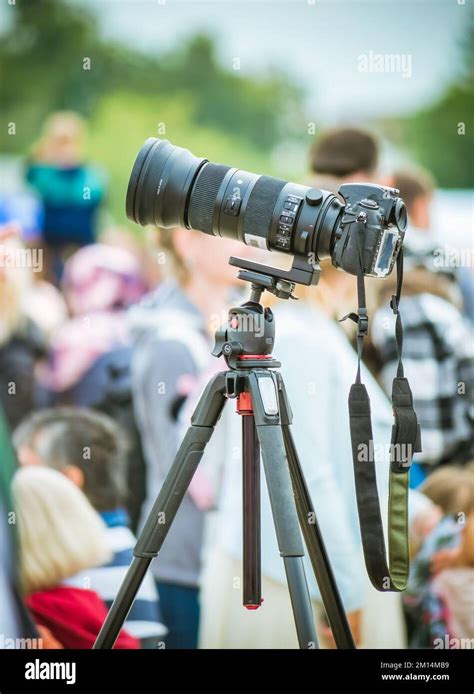
Achieving a pleasing background blur, often referred to as "bokeh," is a highly sought-after effect in photography. This aesthetic quality helps to isolate the subject from its surroundings, drawing the viewer's eye and adding a professional polish to an image. While the ideal scenario involves using specialized lenses with ultra-wide apertures, such as short telephoto primes, to capture this effect directly in-camera, not every photographer has access to such equipment or the ideal shooting conditions. Factors like bright sunlight might necessitate shooting at a narrower aperture, or a travel lens might lack the necessary focal length and aperture range. Fortunately, Adobe Photoshop offers powerful tools to simulate this shallow depth of field effect, allowing photographers to enhance their images in post-production. This tutorial will guide you through the process of creating convincing lens blur in Photoshop, exploring the underlying principles and practical techniques.
Understanding the Principles of Depth of Field
Before diving into Photoshop, it's crucial to understand what causes depth of field blur in real-world photography. Depth of field refers to the range of distance within a scene that appears acceptably sharp in a photograph. A shallow depth of field means only a narrow range is in focus, while the areas in front of and behind the focal plane become progressively blurred. This effect is influenced by several factors:
- Aperture: A wider aperture (smaller f-number, e.g., f/1.8) creates a shallower depth of field, leading to more background blur.
- Focal Length: Longer focal lengths tend to compress the scene and can enhance the perception of background blur.
- Subject Distance: The closer the subject is to the camera, the shallower the depth of field.
- Distance to Background: The greater the distance between the subject and the background, the more pronounced the blur will be.
When a two-dimensional photograph is created, the crucial third dimension - the spatial dimension of distance to the lens - is lost. Photoshop's Lens Blur filter, however, allows us to recreate this information, essentially guiding the software on which parts of the image should be blurred and to what extent.
Photoshop's Lens Blur Filter: A Powerful Tool
While Photoshop offers various blurring filters, such as the ubiquitous Gaussian Blur, they often lack the nuanced control required for realistic depth of field simulation. Gaussian Blur, while useful for general softening, typically requires the use of layer masks to achieve selective blurring and doesn't inherently understand the concept of distance within an image.
Photoshop's Lens Blur filter, available since Photoshop CS, provides a more sophisticated approach. It allows for a much greater degree of control over the blurring effect, particularly when combined with a "depth map." A depth map is essentially a grayscale image that tells Photoshop how much blur to apply to different areas of your photograph. The brighter the area on the depth map, the less blur is applied; conversely, the darker the area, the more blur is applied.
Photoshop Tutorial : Bokeh Effect
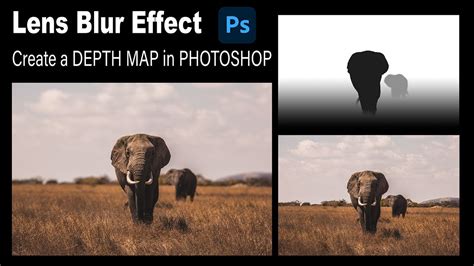
Creating a Depth Map: The Key to Realistic Blur
The core of achieving a convincing lens blur effect in Photoshop lies in creating an accurate depth map. This map will inform the Lens Blur filter about the relative distances of different elements within your image. Here's a step-by-step process:
1. Duplicate Your Background Layer
Before making any modifications, it's essential to preserve your original image. In the Layers palette, right-click on the "Background" layer and select "Duplicate Layer," or use the keyboard shortcut Ctrl+J (Windows) / Command+J (Mac). This ensures you can always revert to the original if needed.
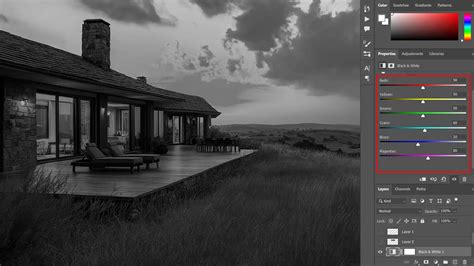
2. Utilize the Channels Palette for Depth Mapping
The Channels palette (Window > Channels) is where we'll construct our depth map. You'll see the composite "RGB" channel and the individual "Red," "Green," and "Blue" color channels.
- Add a New Channel: Click the "Create new channel" icon at the bottom of the Channels palette. This will create a new channel, typically named "Alpha 1," and your image will turn black. This "Alpha 1" channel will serve as our canvas for the depth map.
- Understanding Alpha Channels: Alpha channels function as selections. In the context of the Lens Blur filter, black areas on the alpha channel will receive full blur, white areas will remain sharp, and shades of gray will result in varying degrees of blur.
- Making the RGB Channel Visible: To better visualize your work on the black alpha channel, click the empty box to the left of the "RGB" channel in the Channels palette. This will make the composite RGB image visible, overlaid with a red tint on the "Alpha 1" channel. This red tint indicates areas that are currently pure black on the alpha channel, meaning they will be fully blurred.
3. Painting Your Depth Map
Now, you'll use a brush tool to paint on the "Alpha 1" channel, defining the areas that should remain in focus.
- Brush Tool Settings: Select the Brush Tool (B). Set your brush color to white and adjust its opacity. For initial work, an opacity of around 50% is often useful. You can control brush size with the left and right bracket keys
[and]. To create softer edges for your brush, hold down Shift while pressing the left bracket key. - Painting for Focus: Begin painting over the areas of your image that you want to keep sharp. As you paint with white, the red overlay will disappear, indicating that these areas are becoming white on the alpha channel and will therefore be less blurred.
- Strategic Painting: Focus on the main subject, especially critical details like the eyes. Areas that are further away from the focal plane should be left darker or painted with lower opacity white. The goal is to create a grayscale representation of the scene's depth.
- Viewing the Depth Map: To see your depth map clearly, click the "eyeball" icon next to the "RGB" channel in the Channels palette to temporarily turn off the color channels. You will now see your alpha channel as a black and white image, showing exactly where you have applied white and gray.
4. Preparing for the Lens Blur Filter
Once you are satisfied with your depth map:
- Return to Layers: Go back to the Layers palette. Ensure your duplicated layer ("Layer 1") is selected.
- Select the RGB Channel: In the Channels palette, click directly on the "RGB" channel at the top to re-select it. This ensures that when you apply the filter, it affects the color image, not just the alpha channel.
Applying the Lens Blur Filter
With your depth map created and your layer prepared, you can now apply the Lens Blur filter.
- Access the Filter: Navigate to Filter > Blur > Lens Blur. This will open the Lens Blur dialog box.
- Depth Map Source: In the dialog box, under the "Depth Map" section, you'll find a "Source" option. By default, it might be set to "None" or something else. To use the depth map you just created, select your "Alpha 1" channel from the dropdown menu. Important Note: By default, the Lens Blur filter interprets black as "no blur" and white as "full blur." This is the opposite of how we constructed our depth map. To correct this, you will need to use the "Invert" option within the filter settings or adjust your depth map accordingly (painting white where you want blur, black where you want focus).
- Blur Focal Distance: This slider allows you to fine-tune which part of the image stays sharp. Pixels closer to this focal distance will remain clearer, while those further away will blur more. You can adjust this interactively within the dialog box.
- Radius: This slider controls the overall strength of the blur effect. Increasing the radius value will result in more significant blurring. Experiment with this value until you achieve the desired level of background blur.
- Iris Options (Bokeh Shape): The "Iris" section allows you to control the shape of the out-of-focus highlights (bokeh).
- Shape: Choose from various shapes (e.g., hexagon, octagon) to mimic the aperture blades of different lenses.
- Radius: Adjusts the overall strength of the bokeh effect.
- Blade Curvature: Controls the roundness of the aperture blades.
- Rotation: Determines the orientation of the bokeh shapes.
- Specular Highlights: This section allows you to control how bright highlights in the blurred areas are rendered. You can adjust their brightness and threshold.
- Noise: You can add noise to the blurred areas to help them blend more naturally with the sharper parts of the image, especially if the original image has noise. This can prevent the blurred areas from looking too smooth and artificial.
- Preview: Ensure the "Preview" checkbox is enabled to see the effect in real-time. You can choose between a faster, less accurate preview or a more accurate, slower preview depending on your system's performance.
- Apply the Blur: Once you are happy with the settings, click "OK" to apply the Lens Blur filter to your image.
Refining the Blur and Advanced Techniques
The Lens Blur filter is powerful, but sometimes further refinement is necessary.
Using Layer Masks for Precision
If the Lens Blur filter has blurred areas you wanted to keep sharp, or vice versa, you can refine the effect using a layer mask.
- Create a Layer Mask: With your blurred layer selected, click the "Add layer mask" icon at the bottom of the Layers palette.
- Paint on the Mask: Select the Brush Tool (B) with black as your foreground color. Paint over any areas where you want to reduce or remove the blur. Painting with white will restore the blur. This allows for very precise control over where the blur is applied.
Alternative Selection Methods for Depth Maps
While the Channels palette method is robust, other selection techniques can also be used to generate depth maps, especially for simpler scenes or when you want to create a gradient of blur:
- Quick Selection Tool & Refine Edge: You can use the Quick Selection Tool to isolate your subject. Then, use the "Refine Edge" option to soften the selection's borders, creating a smoother transition. Outputting this selection as a "New Layer with Layer Mask" can serve as a basic depth map where the masked area is sharp and the rest is blurred.
- Gradient Tool: For scenes where the blur should transition smoothly from foreground to background, you can create a selection and then apply a gradient to it. This can then be converted into a depth map.
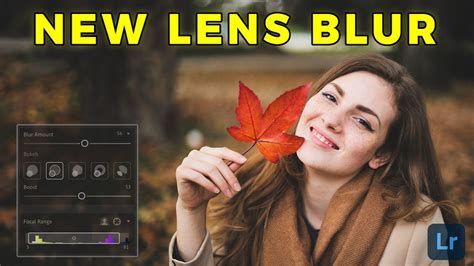
Lightroom's AI-Powered Lens Blur
Adobe Lightroom has also introduced an AI-powered Lens Blur tool. This feature can automatically detect the subject and apply a pleasing blur to the background. You can then adjust the "Bokeh" shape and "Blur amount" using sliders. Lightroom also allows you to "Copy Edit settings" to apply the same blur to multiple images, streamlining your workflow.
When to Use Photoshop's Lens Blur
While the goal is often to achieve desired effects in-camera, Photoshop's Lens Blur filter is an invaluable tool when:
- Ideal Lenses Are Unavailable: You don't have access to fast prime lenses or the specific focal length needed.
- Shooting Conditions Are Limiting: Bright light forces a smaller aperture, or you can't get close enough to your subject.
- Precise Control is Required: You need to fine-tune the depth of field for artistic or compositional reasons.
- Correcting or Enhancing Existing Blur: You want to subtly enhance the blur in an already-shot image.
However, it's important to remember that simulating blur in post-production can sometimes lead to artificial-looking results if not done carefully. Over-blurring or creating an unnatural transition can detract from the image. Therefore, always strive for the best possible capture in-camera and use Photoshop as a tool to enhance, correct, or achieve effects that were not possible during the shoot. The key is to understand the underlying principles of depth of field and to use Photoshop's tools with intention and subtlety.