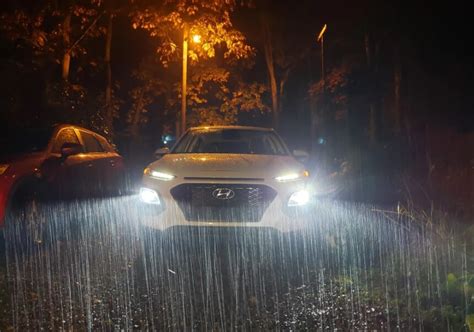
Adding realistic lighting effects to images can significantly enhance their visual impact, transforming a static photograph into a dynamic scene. This tutorial focuses on a powerful technique for achieving this: the realistic addition of headlights to a car within the Photopea editing environment. Whether you've inadvertently missed capturing your car's headlights in a photo or simply wish to imbue your images with a sense of motion and presence, this guide will equip you with the knowledge to achieve a professional, compelling result. We will explore various methods, from simple glow effects to more complex lens flare simulations, ensuring a thorough understanding of the process.
The Foundation: Understanding Light and Its Representation
Before diving into the technical steps, it's crucial to grasp the fundamental principles of light as it appears in photography. Light sources, like car headlights, don't just emit a flat beam; they create a complex interplay of brightness, color, and diffusion. Understanding these characteristics is key to creating a believable effect.
- Brightness Gradient: Light is brightest at its source and gradually diminishes with distance. This creates a natural gradient of illumination.
- Color Cast: Light sources often cast a subtle color onto surrounding surfaces. For headlights, this is typically a cool white or a slight blue hue.
- Diffusion and Glow: Even a focused beam of light has a degree of diffusion, resulting in a soft glow around the immediate source. This glow can be influenced by atmospheric conditions like fog or dust.
- Reflection: Light bounces off surfaces. This means that even if the primary light source isn't directly visible, its presence can be inferred from reflections on the car's bodywork or the road.
Method 1: Simulating Headlight Glow with Layer Effects
This approach focuses on creating a subtle yet effective glow around the headlight area, giving the impression that the lights are on. This method is particularly useful for enhancing existing headlight housings or for scenarios where a full lens flare might be too dramatic.
Step 1: Prepare Your Canvas and Select the Light Source Area
Begin by opening your car image in Photopea. The first crucial step is to identify and select the area where the headlight illumination will originate. This selection will act as the foundation for your light effect.
Step 2: Employing Field Blur for Directional Light
Nace utilizes the Field Blur tool to precisely control the direction of the simulated light. By adjusting the small dial within this tool, you can easily dictate where the light appears to emanate from. This offers a more sophisticated control over the light's path than simple radial blurs. Furthermore, if you need to reposition or transform the selected area, the Ctrl/Cmd + T (Free Transform) tool provides the flexibility to do so.
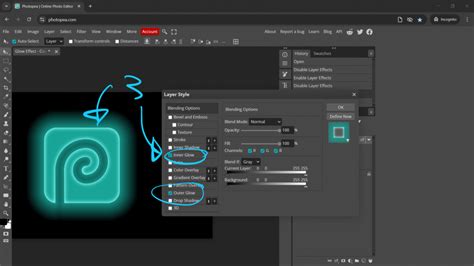
Step 3: Adding a Subtle Outer Glow
The final touch in this method involves adding a gentle glow. This is achieved by using a layer effect, specifically the Outer Glow option. You can select any color for this glow, but for realistic headlights, a soft yellow or a cool white is generally recommended. Nace opts for a soft yellow, which can simulate the warm quality of older incandescent headlights or a subtle warmth even in modern LED lights.
Method 2: Creating Realistic LED Headlights with Brushwork and Blending Options
This method delves into a more detailed approach, ideal for replicating the crispness and intensity of modern LED headlights. It involves manual painting and careful adjustment of blending modes and layer styles.
Step 1: Setting the Stage - Color and Brush Selection
Begin by choosing a white color or sampling the exact color of the LED light from a reference photo. While pure white is common, slight variations can add realism. Once your color is selected, choose the Brush Tool. Ensure your brush has 0% hardness for a soft, diffused effect. You can maintain opacity and flow at 100% for strong application, or reduce them for more delicate control over the glow intensity.
Step 2: Painting the Light Source
With your chosen color and brush settings, begin painting the LED lights. Focus on the area where the light would be most intense. After painting, deselect the area using Ctrl+D (Command+D). Zoom out to assess the effect. If the light appears too sharp or artificial, you can undo the step or apply a Gaussian Blur with varying degrees until it looks natural and aligns with your reference. This process will establish an outline of your LED headlight.
Step 3: Enhancing the Glow with Outer Glow
Now, it's time to add a glow emanating from the light source you've just created. In the Layers Palette, locate the fx icon for blending options and select “Outer Glow.” Ensure the Outer Glow color matches your light source color. Adjust the opacity, spread, and size of the outer glow. The exact settings will depend on the desired look, but aim for a subtle and natural effect. Click “OK” to apply.
Step 4: Refining the Brightness with Opacity Adjustment
To prevent the simulated light from appearing overly bright or artificial, navigate to your headlights layer and reduce its opacity to about 75-85%. This adjustment allows details beneath the light layer to remain visible, contributing to a more integrated and believable effect. Even a subtle detail within the headlight housing can be seen, adding depth.
Step 5: Adding Flare - The Bonus Step
For an extra touch of dynamism, you can add a "flare" effect.
- Duplicate the Layer: Right-click (Ctrl+click) on your headlights layer and choose “Duplicate Layer.” This new layer will intensify the brightness.
- Apply Motion Blur: Go to Filter > Blur > Motion Blur on your duplicated layer. Reduce the distance to zero and then gradually increase it. Observe how the effect changes. This creates an offset blur, giving the impression of light streaking or having a dynamic quality. A common setting is to keep the angle at zero and the distance around 40-50.
Method 3: The Lens Flare Filter Approach
This method offers a quick yet effective way to simulate bright light sources, particularly useful for creating the effect of headlights turning on. It leverages Photopea's built-in filters.
Step 1: Setting Up the Base Layer
The Lens Flare filter requires a non-blank layer to function correctly. Therefore, the first step is to create a new layer (Ctrl+Shift+N/Cmd+Shift+N) and fill it with black. You can achieve this by setting your foreground color to black (press D) and then filling the layer with the foreground color (Alt+Backspace/Opt+Delete).
Step 2: Applying the Lens Flare Filter
Change the blend mode of this black layer to Screen. This is a crucial step, as the "Screen" blend mode makes black pixels transparent, allowing the underlying image to show through. Now, go to Filter > Render > Lens Flare. Set the brightness to 100% and select the “Movie Prime” lens type. This will generate a bright, circular light source that will serve as your headlight. Press “OK.”
Step 3: Positioning the Lens Flare
Activate the Free Transform tool (Ctrl+T/Cmd+T). Zoom out of your image (Ctrl+(-)) and position the generated lens flare precisely where the headlight should be. You will likely need to do this for each headlight individually.
Step 4: Duplicating for the Second Headlight
To create the second headlight, duplicate the layer containing the lens flare (Ctrl+J/Cmd+J). Use the Free Transform tool again to move this duplicated flare to the correct position for the other headlight.
Bonus Step: Adjusting Brightness and Intensity
If the lens flare appears too intense, you can reduce the opacity of the layer. Conversely, to increase the brightness or create a more pronounced effect, you can duplicate the lens flare layers. Holding Ctrl/Cmd and clicking on both layers, then pressing Ctrl+J/Cmd+J, will duplicate both simultaneously. You can then further adjust the combined opacity as needed. A common adjustment might be to reduce the opacity to around 42% for a balanced look.
Photopea Tutorial - Realistic Glowing lights in 3 EASY steps
Method 4: Advanced Glow and Diffusion Techniques
This method focuses on building up glow effects gradually through multiple layers and blending modes, offering a high degree of control and realism.
Step 1: Building the Glow in Layers
The key to achieving a realistic glow is to build it up over a series of layers. Start with the darkest color and the largest brush size. Set your brush’s center directly over the spot where the glow would be brightest. This initial layer might appear as a light blue tint, especially when using the Screen blending mode, which allows darker colors to create a subtle glow.
Step 2: Stepping Down in Brush Size and Up in Color Brightness
As you add more glow, you progressively decrease the brush size and select progressively lighter shades of your chosen color. Use the same technique: center the brush on the brightest point and click. This layered approach mimics how light intensifies at its core.
Step 3: Repeating for Depth and Nuance
You can add as many layers and steps in the light as you need to achieve the desired depth and nuance. This iterative process allows for fine-tuning the light's intensity and spread.
Step 4: Utilizing Layer Masks and Gradients
To further refine the effect and integrate it seamlessly with the car's surface, consider using Layer Masks. Add a layer mask to your glow layer by clicking the Layer Mask icon. Then, use the Gradient Tool (pressing Shift+G several times to cycle through options) to create more realistic transitions and control the fall-off of the light. Experiment with the Radial menu, adjusting parameters like Amount (80-85%), Blur Method (Zoom), and Quality (Best or Good).
Step 5: Grouping for Organization
To keep your layers organized, especially when using multiple layers for glow, create a Group for your headlight effects. This makes it easier to manage, adjust, and duplicate the entire effect.
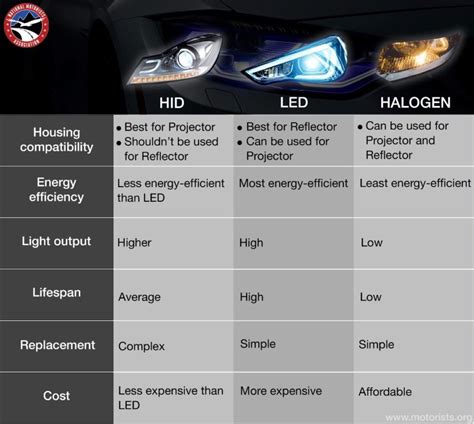
Considerations for Different Light Types
While the methods above are generally applicable, consider the specific type of headlight you are simulating:
- Incandescent Bulbs: Tend to produce a warmer, more yellowish light with a softer glow.
- Halogen Bulbs: Offer a brighter, whiter light than incandescent bulbs, with a more defined beam.
- LED Headlights: Known for their crisp, bright white or bluish light, often with a very sharp cutoff and distinct individual light elements.
- Xenon (HID) Headlights: Produce a very bright, bluish-white light, often with a characteristic "flicker" or "arc" effect.
Final Refinements and Creative Adjustments
Regardless of the primary method used, several final adjustments can enhance the realism:
- Hue/Saturation Adjustment Layer: After creating your initial light effect, add a Hue/Saturation adjustment layer above your headlight layers. This allows you to fine-tune the color and brightness of the light precisely. You can adjust the hue slider to shift the color cast, saturation to control its intensity, and lightness to modify its overall brightness.
- Opacity Control: As mentioned, reducing the opacity of your headlight layers is crucial. This prevents the light from looking "painted on" and allows underlying details to show through, making the effect more integrated.
- Duplication for Intensity: If more brightness is required, duplicating the layers that create the light and glow effect can significantly increase their intensity.
This comprehensive approach, combining various techniques and understanding the nuances of light, allows you to transform ordinary car photographs into visually compelling images with realistic and dynamic headlight illumination in Photopea. Remember that practice and experimentation with different settings and methods are key to mastering these effects.