Creating a realistic and eye-catching chrome effect in Adobe Photoshop is a sought-after skill for designers and digital artists. This tutorial delves into the techniques, offering a step-by-step guide that can be adapted for various elements, from text to logos and beyond. We will explore how to imbue your creations with the characteristic sheen and reflectivity of polished metal, transforming flat designs into dynamic, metallic masterpieces.
Initial Setup and Text Creation
The journey to a convincing chrome effect begins with a solid foundation. For this tutorial, we'll start by creating a new image document. A canvas size of 600x600 pixels is a good starting point, providing ample space for experimentation without being overwhelmingly large. Crucially, this canvas should have a black background. This dark base is essential for making the reflective qualities of chrome pop, as it mimics the way chrome reflects its surroundings, including darker tones.
Once the canvas is prepared, the next step is to introduce your text. Select a font that lends itself well to a metallic treatment. Fonts with strong, defined shapes often yield the best results. For instance, the font Bebas Neue Bold, with its clean lines and bold stature, is an excellent choice. Set the font size to approximately 220 pt, and adjust the kerning to optical to ensure even spacing between characters. Type your desired text onto this black background.

After you have the text precisely as you envision it, it's time to convert it into a format that allows for more advanced manipulation. This is achieved by rasterizing the text layer. In the Photoshop Layers palette, right-click on the text layer and select "Rasterize Layer." This process converts the editable text into pixels, enabling filters and selections to be applied directly.
Harnessing Selections and Channels for Detail
With the text rasterized, we can now leverage Photoshop's powerful selection tools to isolate specific areas for detailed editing. Control-click on the thumbnail of one of the rasterized text layers in the Layers palette. This action will generate a selection around the active pixels of that layer, effectively outlining your text.
The next crucial step involves working with channels. Navigate to the Channels menu in Photoshop. With your text selection active, save this selection as a new channel. This creates a grayscale representation of your selection, which can be used as a mask or to refine the selection further. This technique is fundamental for controlling where subsequent effects are applied, allowing for nuanced control over the chrome's appearance.
Applying Filters for a Rough Chrome Base
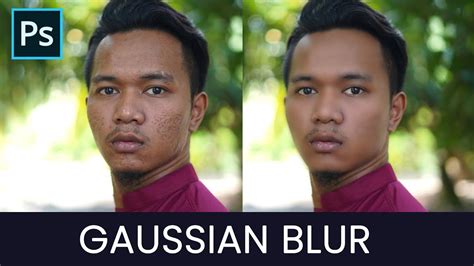
To begin simulating the metallic texture, we'll apply a series of filters. After the initial selection and channel saving, the image might appear a little rough. This is a common occurrence and a necessary precursor to smoothing. To address this, apply a Gaussian Blur of approximately 2 pixels to the layer. This subtle blur will soften any harsh edges and create a more uniform base for the chrome effect, preparing it for further refinement.
Adjusting Curves for Reflectivity
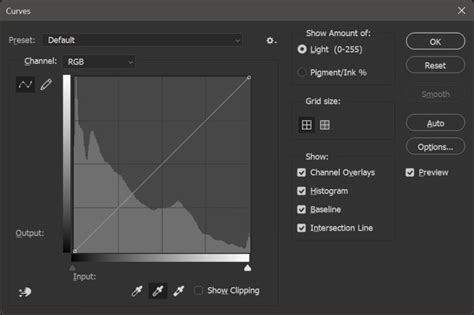
The core of achieving a realistic chrome look lies in manipulating highlights and shadows, and the Curves adjustment is the perfect tool for this. While still working on the top layer, access the Curves adjustment tool. The goal here is to sculpt the tonal range of your text to mimic the way light reflects off a polished chrome surface.
By adjusting the curve, you can dramatically increase contrast, pushing the dark areas deeper and the bright areas more intensely luminous. Experiment with the curve by dragging points. Pulling the curve upwards on the right side will brighten the highlights, while pulling it downwards on the left will deepen the shadows. This process is iterative; you'll likely need to make several adjustments to achieve the desired metallic sheen. After you have adjusted your curves, your image will begin to take on a more pronounced chrome-like appearance.
The Plastic Wrap Filter: Adding a Unique Sheen
A distinctive and effective filter for enhancing the chrome effect is the Plastic Wrap filter. This filter, found under the "Filter" menu, then "Artistic," and finally "Plastic Wrap," can add a unique, slightly textured sheen that complements the metallic look. When applying the Plastic Wrap filter, set all its levels-Detail, Highlight Strength, and Smoothness-to their maximum values. This will create a pronounced, almost liquid-like surface quality that enhances the reflectivity.
Alternative Approaches: Layer Styles and Patterns
While the above method provides a robust way to create a chrome effect, Photoshop offers alternative routes that can be quicker and equally effective, particularly when aiming for a polished, ready-to-use result. One such approach involves utilizing layer styles.
To begin this alternative method, create a new document. A larger canvas, such as 2880x1800 pixels, is suitable if you intend to use the effect as a desktop wallpaper. Fill this new layer with black using the Paint Bucket Tool.
Next, go to "Filter > Noise > Add Noise." Apply a small amount of noise to create a subtle texture. Duplicate this layer. Then, select the top layer and go to "Edit > Transform > Flip Horizontal." Group these two noise layers together.
Now, apply a layer style to this group. Select the group and navigate to "Layer > Layer Style > Blending Options." Within the Blending Options, you can configure various settings such as Bevel & Emboss, Inner Shadow, Inner Glow, and Satin to sculpt the metallic appearance. These settings will vary depending on the specific type and size of your symbol or text, so it's crucial to experiment with the values until you achieve the best result. Pay close attention to the way highlights and shadows are rendered.
Gradient Chrome Text Effect in Photoshop
Enhancing Shine and Glow
To further enhance the realism of the chrome effect, especially when using layer styles, you can introduce additional layers for shine and glow. Select all the layers involved in your chrome effect and duplicate them. Merge all these newly duplicated layers into a single layer.
Apply a Gaussian Blur to this merged layer, using an amount of approximately 15 pixels. After blurring, change the Blend Mode of this layer to "Screen." This blend mode will allow the blurred highlights to spread and create a luminous glow.
Finally, add a Layer Mask to this blurred layer. This mask allows you to selectively reveal or hide the glow effect, giving you precise control over where the shine appears. By carefully painting on the layer mask (using black to hide and white to reveal), you can direct the shine to specific areas, making the chrome look more dynamic and realistic. The last step of adding this shine and glow is key to achieving a truly convincing metallic finish.
Leveraging Pre-made Assets and Actions
For those seeking to save time or explore a wider range of metallic finishes, pre-made assets and Photoshop Actions are invaluable resources. There are numerous bundles available that offer pre-designed chrome text effects. These often include various metallic styles like steel, copper, and bronze, all packaged for quick application. Some packs might even feature a diverse array of textures, including gold foil, red foil, chrome metal, and wood, conveniently consolidated within a single PSD file.
Similarly, for Adobe Illustrator users, there are sets of metallic layer styles that can be applied with a single click, streamlining the design process. These pre-configured styles can provide a professional-looking chrome effect without the need for extensive manual adjustments.
Understanding the Fundamentals: Gradients and Patterns
At its core, creating a chrome effect often involves understanding how gradients and patterns contribute to the illusion of reflectivity. A chrome gradient in Photoshop can be built from scratch by defining a series of colors that mimic the way light bounces off a curved metallic surface. This typically involves a gradient that moves from dark grays to bright whites and back to dark grays, often with subtle color shifts to simulate ambient light.
Furthermore, filters like "ZigZag" (found under Filter > Distort > ZigZag) can be applied to images and then defined as patterns. These patterns can then be applied to layers, providing a base texture that, when combined with other layer effects, contributes to the overall chrome appearance.
The process of creating a chrome effect in Photoshop is a blend of technical skill and artistic intuition. By mastering selections, channels, adjustment layers like Curves, and strategically applying filters, you can achieve stunningly realistic metallic finishes. Whether you choose to build the effect from the ground up or utilize the efficiency of layer styles and pre-made assets, the principles of light, shadow, and reflection remain paramount. Remember that experimentation with settings is key, as the nuances of your design will influence the final outcome, ensuring a unique and compelling chrome effect every time.