Photographers dedicate countless hours to their craft, from the initial vision and meticulous composition to the nuanced art of editing and final export. However, if your photo backup strategy is an afterthought, you are perpetually one hardware failure or accidental deletion away from losing it all. In recognition of the critical importance of data preservation, this guide aims to equip you with the knowledge to establish a robust routine that effectively protects your Lightroom catalog and your extensive library of image files. This is the comprehensive resource that I wish I had possessed when photography transitioned from a casual pastime to a serious pursuit.
Many photographers mistakenly believe that simply backing up their image files is sufficient. Yet, for those who utilize Adobe Lightroom, the Lightroom catalog serves as the central repository of all information pertaining to how your photos are organized and edited. This catalog encapsulates vital metadata, virtual copies, curated collections, and every single adjustment made within the Develop module. The most secure and intelligent method for backing up your Lightroom catalog is to delegate this task to Lightroom itself.
Leveraging Lightroom's Built-in Backup Functionality
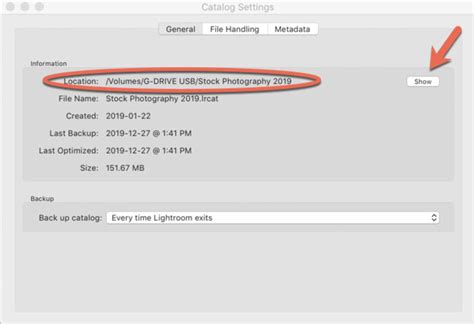
Within Lightroom, you can enable automatic backups by navigating to Preferences > Catalog Settings > General and selecting the option to back up Every Time Lightroom Exits. Consequently, upon closing Lightroom, you will be presented with a prompt, offering the choice to back up your catalog or to skip the backup for that particular session. When this prompt appears, it is highly recommended to ensure that both the “Test integrity before backing up” and “Optimize catalog after backing up” checkboxes are selected. These options are crucial for ensuring the health and efficiency of your catalog.
The "Test integrity before backing up" feature performs a diagnostic check on your catalog to identify any potential corruption before the backup process commences. This proactive measure can prevent the creation of a corrupted backup, which would be rendered useless. Similarly, "Optimize catalog after backing up" defragments and reorganizes your catalog's data, leading to improved performance and faster load times. For optimal performance and to minimize the risk of data loss, it is generally advisable to keep your Lightroom catalog on your computer’s internal drive. However, if you frequently work across multiple computers, maintaining your catalog on an external drive might offer greater portability. Regardless of the primary location of your catalog, it is imperative that your catalog backups are saved to a physically separate drive from your main catalog. As a best practice, periodically cleaning out older catalog backups is essential to free up valuable storage space.
The 3-2-1 Backup Strategy: A Gold Standard for Data Protection
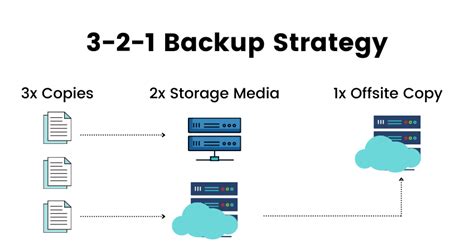
The 3-2-1 photo backup strategy is widely recognized as the gold standard for data protection, and for very good reason. It constructs multiple layers of security designed to safeguard against a wide spectrum of potential data loss scenarios, ranging from accidental deletions to catastrophic hardware failures. The foundational principle involves maintaining at least three copies of your data, stored on two different types of media, with at least one copy located offsite.
You begin with your primary copy, which represents the working version of your photo library - the environment where you import, cull, and edit your images. Subsequently, you create a secondary copy of these files. This could take the form of a separate external hard drive, a RAID array, or another local storage device that you mirror on a regular basis. This is where the third, offsite copy becomes indispensable. This version is housed in a completely different physical location, frequently leveraging cloud storage services such as Backblaze.
The rationale behind employing two distinct types of media is rooted in the concept of redundancy and minimizing single points of failure. If you were to back up both your original files and your secondary copy to the same brand of external hard drive, plugged into the identical power strip, and situated within the same room, you would not be effectively protecting your data. A single event, such as a power surge, flood, or hardware malfunction, could simultaneously compromise all your storage devices. The 3-2-1 strategy also effectively mitigates the impact of human error, a factor that is often overlooked. Accidentally deleting a folder? It happens. This comprehensive approach is not about succumbing to paranoia; rather, it is about diligent and intelligent preparation. Performing a backup once is a commendable step. However, implementing a structured backup methodology that accounts for multiple potential failure points provides a significantly more robust safeguard for your precious photographic work.
Understanding Storage Media: HDDs vs. SSDs and the Diversity Advantage
When it comes to storing and backing up your image files, not all drives and systems are created equal. Each offers distinct advantages and disadvantages concerning speed, capacity, and longevity. The optimal setup often hinges on two primary factors: the sheer volume of data you possess and your comfort level with technology.
Hard Disk Drives (HDDs) utilize spinning platters to store data. Having been a staple in data storage for decades, they offer high capacities at a relatively low cost, making them an excellent choice for large photo archives, particularly when lightning-fast access is not the paramount concern.
Solid State Drives (SSDs), on the other hand, employ flash memory and lack any moving parts. This design makes them faster, lighter, and more durable than HDDs, albeit at a higher cost per terabyte.
For most photographers, a combination of both HDDs and SSDs provides the best balance. HDDs are ideal for storing larger photo archives or for long-term backup and archival purposes where cost-effectiveness is a priority. SSDs are best suited for your working catalog, actively used image files, and any other data that benefits from rapid access.
The Diversity Advantage: Beyond a Single Brand
Here's a professional strategy that many photographers overlook: diversify your backup hardware. While all storage devices are susceptible to failure, utilizing drives from multiple manufacturers can shield you from systemic manufacturing defects. Imagine a scenario where a particular brand experiences a widespread production flaw; by incorporating drives from manufacturers like Western Digital, Seagate, and Samsung, for instance, you are effectively hedging your bets against such an eventuality.
Direct-Attached Storage (DAS) vs. Network-Attached Storage (NAS) for Lightroom
DAS (Direct-Attached Storage) functions precisely as its name suggests - it is a storage device that connects directly to your computer, typically via USB, USB-C, or Thunderbolt. DAS systems are highly compatible with Lightroom because the software can easily read from and write to locally attached storage. This direct connection ensures efficient data transfer and optimal performance.
NAS (Network-Attached Storage) presents a different scenario. While you can utilize Lightroom with a NAS for storing your image files, it is strongly advised not to store your Lightroom catalog on a NAS. The catalog must reside on a local drive for optimal performance. Furthermore, Lightroom does not perform optimally when accessing catalogs or files over a network connection. The software is designed for low-latency access to your files, a requirement that NAS devices often struggle to meet due to network overhead. Consequently, if you are a Lightroom user, it is best to avoid storing your catalog on a NAS. While storing image files on a NAS might be feasible, performance issues are frequently encountered.
NAS vs DAS: What's the Difference
RAID: Understanding Redundancy, Not a Replacement for Backup
RAID stands for Redundant Array of Independent Disks, and it is a method of combining multiple drives into a single logical system to enhance performance, provide fault tolerance, or both.
- RAID 0 (Striping): Combines two or more drives to increase read/write speeds. While offering excellent performance, it lacks redundancy; if a single drive fails, all data within the array is lost.
- RAID 1 (Mirroring): Mirrors data from one drive onto another. If one drive fails, the other drive still contains an exact copy of your data, ensuring continuity.
- RAID 5: Utilizes three or more drives with one drive dedicated to parity (recovery) data. It offers a balance between speed and fault tolerance, allowing the array to withstand the failure of a single drive.
- RAID 10 (1+0): Combines the mirroring capabilities of RAID 1 with the striping performance of RAID 0, offering both high performance and redundancy.
Parity is essentially a form of backup mathematics. In RAID 5, parity data is distributed across all drives, enabling the system to reconstruct lost data if one drive fails.
It is crucial to understand that RAID is a redundancy strategy, not a comprehensive backup solution. A true photo backup strategy necessitates the creation and maintenance of separate, independent copies of your data stored in different locations. RAID can be an integral component of your data protection strategy, but it should never be your sole line of defense.
RAID for the Non-Tech-Savvy User
For users who are less inclined towards complex technological setups, a DAS system (external hard drive) configured with RAID 1 or RAID 5, particularly one that is pre-configured or utilizes software like OWC SoftRAID, offers an excellent balance of protection and ease of use. Overly complex solutions are often unnecessary. If you prioritize the smoothest possible Lightroom experience, a DAS setup is generally the recommended path. Employing SSDs for speed, HDDs for bulk storage, and incorporating RAID only when additional layers of protection are desired is a well-rounded approach.
Cloud Storage: The Offsite Guardian of Your Memories
Offsite backups are an indispensable element of any photographer's data protection strategy, and cloud storage provides one of the most accessible and reliable solutions. Services like Backblaze, for instance, offer unlimited cloud storage for a reasonable annual fee. These services can automatically back up both your internal drive and any connected external drives, operating quietly in the background and updating your photo backups automatically as long as your drives are connected. While the initial upload of your entire library may require a significant amount of time, especially with slower internet connections or vast amounts of data, subsequent incremental updates are remarkably fast and effortless. The efficacy of such solutions is not merely theoretical; numerous professional photographers have successfully recovered their entire photo libraries thanks to services like Backblaze. This kind of real-world protection solidifies cloud backup as an essential layer in a comprehensive workflow. It is affordable, automated, and provides that crucial offsite component.

Proactive Hardware Management: When Drives Fail
Drives, whether they are external SSDs, HDDs, or RAID arrays, do not last forever. Drive failure is not a matter of if, but when. The frequency with which you should replace your drives is contingent upon your individual risk tolerance. Some photographers may push their hardware to its limits, while others prefer to adhere to a schedule for proactive hardware replacement to minimize the likelihood of unexpected failures.
- SSDs (Solid State Drives): Typically have a lifespan of 5 years or more, but it is prudent to monitor their performance for any signs of degradation.
- Cables and Adapters: These often-overlooked components can also become failure points. Regularly inspect and, if necessary, replace them.
- RAID Arrays: If a drive within a RAID array fails, it should be replaced immediately. Furthermore, consider proactively replacing all drives in the array once one has failed, as this can indicate a potential systemic issue or the onset of aging for the entire set.
Note: It is paramount to actively monitor the health of your drives. Tools such as CrystalDiskInfo (for Windows) and DriveDx (for Mac) can perform S.M.A.R.T. (Self-Monitoring, Analysis, and Reporting Technology) checks. These checks provide early warnings about potential drive failures by tracking critical metrics like read error rates, temperature, and spin-up time, enabling you to address emerging issues before they escalate into catastrophic data loss. Many of these diagnostic applications are available for free or at a low cost, making them an easily integrated addition to your digital preservation toolkit.
On-the-Go Backup Strategies: Staying Protected While Traveling
When you are on the road, your photo backup system needs to be lightweight, straightforward, and dependable, especially in environments where internet access may be unreliable.
- Manually or Automatically Copy Everything to a Second Drive: A common and effective practice is to back up the day’s images by duplicating them onto a second drive each evening.
- Physically Separate the Drives: This is a crucial step that many photographers overlook. Keep your primary working drive in your camera bag, and store the backup drive in a different location - perhaps in your jacket pocket, suitcase, or even with a trusted travel companion. When flying, it is advisable to keep one drive in your carry-on luggage and the other in your checked baggage. This approach ensures you have two physical copies of your work, which often provides sufficient protection for many short trips or in lower-risk environments.
- Optional Cloud Backup of Selects: If reliable Wi-Fi is available, consider exporting a few of your most critical RAW selects and uploading them to a cloud service like Dropbox or Google Drive.
The Lightroom Catalog: More Than Just a File List
The Lightroom Classic catalog is, in essence, a sophisticated database that meticulously tracks the location of your photos and stores a wealth of information about them. Every edit, rating, keyword assignment, collection organization, and any other modification you perform within Lightroom Classic is recorded and stored within this catalog file. Changes have been implemented in how image previews are stored, starting with version 13.3 of Lightroom Classic.
When using Lightroom Classic in conjunction with cloud synchronization services like Microsoft OneDrive or Apple iCloud Drive, it is important to be mindful of unintentionally consuming your online storage. It is strongly recommended not to store your Lightroom catalog in locations that are actively synchronized by these services, as this can lead to conflicts and potential catalog corruption.
When you install a newer version of Lightroom Classic, particularly a major version update, the application will typically prompt you to upgrade your catalog to ensure compatibility with the latest version. This process is essential for accommodating any database-related changes made to support new features and performance enhancements in the updated software. Lightroom Classic will automatically create a copy of your old catalog during this upgrade process. You can learn more about where your images are saved by consulting the documentation on opening files in Explorer or Finder. Upgrading your old catalog in the new version of Lightroom Classic is a straightforward process. If you encounter difficulties during the catalog upgrade, you can open the old catalog in your previous version of Lightroom Classic and then export it as a new catalog. This exported catalog can then be imported into the new version of Lightroom Classic.
To merge content from one catalog into another, you can use the File > Open Catalog command to select your master (or primary) catalog. Then, navigate to File > Import From Another Catalog to choose the catalog containing the photos you wish to add.
The most straightforward method for utilizing your Lightroom Classic catalog across multiple computers (such as a desktop and a laptop) is to keep both the catalog and the associated image files together on an external drive. Lightroom Classic also stores supplementary information in a new file with the .lrcat-data extension, located in the same folder as your primary catalog file. If this .lrcat-data file is missing or misplaced, any AI-driven edits applied to your images within Lightroom Classic may be permanently lost. If the corresponding .lrcat-data file is present, quit Lightroom Classic. If it is missing, choose to continue.
You have the flexibility to move your catalog to a different location on your computer's hard drive, to an external disk, or even to another computer entirely. To move a catalog between a Windows computer and a Mac, you will need to copy your catalog, .lrcat-data file, preview files, and image files from the original computer onto an external drive. After relocating your catalog, you may need to guide Lightroom Classic to its new location by following the instructions in the "Lightroom Classic can't find my catalog" documentation.
Catalog Compatibility and Renaming
It is important to note that catalogs in Lightroom Classic are not backward compatible. Beginning with the October 2024 release of Lightroom Classic (Version 14.0), you can rename your catalog directly from within the application by selecting File > Rename Catalog and entering the new desired name for the currently open catalog. When renaming a catalog through the application, you do not need to manually rename its corresponding .lrcat-data, preview, and smart preview files.
To export a specific folder as a separate catalog, right-click (Windows) or Control-click (macOS) on the desired folder within the Folders panel of the Library module and select the export option.
It is critical to remember that backing up your catalog does not, in itself, back up the original photo files it references. While you cannot directly sync smart previews of your photos from Lightroom Classic to the broader Lightroom ecosystem, you can sync them to the cloud-based Lightroom ecosystem.
When experiencing issues with Lightroom Classic not finding your catalog, the renamed catalog should typically appear as the first option in the Select Catalog dialog box.
Managing Missing Photos
If you move your images using Finder (macOS) or Windows Explorer outside of Lightroom Classic, your catalog may lose track of their location, leading to "missing photos." To prevent this, always move your image files from within Lightroom Classic itself, rather than through your operating system's file manager.
A Photographer's Workflow: Integrating Backups into Daily Practice
A user shared their evolving backup strategy, highlighting a common challenge faced by photographers as they increasingly rely on cataloging features:
"For the past few years, I have been editing my pictures in Lightroom, then I exported them in folders (by projects as well as "bests of", like "best of drone") that I backed up using the 3-2-1 method: each folder in several hard drives, and then on the cloud (OneDrive). As I am working in more "serious" projects, I am using the cataloging features of LR more and more. The collections, the keywords, etc. I am very happy with it but I need to rethink my backing up structure. I am contemplating backing up my catalogs on hard drives and on the cloud as well as the master folder where all the RAWs are located. It sounds like a doable solution since I can copy and paste the folders where the masters as well as the catalogs are located to hard drives easily. I can also set up the folders to be saved on OneDrive but I read it can mess up the LR catalogs. I can also delete from LR (and the drives) the unrated RAWs to save some space. I'm wondering if its the way to go. Besides that, I am looking for any feedbacks/methods on how to backup a LR catalog as well as the masters on drives and on the cloud so I can use my LR in case the computer crashes/gets stolen/etc. Any feedback would be more than appreciated."
Another user offered a concise approach: "First of all just use one Lightroom catalogue. You need to back up the image files and the catalogue file. They are separate things. Images are not stored in the catalogue. Edits, collection info etc are are stored in the catalogue. To back up just save a copy of all your image files to your backup location and copy the catalogue file (file extension .lrcat) to your backup location. That is it. You don't need to back up previews. If you choose to save presets with your catalogue they will be saved in the same folder as the catalogue file and can be easily backed up as well. Don't delete files to save space."
A clarifying suggestion was made: "Use the built-in Lightroom Classic backup feature, set it to daily or weekly or monthly, as your needs require. Make sure to check the important features in the backup dialog box that say "Test integrity before backing up" and "Optimize Catalog after backing up"."
A crucial point regarding the physical separation of backups was emphasized: "I would add to this that when you copy photo files to make a backup, or make backups of the catalog file, these backups must go to a different disk than the original. This is not optional."
Clarifying "Different Disk" and Cloud Backups
When asked to elaborate on the significance of backing up to a "different disk," the explanation was provided: "It doesn't have to be an external drive. If the catalog are on drive "A" then the backup of the catalog must be on some other drive, not drive "A". Same for the photos. Why?" The underlying principle is to avoid a single point of failure. If your primary drive fails, having a backup on the same drive renders the backup useless. This separation ensures that a hardware failure on your primary storage does not compromise your backup.
Regarding automated backups with OneDrive, the user inquired for elaboration. The core concept is that services like OneDrive can be configured to automatically synchronize specific folders to the cloud. If your Lightroom catalog is located within a folder that OneDrive is set to back up, then your catalog backups will be automatically uploaded to the cloud. However, it is vital to reiterate the caution against storing your working catalog directly in a folder synchronized by cloud services like OneDrive or iCloud Drive, as this can lead to corruption. Catalog backups, on the other hand, can safely reside in such folders.
Advanced Catalog Management and Troubleshooting
Users sometimes encounter situations where catalog backups take an unexpectedly long time to complete. A catalog with approximately 19,000 to 20,000 images is generally considered small and should ideally complete its backup process in under five minutes. If backups are taking significantly longer, it indicates a potential issue.
When a backup process is running, a small text message will often display the current phase (e.g., optimizing, zipping, copying). If the "copying" phase is consuming the majority of the time, it could suggest a problem with the destination drive. Running diagnostics on the destination drive is recommended, as a faulty cable or the drive itself could be the culprit.
The zipping process, if taking over an hour, is also an anomaly. A Lightroom catalog file (.lrcat) for a catalog of this size should typically be less than 4 GB, and even smaller when zipped. Factors that can contribute to larger catalog files include:
- Extensive use of masking and AI tools: These tools often generate a significant number of database entries due to their pixel-level operations.
- Numerous history states: Each edit adjustment creates a new record in the database, contributing to file size.
- Accumulation of orphaned records: In a relational database, some records may lose their connection to other tables. While not directly related to missing images, this can inflate the catalog size.
A potential solution for a bloated catalog is to use the “Export as a Catalog” function. This process creates a new catalog file, effectively cleaning out any orphaned records or unnecessary historical data that is not directly related to the images currently in your inventory. Before performing this export, it is advisable to use the "Find Missing Photos" function to identify and relink any lost image connections. When exporting, you will be prompted whether to export digital negatives (the actual image files). For this process, you should not export the negative files, as you are only aiming to create a cleaner catalog file.
When exporting to a new catalog, you can assign it a new name, such as "Catalog 2," to easily differentiate it from your original catalog. The "Export as a Catalog" dialog will allow you to specify a destination folder and a name for your new catalog. Ensure that all your external drives containing image files are mounted and accessible when you select "All Photographs" to ensure all images are included in the export. Your collection structure and keywords associated with the selected images will be preserved in the new catalog.
The Unseen Perils: Why Catalog Backups are Non-Negotiable
In any field that relies on digital technology, your photography and final images are susceptible to numerous issues related to file storage. The loss of files can result in the forfeiture of hours of work and, consequently, a loss of income. The following are just a few reasons why maintaining a backup of your Lightroom catalog is of paramount importance:
- Program and Computer Crashes: These unforeseen events can be particularly disastrous when they are accompanied by data loss.
- Computer Viruses: Malicious software can lead to corrupted or lost files, rendering your work inaccessible.
- Physical Damage and Theft: Theft, accidental drops, damage from electrical surges, and internal computer issues like unstable power supplies all pose significant threats to your device and, by extension, your files.
These potential disasters underscore the absolute necessity of a comprehensive backup plan.
Conclusion: A Layered Approach to Digital Asset Protection
Backup systems may not be the most glamorous aspect of being a photographer, but they are undeniably one of the most critical. If you value your photographic work, you must protect it. The good news is that establishing a solid photo backup system does not necessitate complexity or significant expense. By consistently backing up your Lightroom catalog from within Lightroom itself, enabling integrity checks, and proactively replacing aging hardware, you build a robust defense against data loss. There is no single "perfect" system, but there is undoubtedly a right system for your individual needs and workflow.