In the dynamic world of graphic design, the ability to manipulate and adapt image formats is paramount. As demand for graphics that can be resized without compromising quality grows significantly, Scalable Vector Graphics (SVG) has emerged as a crucial solution. This format enables designers to create images that remain sharp and clear at any scale, a stark contrast to the limitations of raster formats like PNG when resizing. If you are familiar with Adobe Photoshop, you are in luck, as this powerful software offers various tools and techniques to effectively transform PNG files into the versatile SVG format. This comprehensive guide will lead you through the process of converting PNG to SVG in Photoshop, offering valuable tips and tricks to enhance your design capabilities and make your images more versatile and high-quality.

The Fundamental Differences: Raster vs. Vector
Before diving into the conversion process, it's essential to grasp the core distinction between raster and vector image formats. This understanding is fundamental to appreciating why the PNG to SVG conversion is so valuable.
PNG: The Pixel-Based Powerhouse
PNG (Portable Network Graphics) is a raster graphic format widely utilized for images on the web. It excels at rendering photographs and images featuring intricate color gradients, offering a high degree of detail. However, PNGs are composed of a fixed number of pixels. When you resize or scale a raster image, the software must either add new pixels or discard existing ones, inevitably affecting the image's quality. This often results in the image appearing blurry or pixelated, diminishing its professional appeal. Even though Photoshop is primarily a raster graphics software, it possesses numerous tools and tricks to support vector elements.
SVG: The Mathematically Defined Marvel
In contrast, SVG (Scalable Vector Graphics) is a vector-based format. Instead of relying on pixels, SVG uses mathematical equations to define shapes, lines, and curves. This mathematical foundation means that SVG images can be resized to virtually any scale - from the size of a postage stamp to a billboard - without losing any detail or sharpness. This inherent scalability makes SVG the perfect choice for graphics such as icons, logos, and any design element that needs to maintain crispness across various applications and resolutions. Converting a PNG to an SVG essentially transforms a static, pixel-dependent image into a dynamic, infinitely scalable asset.
The significance of PNG to SVG conversion lies in its ability to bridge the gap between these two formats, allowing designers to leverage the convenience of PNG creation while benefiting from the adaptability of SVG.
Method 1: Manual Vectorization in Photoshop
While Photoshop is fundamentally a raster editor, it offers robust tools for creating and manipulating vector paths, enabling you to vectorize images manually. This method, though more time-consuming, offers a high degree of control and is particularly effective for simple images like logos, icons, and solid shapes.
Step 1: Isolate Your Image
The first crucial step is to separate the image you intend to vectorize from its background.
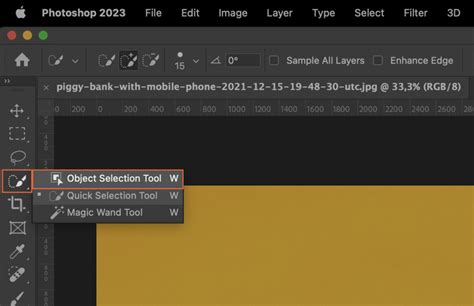
- Make a Selection: Using Photoshop's selection tools (such as the Magic Wand, Quick Selection Tool, or Lasso Tool), carefully create a selection around the image you want to convert. Precision here will save you time later.
- Copy to a New Layer: Once your selection is made, copy it and paste it onto a new, independent layer. This isolates the subject matter and ensures that any vectorization efforts are focused solely on your intended graphic, free from background interference.
Step 2: Create a Vector Mask
With your isolated image on its own layer, you can now begin the vectorization process by creating a vector mask.
- Select Create Vector Mask: With the layer containing your isolated image active, navigate to the
Layermenu, then selectVector Mask, and chooseCurrent Selection. Alternatively, if you have a selection active, you can click the "Create vector mask" icon at the bottom of the Layers panel. This action will generate a vector mask based on your selection.
Step 3: Refine the Path
The vector mask provides a foundational path, but it often requires refinement to achieve clean, precise vector lines.
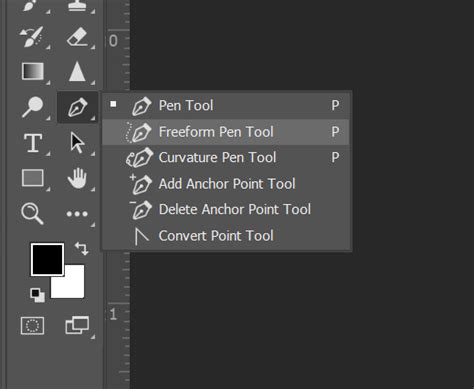
- Utilize the Pen Tool: Select the Pen Tool (P). Ensure that the vector mask is selected in the Layers panel. You can now click and drag to create and adjust anchor points and curves, meticulously tracing the edges of your image.
- Direct Selection Tool: The Direct Selection Tool (A) is invaluable for fine-tuning the anchor points and curves created by the Pen Tool. You can tweak individual anchor points, adjust the curvature of lines by manipulating their handles, or smooth out jagged edges to achieve a polished vector look. This iterative process of adjusting points and curves allows for significant precision.
Step 4: Export the Path as a Vector File
Once you are satisfied with the accuracy and smoothness of your vector path, it's time to export it into a usable vector format.
- Save As: Go to
File>Save As. - Choose File Format: In the "Save as type" dropdown menu, select
Photoshop EPS file format. EPS (Encapsulated PostScript) is a widely supported vector format that retains vector data. - Export As (Alternative): For more modern vector formats like SVG, you can use
File>Export>Export As. Here, you can directly choose SVG as your desired output format. This option is often preferred for web use.
Testing your newly created vector file in a vector editing tool or a web browser is crucial to ensure it renders exactly as intended, checking for any rendering artifacts or irregularities.
Method 2: Leveraging Photoshop Actions for Automation
For those seeking a more streamlined and automated approach, Photoshop Actions can be a game-changer. These pre-recorded sequences of commands can instantly transform your images into vector art, often utilizing techniques similar to manual vectorization but without requiring manual intervention.
Understanding Photoshop Actions
A Photoshop action is essentially a macro that records a series of editing steps. Once recorded, it can be replayed on any image, applying the same transformations automatically. This is particularly useful for batch processing or when you need to quickly vectorize multiple simple graphics.
Exploring Pre-made Actions
Several pre-made Photoshop actions are designed specifically for converting images to vector art, or even for "cartoonifying" them. These actions often employ sophisticated algorithms to detect edges and create vector paths.
- Quick Conversion Actions: Some actions follow a basic process for vectorizing simple images, similar to the manual method but automated. These are excellent for quickly turning logos, icons, and basic shapes into vector formats.
- Cartoonify Actions: Beyond simple vectorization, some actions can also stylize your images, giving them a cartoon-like appearance while retaining vector properties.
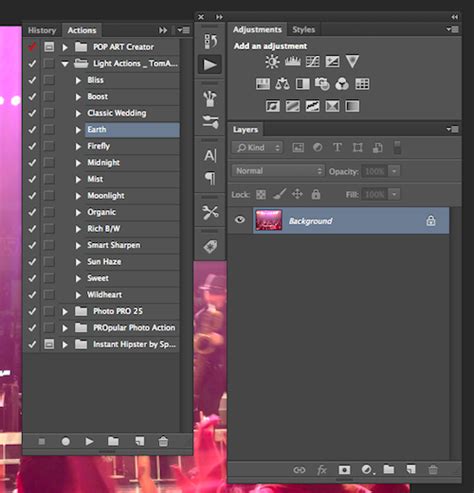
When using an action, the process is typically as simple as selecting the action from the Actions panel and clicking "Play." The action will then execute the recorded steps, transforming your current image into a vector graphic. You won't have to perform any of the manual work yourself.
Benefits of Using Actions
- Speed and Efficiency: Actions drastically reduce the time required for vectorization, making them ideal for projects with tight deadlines.
- Consistency: They ensure a consistent result across multiple images, applying the same settings and techniques every time.
- Ease of Use: For users who may not be highly proficient with Photoshop's manual vector tools, actions provide an accessible entry point into vectorization.
It's important to note that the effectiveness of these actions can vary depending on the complexity of the original image. They generally work best on images with clear lines and distinct color areas, such as logos and icons.
Method 3: Adobe Express - The Online Vector Converter
For a user-friendly, web-based solution, Adobe Express offers a powerful and convenient way to convert PNG files to SVG format. This method is particularly appealing for its simplicity and accessibility, requiring no software installation beyond a web browser.
The Adobe Express Workflow
The Adobe Express vector file converter is designed to make the conversion process as straightforward as possible, allowing for impressive edits on the go.
- Upload Your PNG: Easily upload your PNG image directly from your device to the Adobe Express converter.
- Instant Conversion: The tool will then convert your PNG to SVG in a matter of seconds.
- On-the-Go Editing: Before downloading, Adobe Express provides an editor where you can make further customizations. This includes applying filters, adding text or shapes, adjusting colors, and utilizing a wide array of expertly designed templates for inspiration. This allows you to refine your design and create a compelling image quickly.
How to convert PNG to SVG in Adobe Express (Graphic Shift)
Benefits of Adobe Express
- Simplicity: The interface is intuitive, making it accessible even for beginners.
- Speed: The conversion process is remarkably fast.
- Cloud-Based: No software installation is needed; access it from any device with an internet connection.
- Integrated Editor: The ability to edit and enhance the SVG directly within the platform adds significant value.
- Quality Preservation: Adobe Express's PNG to SVG converter is engineered to maintain as much quality from the original image as possible during the conversion.
Free Access
A significant advantage of Adobe Express is its free plan, which includes core features such as photo editing tools, various effects, and thousands of free templates. This makes it an excellent option for individuals and small businesses looking for cost-effective design solutions.
Converting PSD to SVG: An Illustrator Integration
If you are working within the Adobe ecosystem, you likely have access to both Photoshop and Adobe Illustrator. Converting a Photoshop (PSD) file to SVG is a process that often leverages the strengths of both programs, particularly Illustrator's advanced vector tracing capabilities.
The Illustrator Advantage
Adobe Illustrator is the industry standard for vector graphics, and its "Image Trace" function is exceptionally powerful for converting raster elements into editable vector paths.
The Conversion Process
- Open PSD in Illustrator: Begin by opening your Photoshop (PSD) file directly in Adobe Illustrator. If your PSD file is well-organized with distinct layers, Illustrator will preserve this structure, making the subsequent tracing process more manageable.
- Utilize Image Trace: Select the raster elements within your Illustrator document that you wish to vectorize. Then, navigate to
Object>Image Trace>Make. This command initiates Illustrator's sophisticated tracing engine. - Adjust Settings: The Image Trace panel offers a wealth of options to fine-tune the conversion. You can adjust parameters such as colors, paths, corners, and noise to achieve the optimal result for your specific image. Experimenting with different presets (like "Logo," "Black and White Logo," or "Sketches") can also yield excellent starting points.
- Expand and Save: Once you are satisfied with the traced result, you need to "expand" the trace to convert the traced paths into actual vector objects. Go to
Object>Image Trace>Expand. Your artwork is now composed of editable vector paths. Finally, save your work as an SVG file viaFile>Save Asand selecting SVG from the format options.
This method is particularly advantageous for complex designs originating in Photoshop that require robust vector conversion.
The Broader Benefits of Vectorizing Images
Learning to convert PNG images into SVG graphics in Photoshop, or through other related tools, is a highly valuable skill for any designer. It empowers you to transform images that are inherently limited in their scalability (like PNGs) into versatile, high-quality assets (like SVGs).
Scalability Without Sacrifice
The primary benefit, as discussed, is the ability to resize your graphics infinitely without any loss of quality. This means a logo created as an SVG will look equally sharp on a tiny app icon as it does on a large banner.
Editability and Flexibility
Vector files are inherently more editable than raster files. You can easily change colors, modify shapes, and adjust individual elements within an SVG file without affecting the overall image quality. This flexibility is crucial for branding consistency and adapting designs for different media.
Web Performance
SVGs are often favored for web design due to their small file sizes (especially for simpler graphics) and their ability to scale perfectly on different screen resolutions. This contributes to faster page loading times and a better user experience.
Design Versatility
By mastering PNG to SVG conversion, you unlock a new level of design versatility. You can take existing raster assets and repurpose them for applications where vector graphics are essential, such as in print design, laser cutting, or embroidery.
The more you practice and experiment with these conversion techniques, the more adept you will become at identifying the best methods for your specific projects and designs. The process encourages a deeper understanding of both raster and vector principles, ultimately enhancing your overall design capabilities and allowing your creative work to reach new and exciting places.