Are you someone who has always admired 2D animation in media, whether it be movies or shows? Inspired to bring your own creations to life, but don’t know where to start? Well, look no further! This guide, presented by Omnific, or Omni for short, is designed to introduce you to the fundamental principles of animation and how to effectively utilize Clip Studio Paint EX to realize your artistic visions.
Understanding the Fundamentals: Timing and Spacing
Before diving into the software, it's crucial to grasp the core concepts of animation: timing and spacing. These are the building blocks that give life and fluidity to your drawings.
Timing: The Rhythm of Movement
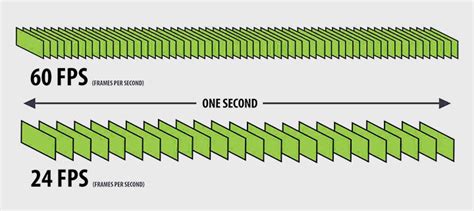
Timing in animation refers to how long a drawing will last on screen. You might have heard terms like 12 frames per second (fps) and 24fps. Having more frames, such as in 24fps, can create smoother animations because there are more drawings placed in between key moments. However, this also means it will take longer to draw everything. Conversely, 12fps can appear slightly choppier as it's half the frame rate of 24fps, but this isn't necessarily a negative. The choice ultimately depends on the artist's preference or the specific project; some animations work better at 24fps, while others shine at 12fps.
Let's consider an example: if you were to animate a ball moving from point A to point B at 12fps. You would draw the ball at point A on the first frame and then draw the same ball at point B, skipping 12 frames in between. This means it would take 12 frames, or one second, for the ball to travel across the screen. Drawing a unique image for each frame is known as "animating on ones." "Animating on twos" means each drawing is held for two frames, and "animating on threes" means each drawing is held for three frames. It's quite common for 24fps animations to be animated on twos, while 12fps animations are often animated on ones. However, animators have the discretion to decide when to use ones, twos, or threes, often influenced by the perceived weight and nature of the movement they wish to convey. Ones are typically used for fast-paced action, while twos and threes are suitable for normal-paced animation. Furthermore, you are not restricted to using just one method; your animation can incorporate a combination of ones, twos, and threes within a single piece.
Spacing: The Illusion of Motion
Spacing, as the name suggests, is about how you position your drawings relative to each other. Returning to our ball moving across 12 frames, if the ball were spaced equally throughout its path, the movement would appear stiff and mechanical. By varying the spacing between drawings, you can create the illusion of acceleration and deceleration, making the movement look more natural and fluid, all while maintaining the same number of drawings and travel time. Remember this key principle: tighter spacing between drawings makes movement appear slower, while wider spacing makes it look faster.
The technique of spacing your drawings closer together at the beginning of an action is called "Ease in," which creates an acceleration effect. Conversely, spacing them closer together at the end of an action is called "Ease out," which creates a deceleration effect. If you're using animation software like Clip Studio Paint and wish to see your previous or upcoming drawings for reference, you can enable "onion skinning." Onion skinning is invaluable for visualizing how poses should transition between drawings, helping to maintain consistency and achieve a more fluid animation. However, it's important not to rely on onion skinning too heavily; your primary focus should always be on whether the drawing feels right and is moving correctly.
Enhancing Your Animation with Key Principles
Beyond basic timing and spacing, several animation principles can elevate your work from simple motion to compelling storytelling.
Anticipation and Overshoot: Building Momentum and Impact
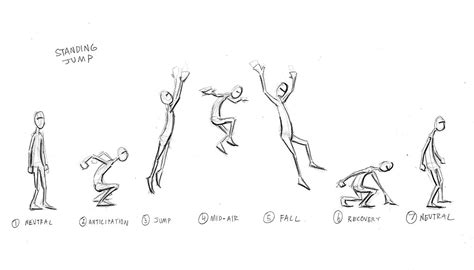
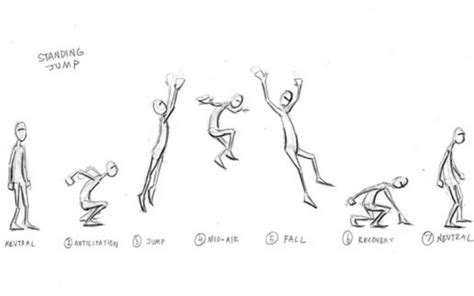
Consider a character needing to jump across a gap. Initially, you might think of three key poses: stationary (standing), action (jumping), and stationary at the landing point. However, adding an "Anticipation" pose, where the character crouches down to build tension like a coiled spring, with bent legs and raised arms, will make the subsequent jump far more dynamic. Upon landing, incorporating an "Overshoot" pose, where the character continues to move slightly past the final stationary frame due to momentum, will add a sense of weight and realism.
Squash and Stretch: Conveying Weight and Elasticity
The principle of "squash and stretch" is used to emphasize the weight or elasticity of an object or character. Imagine a bouncing ball: it typically "squashes" towards the bottom of its arc as its weight and momentum press it against the ground. Then, as it bounces back up, it "stretches" upwards rapidly. It's crucial to remember that the volume of the ball generally remains consistent during these transformations. If you were to squash a rubber ball downwards against the ground, its weight would distribute evenly outwards. Similarly, when it stretches longways, its weight distributes evenly inwards. Applying squash and stretch makes objects and characters feel more organic and imparts the illusion that they are made of different materials. This technique is widely observed in animations, where it's used to convey motion during speech, with characters squishing and stretching as their expressions change.
Arcs: The Natural Path of Motion
Always keep "arcs" in mind when animating. Simply put, arcs are curved paths. If you create an animation where movement follows a linear path, it will likely appear mechanical, like a car or a robot. Think about the natural path your hand follows when reaching for a pencil or picking up a book; it creates subtle arcs. Embracing arcs in your animation will make movements appear more natural and graceful.
Principles of Animation - Arcs
The Animation Production Pipeline in Clip Studio Paint
Now that we've covered the foundational principles, let's explore how to bring these concepts to life within Clip Studio Paint. The animation process can be broken down into several key stages, much like building a house.
1. Storyboarding: Visualizing Your Narrative
The first step in any animation project is to create a storyboard. While some artists prefer detailed storyboards, it's highly recommended to keep them simple and rough enough to clearly convey your ideas. This visual outline serves as the blueprint for your entire animation.
2. Animatic: Bringing the Storyboard to Life
An animatic is the next crucial step. The difference between a storyboard and an animatic is that a storyboard is a static sequence of drawings, whereas an animatic is a timed version of these drawings put together in a video format. If your animation will incorporate audio or music, creating an animatic is essential for synchronizing visuals with sound.
3. Rough Animation: Laying the Foundation
In my opinion, rough animation is arguably the most vital step in building your animation. This is where you focus on creating "key frames." When animators concentrate solely on drawing key frames, it's referred to as "pose-to-pose" animation. This method is commonly used for character animation and helps visualize and map out the progression of the movement. Alternatively, "straight ahead" animation involves drawing each frame sequentially, one after another.
Focusing on pose-to-pose keyframes, unlike the animatic, you'll want to draw your key poses as close as possible to the character's final design, maintaining consistent proportions and capturing the poses that will define the action. The main objective here is to get the movements correct. This approach works well for me, but other animators with strong observational skills might prefer to add more detail to their keyframes. Ultimately, it comes down to your personal animation workflow and what helps you achieve the most natural movement. It's also highly beneficial to maintain a reference sheet for the character you are animating.
4. Adding Extremes and Breakdowns: Defining the Action
After establishing your key frames, you'll move on to adding "Extremes." These are poses that represent significant changes in direction or form, such as the anticipation, overshoot, squash, and stretch we discussed earlier. Extremes can be exaggerated for dramatic effect or subtle, like a slight overshoot.
Following the extremes, you'll create "Breakdowns." Breakdowns are poses that help transition between key poses, often providing extra information or personality to the movement. When adding breakdowns, remember to utilize your onion skinning tool and consider the spacing to determine the ideal placement for these transitional poses.
5. In-Between Frames: Smoothing the Flow
"In-between frames" are the drawings created between your keyframes and breakdowns to smooth out the animation and unify the overall movement. These frames fill in the gaps and ensure a seamless flow from one pose to the next.
6. Tie Downs and Clean Up: Refining the Lines
"Tie Downs" are still considered part of the rough animation stage, but the focus shifts to achieving cleaner lines. You'll go over your existing frames and refine the lines, making them more precise. The "Clean Up" stage is, in my opinion, the most tedious and time-consuming part of animation. This is where you take your refined rough animation and produce smooth, clear line art that will be ready for coloring.
7. Coloring: Adding Life and Vibrancy
Finally, it's time to color your animation. This process is relatively straightforward: you'll go frame by frame and fill in the colors for each section using the paint bucket tool. A crucial piece of advice when coloring: ensure that all your lines are closed off or completed during the clean-up stage. This will prevent the paint bucket tool from spilling over into unintended areas, ensuring clean and precise coloring.
Principles of Animation - Arcs
Clip Studio Paint EX: Your Animation Companion
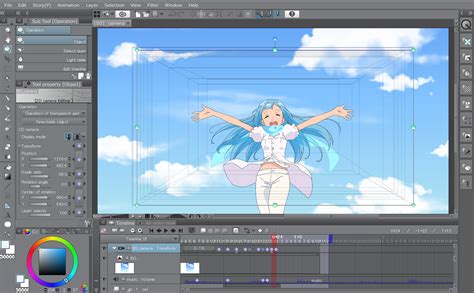
Clip Studio Paint EX is a powerful and versatile tool that caters to every stage of the animation process. Its robust feature set and user-friendly interface make it an ideal choice for both beginners and experienced animators.
Managing Layers and Animation Folders
Clip Studio Paint EX excels at managing layers, which is essential for animation. The timeline palette allows for intuitive control over your animation folders, ensuring that your frames are organized and displayed correctly. You can utilize the "layer color" setting to assign specific colors to different layers, making it easier to keep elements distinct and prevent accidental drawing on the wrong layer or folder.
A Powerful Brush Engine for Every Stroke
The software boasts a powerful brush engine that allows for precise control over every stroke. Whether you're creating still images, defining linework, or adding shading, Clip Studio Paint's brushes offer a natural, high-quality drawing experience, mimicking traditional art tools. The stabilization and correction features help reduce shaky lines and taper brushstrokes automatically, resulting in organic-looking lines.
Beyond Traditional Animation: Vector Layers and 3D References
Clip Studio Paint allows you to draw your animation and storyboards on vector layers. This is a significant advantage, as vector lines can be resized and edited without losing line quality, ensuring a perfect finish. Furthermore, the software provides 3D reference models that can be posed in detail, allowing for accurate compositions and the creation of complex scenes with multiple figures and objects. You can change camera angles and focal points on 3D layers, providing a dynamic way to establish perspective and reference for your artwork.
Seamless Workflow Integration
Clip Studio Paint EX is designed to streamline your entire animation workflow. You can import music, sound effects, and dialogue, and export your animation complete with sound. The ability to save multiple workspace layouts means you can instantly switch between different palette arrangements tailored to specific tasks. Auto Actions allow for the automation of repetitive tasks, saving you valuable time. For those who prefer tactile control, the Clip Studio Tabmate offers a way to operate the app with the push of a button, so you never have to lift your pen.
Exploring Different Animation Types and Techniques
Digital animation encompasses a wide array of techniques, each with its own characteristics and creation methods. Understanding these can broaden your creative horizons.
Traditional Hand-Drawn Animation
This method, often referred to as cel animation, creates movement through a sequence of 2D images. While traditionally done on physical cels, Clip Studio Paint allows you to replicate this process digitally, combining hand-drawn techniques with software efficiency.
3D Animation
This popular form of animation involves manipulating 3D models of characters and objects using specialized software. While Clip Studio Paint is primarily a 2D animation tool, it can be used in conjunction with 3D workflows, particularly for creating storyboards and concept art.
Motion Graphics
Motion graphics involves animating text, static images, and abstract elements. This often utilizes software to "tween" images, creating smooth motion between keyframes.
Stop Motion Animation
This technique involves physically manipulating real-world objects in small increments and then capturing each step as a photograph. When these photographs are played back in sequence, they create the illusion of movement.
Cutout Animation
Cutout animation involves creating characters and objects from flat pieces, which are then animated by moving and manipulating these cutouts.
Motion Capture Animation
This advanced technique records the movements of actors or props to enhance the realism of 3D animations. The real-life movement data is then applied to a 3D mesh and refined by a 3D animator.
Getting Started and Resources for Growth
To embark on your animation journey, you'll need suitable software and a drawing tool. If you already own a tablet like an iPad or Android tablet with pressure sensitivity, you might not need a high-spec dedicated drawing tablet initially. Many illustration apps also include animation features, making the transition smoother with familiar tools.
Online courses and tutorial videos are invaluable resources for learning digital animation from other artists. Starting with simpler projects, such as short GIF or loop animations, is a great way to build confidence. Beyond technical steps, dedicate time to learning animation theory, such as Disney's 12 principles of animation, to strengthen your projects and create more impactful and charming animations.
Clip Studio Paint offers a wealth of tutorials and resources to help you master its animation capabilities. From beginner tutorials on animating a blink motion to more advanced guides on creating walk cycles, animating effects, and even drawing backgrounds with perspective rulers, the platform provides comprehensive learning materials. Exploring the vast library of assets on Clip Studio Assets can also provide pre-made materials, brushes, and even 3D models to enhance your backgrounds and add detail to your characters.
Remember, practice makes perfect. With patience, creativity, and the right tools like Clip Studio Paint, you can bring your unique animated stories to life.