Before embarking on any significant adjustments to the lighting within a photograph using Adobe Photoshop, a crucial preliminary step involves the accurate identification and selection of the light sources themselves. The fundamental question then arises: how can one isolate precisely the brightest areas of a given photo? The interplay between areas of illumination and shadow is what defines an image's contrast. Photoshop's Channels feature provides a powerful mechanism for discerning and subsequently selecting these high-contrast regions within an image.
Understanding and Utilizing Photoshop Channels for Selection
The Channels menu is readily accessible within the Layers Panel in Photoshop. Upon opening it, users will encounter options corresponding to each color channel present in the image. Given that most digital images operate within the RGB color model, these options typically include Red, Green, and Blue. The process involves systematically clicking through each of these channels to identify the one that exhibits the most pronounced contrast between light and dark areas. For instance, in a specific example, the blue channel might reveal the greatest degree of contrast between light and dark tones.
This identified channel can then be leveraged to create a precise selection of the illuminated portions of the photograph. The technique involves holding down either the CTRL key (on Windows) or the CMD key (on Mac) and clicking directly on the desired channel within the Channels panel. This action loads the tonal information of that channel as a selection, where lighter areas translate to active selection and darker areas to inactive.
Translating Selections into Layer Masks for Targeted Adjustments
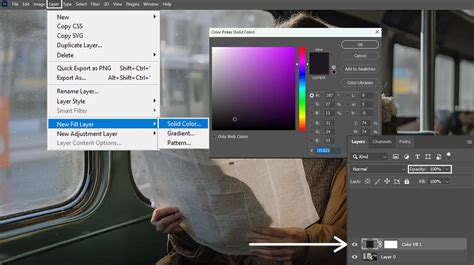
Once a selection representing the light areas has been established, the next logical step is to transfer this selection into a Layer Mask. This is a pivotal technique for non-destructive editing, allowing for precise control over where adjustments are applied. With the newly created selection still active, navigate back to the Layers Panel. From there, add a Solid Color Fill Layer to your project. Crucially, Photoshop will automatically interpret the active selection and apply it as a Layer Mask to this new Fill Layer. This means the color fill will only be visible or affect areas corresponding to the selected light sources.
However, it's often the case that the initial selection, while effective in isolating bright areas, might encompass more than just the intended light sources. You might observe that the Layer Mask is influencing a broader range of the image than initially desired. To refine this, with the Layer Mask of the Solid Color Fill Layer still selected, introduce a Levels Adjustment Layer. By manipulating the sliders within the Levels Adjustment, specifically moving the slider from left to right, you can effectively "clip" the mask. This action preserves the brightest areas of the Layer Mask, effectively converting less bright areas to pure black, thereby excluding them from the mask's influence. This refinement step helps to isolate the mask more closely to the actual light sources.
Enhancing Selections with the Brush Tool for Finer Control
While the Levels adjustment offers significant refinement, further precision can be achieved using the Brush Tool. This allows for manual editing of the Layer Mask. By selecting the Brush Tool and choosing an appropriate brush size and hardness, you can paint directly onto the Layer Mask. Painting with black will hide the effect of the Fill Layer in those areas, while painting with white will reveal it. This manual touch-up is invaluable for fine-tuning the mask to perfectly align with the desired light sources, ensuring that the lighting adjustments are applied with maximum accuracy and subtlety. The outcome of these steps should be a Solid Color Fill Layer that selectively appears only over the light sources within the photograph.
Leveraging Blending Modes for Realistic Lighting Effects
Blending Modes in Photoshop represent a powerful and efficient method for merging layers together to achieve a wide array of visual effects. When applied to the Solid Color Fill Layer used for lighting adjustments, Blending Modes can transform a simple color overlay into a sophisticated and natural-looking enhancement. Experimenting with modes such as "Screen" or "Overlay" is highly recommended. Switching the Blending Mode to "Screen" will lighten the image based on the color fill, while "Overlay" will increase contrast and saturation while blending the color in a way that often appears more subtle and realistic. These modes interact with the underlying image pixels, allowing the added color to integrate seamlessly rather than appearing as a flat, artificial overlay.
The Science of All 27 Blend Modes in Photoshop!
The potential for creative manipulation doesn't end there. To further enhance the lighting effects, consider duplicating the Solid Color Fill Layer. This allows for the application of additional colors or the selection of entirely different Blending Modes on the duplicated layer. For example, one layer might be set to "Screen" with a subtle yellow tint to simulate warm light, while another duplicated layer could be set to "Overlay" with a cooler tone to introduce atmospheric depth or subtle color shifts in the shadows. This layering approach permits the construction of complex and nuanced lighting scenarios.
Adding Atmospheric Glow and Depth with Gaussian Blur
For photographers aiming to imbue their images with a sense of atmospheric depth or a subtle luminous quality, the addition of a glow effect can be highly effective. This can be achieved by duplicating one of the existing Solid Color Fill Layers that has been precisely masked to the light sources. Once duplicated, select the Layer Mask of this new layer and apply a Gaussian Blur filter. The degree of blur will determine the intensity and spread of the glow.
After applying the Gaussian Blur, change the Blending Mode of this duplicated and blurred layer to "Screen" or "Overlay." This will cause the blurred color to spread outwards from the light sources, creating a soft, ethereal glow. This technique is particularly useful for enhancing the natural luminescence of light sources like the sun, lamps, or even reflections, adding a captivating and atmospheric dimension to the photograph. The interplay of sharpened light sources and softly glowing areas can create a visually compelling and professional finish.
Advanced Techniques for Dynamic Lighting Adjustments
Beyond the foundational techniques, Photoshop offers more advanced methods for manipulating light that can yield even more sophisticated results. One such method involves the use of Luminosity Masks. While the Channels panel provides a good starting point, Luminosity Masks offer a more granular control over selections based on the brightness values within an image. These masks can be generated using dedicated Photoshop panels or through manual channel manipulation, creating masks that precisely target specific tonal ranges - from the brightest highlights to the deepest shadows.
When working with Luminosity Masks, you can create adjustment layers that are targeted to very specific areas of light. For instance, you could create a Curves adjustment layer that only affects the brightest 10% of the image, allowing for subtle highlight recovery or enhancement without impacting midtones or shadows. This level of control is indispensable for professional retouching, where minute adjustments can have a significant impact on the overall mood and realism of an image.
Furthermore, consider the concept of "painting with light" through the strategic use of gradient layers and blend modes. A gradient layer, set to a subtle color and blended with the image using modes like "Soft Light" or "Overlay," can be used to simulate the direction and quality of light. For example, a subtle warm gradient originating from one side of the image can suggest a light source, while a cooler gradient on the opposite side can imply reflected light or ambient shadow. The key here is subtlety; these effects should enhance, not overpower, the natural lighting of the photograph.
Exploring different color temperatures within your lighting adjustments can also add significant depth. While "Screen" and "Overlay" are excellent starting points, consider using the "Color" blend mode in conjunction with a Hue/Saturation adjustment layer. This allows you to shift the color of the light without altering its luminosity, enabling the introduction of specific color casts that mimic different lighting conditions - perhaps a warm, golden hour glow, or the cool, diffused light of an overcast day.
The concept of selective sharpening can also contribute to the perception of light. By sharpening the edges of light sources or areas where light is most intense, you can draw the viewer's eye and enhance the feeling of brilliance. This is often achieved by creating a sharpened layer, masking it to the bright areas, and then reducing its opacity to ensure a natural look.
Finally, for those seeking to emulate specific photographic lighting scenarios, understanding the behavior of light in different environments is crucial. This includes appreciating how light interacts with surfaces, how shadows are cast, and how atmospheric conditions affect light quality. Photoshop, when wielded with this understanding, becomes not just a tool for correction, but a powerful instrument for artistic expression, allowing the creator to sculpt light and shadow to convey emotion, create drama, or simply enhance the inherent beauty of the subject. The journey of mastering lighting in Photoshop is an ongoing one, with each new technique and understanding unlocking further possibilities for visual storytelling.