In the realm of 3D texturing, achieving realism hinges on the meticulous attention to detail, particularly in how light interacts with surfaces. This tutorial delves into a crucial aspect of this process: effectively utilizing and manipulating ambient occlusion within Substance Painter to enhance interior lighting and surface detail on 3D models. While the initial context provided focuses on sofa texturing, the principles discussed here are broadly applicable to any 3D asset requiring nuanced shading, from intricate architectural interiors to complex mechanical components.
Preparing Your 3D Model for Detailed Texturing
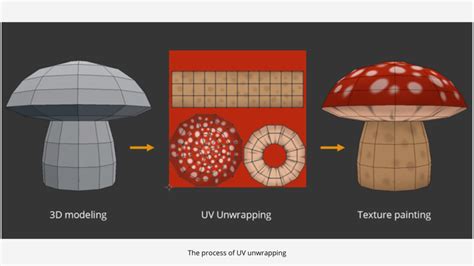
Before embarking on the texturing journey, the foundational step involves preparing your 3D model. This crucial phase sets the stage for efficient and high-quality texturing. For any 3D model, including the sofa example, this begins with the meticulous setup of UV maps. These maps are essentially 2D representations of your 3D model's surface, allowing for the application of 2D textures. Ensuring these UV maps are well-organized and optimized is paramount. Overlapping UVs can lead to texturing artifacts, while inefficient UV layouts can waste texture space and complicate the painting process. Therefore, it's vital to ensure the model is optimized for painting, which often involves unwrapping the model in a way that minimizes distortion and seams.
Core Substance Painter Tools for Realistic Texturing
Substance Painter offers a powerful suite of tools designed to streamline the creation of complex and realistic textures. At the heart of its workflow are smart materials, masks, and layers. Smart materials are pre-made material presets that can be applied to your model, instantly providing a base layer of detail and realism. They often incorporate procedural elements and masks that adapt to the model's geometry.
Masks, on the other hand, are instrumental in controlling where effects are applied. They can be generated procedurally based on various texture maps (like curvature or ambient occlusion) or painted manually. Layers, the fundamental building blocks of Substance Painter's non-destructive workflow, allow for the stacking of different materials, effects, and masks. This layering system enables you to build up complexity incrementally, making it easy to adjust or remove elements without affecting other parts of your texture. These tools collectively empower artists to quickly and effectively add intricate details, transforming a flat 3D model into a visually rich asset.
Advanced Techniques: Crafting Custom Materials and Procedural Details
As artists gain proficiency, delving into more advanced texturing techniques becomes essential for pushing the boundaries of realism. This includes the creation of custom materials tailored to specific needs. Instead of relying solely on presets, you can build materials from scratch by combining various procedural generators, filters, and textures. This allows for unparalleled control over the look and feel of your surfaces.
A common requirement for many assets is the addition of realistic stitching, especially for fabric or leather items like sofas. Substance Painter facilitates this through various methods, including the use of alphas and procedural noise to simulate thread geometry and texture. Furthermore, procedural textures are invaluable for introducing subtle variations and imperfections that mimic real-world materials. Applying these procedurally can create believable wear and tear, fabric weaves, or leather grain patterns, preventing a texture from appearing too uniform or artificial.
Understanding and Harnessing Ambient Occlusion
Ambient occlusion (AO) is a fundamental shading and rendering technique in computer graphics. It's used to calculate how exposed each point in a scene is to ambient lighting. Essentially, areas that are harder to reach by indirect light - such as crevices, corners, or the interior of objects - will appear darker. This darkening effect adds a sense of depth and realism to a 3D model, making it appear more grounded and substantial.
The result of this ambient occlusion computation is typically stored in a dedicated texture map, often referred to as an "Ambient Occlusion map." This map acts as a guide, indicating where shadows should be deepest. In Substance Painter, the ambient occlusion channel plays a pivotal role in this process.
The Ambient Occlusion Channel in Substance Painter
To effectively paint custom occlusion details, an Ambient Occlusion channel is a prerequisite within your Substance Painter project. Once this channel has been added to a Texture Set (which represents a specific material or set of materials for your model), any layer within that Texture Set can be utilized to paint new information directly into the AO channel.
However, it's important to understand how Substance Painter handles AO by default. The default project setup usually combines the baked Ambient Occlusion channel with the Ambient Occlusion map derived from your additional maps (often generated during the baking process, which calculates details like curvature, normals, and AO from your high-poly model). This default combination means that by default, you cannot directly paint over the baked AO map. Instead, the results of each map - the baked maps and the channels you paint on - are multiplied together. This multiplication creates a darker overall effect where both maps indicate occlusion.
Customizing AO with Fill Layers and Blending Modes
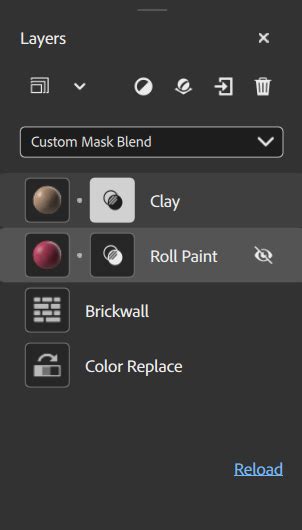
To gain more control and paint custom occlusion details, you can leverage fill layers and manipulate blending modes. A common workflow involves creating a new fill layer and then placing the baked ambient occlusion map directly into the "ambient occlusion" slot within the properties panel of that fill layer.
How to paint ambient occlusion in Substance Painter
By default, the blending mode for the AO channel on any new layer is set to "Multiply." This is why the baked AO map appears to be multiplied with other layers. To paint custom occlusion details without this inherent multiplication, you can create a new layer (this can be a regular layer or another fill layer) and explicitly change its blending mode to "Normal" for the AO channel. When the blending mode is set to "Normal" for the AO channel, you are essentially painting directly into that channel, allowing you to add or subtract occlusion detail as needed, independent of the baked AO map's influence. This provides a much more granular level of control for accentuating specific areas or creating unique lighting scenarios.
Leveraging Environment Maps for Lighting and Exposure Control
Beyond the internal workings of ambient occlusion, the overall lighting of your scene in Substance Painter is heavily influenced by environment maps. An environment map is essentially a 360-degree panoramic image that wraps around your 3D scene, providing realistic indirect lighting and reflections.
The Environment map texture itself is the image file used for this purpose. You can often import your own HDR (High Dynamic Range) images to achieve specific lighting moods. The visibility/opacity of the environment textures in the background of the viewport can be controlled, allowing you to fine-tune how much the environment contributes to the overall scene illumination and how prominently it's displayed behind your model.
Understanding Exposure Value (EV) and Rotation
The exposure value (EV) is a numerical representation of a scene's luminance. In Substance Painter, this setting allows you to offset the default luminance value of the environment map. While it might be tempting to adjust this, it's generally recommended to keep the EV setting at 0 when working with the environment maps provided with the application. This ensures you're using the intended lighting setup. However, for advanced users, manipulating EV can simulate different lighting conditions, such as a bright sunny day versus a dimly lit interior.
The horizontal rotation of the environment texture is a powerful tool for refining your lighting. This control is incredibly useful for changing how light falls on your object, allowing you to experiment with different angles of illumination. By rotating the environment map, you can highlight specific features of your model, create dramatic shadows, or simply find the most aesthetically pleasing lighting setup.
Furthermore, the sharpness or blurriness of the environment texture in the background of the viewport can be adjusted. This setting influences how detailed the environment appears behind your model. A sharper environment map will provide more defined reflections, while a blurrier map can create a softer, more diffused lighting effect.
Finally, the control over how the environment texture rotates around the 3D model inside the viewport is crucial for understanding how light interacts with your object from all angles. This allows you to preview the lighting from various perspectives without having to constantly re-orient the environment map itself. By understanding and manipulating these environment map controls, you can sculpt the lighting of your scene to perfectly complement your textures, bringing your 3D models to life with a sense of depth and realism that goes beyond surface detail alone.
tags: #substance #painter #reduce #inteeroir #ambient #light