Photopea, a powerful web-based image editor, offers a versatile toolkit for manipulating both raster and vector graphics. A common task for designers and artists is the conversion of paths into editable shapes, a process that allows for greater flexibility in design and application. This article delves into the various methods and tools available within Photopea for achieving this, from basic transformations to more advanced warping techniques, with a focus on understanding the underlying principles and practical applications.
The Foundation: Free Transform and Basic Manipulations
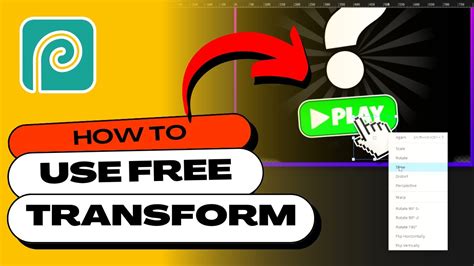
At the core of Photopea's transformation capabilities lies the Free Transform tool. This fundamental instrument serves as the gateway to resizing, rotating, skewing, and distorting elements within your project. When Free Transform is activated, a bounding box, often referred to as the "transformation rectangle," appears around the selected content.
Within this rectangle, several actions can be performed:
- Moving: Pressing and dragging inside the rectangle allows you to reposition the transformed content.
- Rotating: Clicking and dragging outside the rectangle initiates a rotation of the element.
- Resizing: Dragging the corners of the rectangle uniformly scales the content.
- Scaling: Dragging the sides of the rectangle allows for horizontal or vertical scaling, altering the proportions.
Beyond direct manipulation, the Free Transform function offers precise control through its top menu. Here, specific numerical values can be entered for scaling, rotation, and skewing. Once transformations are complete, they can be confirmed or canceled using dedicated buttons in the top menu. Alternatively, these transformations can be accessed via the Edit > Transform menu, providing access to options like Scale, Rotate, Skew, Distort, Perspective, and Warp.
Beyond the Basics: Advanced Transformations
While scaling, rotating, and skewing are essential, Photopea provides more sophisticated transformation tools for complex scenarios.
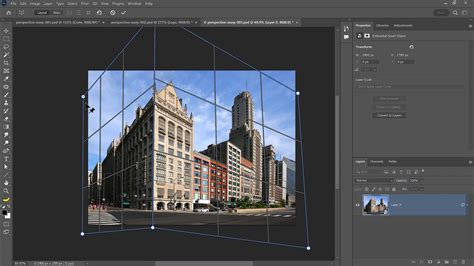
Perspective Transform
The Perspective Transform is particularly useful when you need to simulate a three-dimensional view of an image. It allows you to adjust the vanishing points, effectively making an object appear as if it's viewed from an angle. This is crucial for realistically placing images onto surfaces that are not directly in front of the viewer.
Warp Transform
For even more intricate distortions, the Warp Transform is indispensable. This feature allows for a significant degree of bending and molding of a rectangular area. It utilizes a grid of 16 control points, offering granular control over the curvature and deformation of the selected content. When Free Transform is active, a "Warp" button becomes available in the top panel, enabling access to this powerful tool.
Smart Objects: Non-Destructive Editing and Warping
A key workflow for managing transformations, especially warping, involves the use of Smart Objects. You can convert a shape layer or a bitmap layer into a Smart Object. This is a crucial step because it allows for non-destructive editing.
When a layer is converted to a Smart Object and then warped, the original pixel data or vector path remains intact. If you need to adjust the warp, or even revert to the original state, you can do so without permanently altering the underlying content.
To edit a warped Smart Object:
- Double-click the Smart Object in the Layers panel. This action will open the original, non-warped shape in a new window.
- Within this new window, you can edit the path using Photopea's vector tools, or you can remove the existing path and draw or paste a completely new one.
- After making your modifications, navigate to the File menu and select "Save Smart Object." This action updates the warped shape in your main project window, reflecting the changes you've made.
This process is particularly useful for applying the same warping effect to different shapes or for refining an existing warp. If you wish to copy an existing warping to another shape while retaining the original shape with its warping, you can duplicate the Smart Object and then modify the content of the duplicate.
Path Editing within Smart Objects:
When a Smart Object is opened for editing, mastering the Path Selection Tool and the Direct Selection Tool becomes essential. These tools allow for precise manipulation of the path's knots (anchors) and handles, enabling intricate adjustments to the vector outline. While this process might seem complex initially, the flexibility and control it offers make it a worthwhile effort for achieving professional results.
The Challenge of Editing Existing Warp Meshes
It's important to note that Photopea, while powerful, does not offer a simple, direct method for editing an existing warp mesh once it has been applied. The primary way to modify a warp is to re-apply it or to edit the underlying Smart Object's path and then re-warp. This necessitates a careful approach to the initial warp application.
Photopea Advanced Guide (2025) | The Only Advanced Guide You’ll Need
Photopea's Vector Graphics Tools: Building Shapes from Paths
Photopea is equipped with a comprehensive suite of tools for creating and manipulating vector graphics, which are fundamentally based on paths. Understanding these tools is crucial for converting raster elements into editable vector shapes or for creating vector shapes from scratch.
The Pen Tool: Precision Path Creation
The Pen Tool is the cornerstone of vector graphics creation in Photopea. It allows you to meticulously craft paths by adding "knots" (also known as anchor points) one by one.
- Adding Knots: Clicking within the image area adds a knot.
- Creating Curves: To create smooth curves, you click and drag when adding a knot, which generates handles that control the curve's shape. Releasing the mouse immediately after clicking will create a sharp corner with collapsed handles.
- Closing Paths: Clicking on the first knot of a path will close it, forming a complete shape.
- Sequential Knot Addition: When a knot is already selected, any newly added knot will be placed immediately after it within the same path. This is because each new knot is automatically selected after being added.
Free Pen Tool: Sketching with Vector Precision
The Free Pen Tool offers a more intuitive approach to path creation, akin to drawing with a brush.
- Drawing Strokes: You click and drag your mouse to draw a shape. Upon releasing the mouse, your freehand stroke is converted into a smooth vector curve, complete with adjustable knots and handles. This is ideal for organic shapes or when a more freeform approach is desired.
Shape Tools: Geometric and Predefined Forms
Photopea provides a range of dedicated shape tools for quickly generating common geometric forms:
- Rectangle Tool: Creates rectangular and square shapes.
- Ellipse Tool: Generates elliptical and circular shapes.
- Polygon Tool: Allows for the creation of polygons with a customizable number of sides.
These tools are designed for efficiency, enabling users to quickly lay down foundational shapes that can then be further refined.
Custom Shape Tool: Expanding Your Geometric Library
The Custom Shape Tool offers access to a gallery of predefined shapes. This tool is incredibly useful for incorporating complex or specialized forms into your designs without having to draw them manually. You can select a shape from the available options, and it will be rendered as a vector path in your project.
Converting Raster to Vector: A Practical Approach
While Photopea excels at creating vector shapes from scratch, it also provides methods for converting existing raster images or elements into editable paths. This is often a more complex process and may require a combination of tools and techniques.
Tracing Bitmaps
For simple, high-contrast raster images, Photopea's tracing capabilities can be leveraged. While not a direct "vectorize" button like in some dedicated vector software, you can achieve a similar result through a manual process:
- Isolate the element: If you have an image with a distinct object against a background, you'll first need to isolate that object using selection tools like the Magic Wand, Lasso, or Pen Tool.
- Create a selection: Once the object is selected, you can convert this selection into a path. Go to
Path > Make Work Path. Photopea will create a work path based on your selection. The tolerance value you set for "Make Work Path" will determine the smoothness and complexity of the resulting path. - Refine the path: The generated work path is often a starting point. You will likely need to use the Direct Selection Tool to adjust anchor points and handles, smoothing out any jaggedness or inaccuracies.
- Convert to Shape Layer: Once you are satisfied with the path, you can convert it into a shape layer. You can do this by right-clicking on the path in the Paths panel and selecting "Make Shape." Alternatively, you can create a new shape layer and then use the Pen Tool to trace over your work path, effectively recreating it as a vector shape.
Utilizing Text as Paths
An interesting application of Photopea's vector tools is the conversion of text into paths. This allows for the manipulation of individual characters as vector shapes.
- Type your text: Use the Text Tool to input your desired characters.
- Rasterize Type: Right-click on the text layer in the Layers panel and select "Rasterize Type." This converts the text into a pixel-based layer.
- Create a Selection: Use a selection tool, such as the Magic Wand, to select the rasterized text.
- Make Work Path: Go to
Path > Make Work Path. This will create a path based on the outline of your text. - Refine and Convert: As with tracing bitmaps, you can then refine this path using the Direct Selection Tool and convert it into a shape layer if needed.
This process is particularly useful for creating unique typographic designs, distorting text in non-standard ways, or for incorporating text elements into complex vector illustrations. Each character will become a path with knots, which you can then modify manually to achieve a custom look.
Workflow Considerations and Best Practices
Successfully converting paths to shapes in Photopea involves understanding the interplay between different tools and adopting efficient workflows.
Non-Destructive Editing Philosophy
Embrace non-destructive editing techniques whenever possible. The use of Smart Objects for warping and transformations is a prime example. By keeping original data intact, you retain the flexibility to make changes later without compromising quality.
Understanding Path Types
Photopea differentiates between work paths and vector shape layers. Work paths are temporary paths created during the editing process (e.g., from selections). Vector shape layers are permanent layers that contain editable vector data. Understanding this distinction is key to managing your vector elements effectively.
Layer Management
Maintain a clear and organized layer structure. Naming your layers descriptively, grouping related elements, and utilizing Smart Objects will significantly streamline your workflow, especially in complex projects.
Practice and Experimentation
Photopea's vector tools, like any powerful creative software, require practice. Experiment with the Pen Tool, Free Pen Tool, and the various transformation options. Try converting different types of raster elements into paths. The more you practice, the more intuitive these processes will become. The effort invested in learning these techniques is undoubtedly worth the enhanced creative control and flexibility they provide.