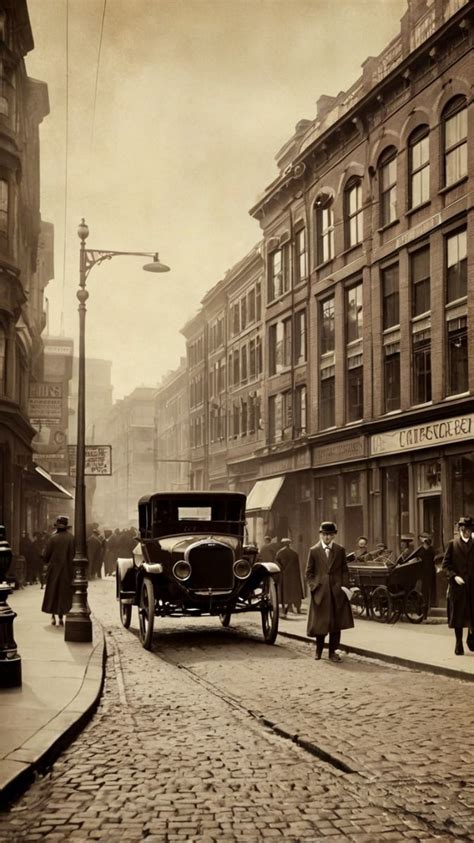
The sepia tone effect, a beloved aesthetic in photography, offers a warm, nostalgic, and timeless appeal. Historically achieved through chemical processes in film photography, this characteristic taupe-colored tint has transitioned seamlessly into the digital realm. In the digital age, Photoshop stands as a powerful tool for recreating this classic look, allowing photographers to imbue their images with a sense of vintage romance. While the charm of sepia is undeniable, particularly for wedding photography aiming for a timeless feel, achieving a truly professional and nuanced effect requires more than a simple one-click solution. This guide will delve into various methods for creating a sepia tone effect in Photoshop, from basic approaches to advanced, non-destructive techniques that preserve image contrast and detail.
The Allure of Sepia: A Historical Perspective
The sepia tone effect has been a staple in photography for over a century, primarily as a way to add warmth and depth to black and white images. In the film era, this effect was achieved through a process called tinting, often involving the use of silver sulfide ferrocyanide. This chemical treatment would alter the silver halides in the photographic print, resulting in a warm, brownish hue that evoked a sense of age and sophistication. The appeal of sepia lies in its ability to evoke memories, add a touch of elegance, and give images a distinctive, classic character. This enduring charm makes it a popular choice for contemporary photographers looking to add a dash of nostalgia to their work, transforming modern portraits into vintage-inspired masterpieces.
Understanding the Challenges of Sepia Toning
A common pitfall when applying color toning to images, including sepia, is that the highlights and shadows can also become toned. This indiscriminate toning can inadvertently flatten the contrast of an image, diminishing the impact and visual dynamism that is often desired in black and white photography. A truly professional sepia effect, therefore, aims to apply the warm tones selectively, preserving the integrity of the image's tonal range and ensuring that the highlights remain bright and the shadows retain their depth.
Method 1: The Basic Sepia Tone (Direct Application)
For those seeking a quick and straightforward way to add a sepia tone, Photoshop offers several simple methods that can be applied directly to a color image, eliminating the need for a separate black and white conversion beforehand.
One such method involves using the Hue/Saturation adjustment layer. Within Photoshop, navigate to the adjustment layers and select "Hue/Saturation." While this adjustment layer offers a "Sepia" preset, it's often beneficial to fine-tune the color manually for a more personalized result. Another straightforward approach utilizes the Photo Filter adjustment layer. This layer provides a dedicated "Sepia" filter that can be applied with adjustable density.
A fundamental technique involves opening your image in Photoshop and then accessing the Color Picker. By carefully adjusting the H (Hue), S (Saturation), and B (Brightness) values, a pale brown color ideal for sepia toning can be achieved. For instance, setting H = 30, S = 20, and B = 50 can yield a suitable starting point. This method, while basic, is perfectly acceptable for many applications and has the advantage of being non-destructive, meaning you can always revert or modify the effect later.
Another simple yet effective technique is to use a Solid Color fill layer. Open your image and create a new Solid Color adjustment layer. Choose a brown shade that appeals to you. Then, change the blend mode of this layer to "Color." This will apply the chosen color as a tone over your image. You can then adjust the opacity of this layer to control the intensity of the sepia effect. This method is also non-destructive and allows for easy adjustments.
Method 2: The Professional Sepia Tone (Advanced Non-Destructive Workflow)
For a more refined and professional sepia tone effect that preserves image contrast and detail, a slightly more involved, yet highly effective, non-destructive workflow is recommended. This advanced method ensures that the highlights and shadows are protected from unwanted toning, leading to a more nuanced and visually appealing result.
Step 1: Creating a Black and White Conversion
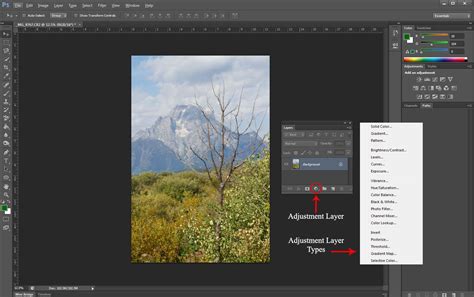
The first crucial step in this professional workflow is to convert your color image into a black and white (monochromatic) version. While desaturation (Image > Adjustments > Desaturate or Shift + Ctrl + U / Shift + CMD + U) is a quick method, it is considered destructive as it alters the original pixel data without creating a new layer. A far superior approach is to use a Black & White Adjustment Layer.
To do this, go to Layer > New Adjustment Layer > Black & White. This adjustment layer offers significant control over the conversion process. You can individually adjust the sliders for Red, Yellow, Green, Cyan, Blue, and Magenta to fine-tune how different color ranges are converted to grayscale. This allows you to emphasize or de-emphasize certain tones, providing a much more artistic control over the initial black and white conversion.
Step 2: Enhancing Contrast (Optional but Recommended)
Once you have your black and white image, it's often beneficial to enhance its contrast. This can be achieved using a Curves Adjustment Layer. Go to Layer > New Adjustment Layer > Curves. By creating a subtle "S" curve - slightly lifting the mid-tones and tapering off the black and white points - you can add a gentle boost to the image's contrast. This involves slightly lifting the curve in the upper-mid tones and lowering it in the lower-mid tones. The black point at the bottom left and the white point at the top right of the curve can also be slightly tapered to prevent harsh blacks and blown-out whites. Alternatively, a Brightness/Contrast Adjustment Layer can be used, increasing the Brightness slider to a value like 20 to lighten the image and create a more ethereal feel.
Step 3: Applying the Sepia Tone
Now comes the critical step of applying the sepia tint without affecting the highlights and shadows. This is where blending options become essential.
Using a Solid Color Layer and Blend If:Create a new Solid Color adjustment layer (Layer > New Fill Layer > Solid Color). Choose a warm, taupe-like brown color for your sepia tone. This is where experimenting with different shades of brown is key to achieving the desired look. Once the color is selected, the layer will completely colorize your image.
Now, double-click on the Solid Color fill layer to open the Layer Styles dialog box. Scroll down to the "Blend If" section at the bottom. Here, you'll find sliders for "This Layer" and "Underlying Layer." Focus on the "This Layer" sliders. Drag the white triangle slider on the right to the left. As you drag it, you will notice that white areas in your image begin to reappear. This indicates that these highlight areas are being protected from the sepia tone.
To further refine this protection, hold down the Alt key (Windows) or Option key (Mac OS) and click on the white triangle slider. This will split the triangle into two halves. Drag the left-hand half of this split triangle all the way to the left. This action allows you to fine-tune the transition, ensuring that the sepia tone is applied smoothly and only to the mid-tones and shadows, leaving the highlights relatively untouched. You can also adjust the "Underlying Layer" sliders to control how the sepia layer interacts with the underlying black and white image.
Using a Color Fill Layer with Blend Modes:Another effective approach is to use a Color Fill layer as described above, but then experiment with different blend modes. While "Color" is a common choice, modes like "Overlay," "Soft Light," or "Multiply" can yield different results and intensities of the sepia effect. Each blend mode interacts with the underlying pixels in a unique way, offering a spectrum of creative possibilities.
Using the Photo Filter Adjustment Layer (with Caution):While the Photo Filter adjustment layer has a direct sepia setting, it can sometimes tint the whites more heavily than desired. If you opt for this method, after applying the Sepia Photo Filter, you can use the "Blend If" sliders within the Layer Styles dialog box for that layer to mitigate excessive tinting in the highlights, similar to the technique described for the Solid Color layer. You can also click the "Color" button within the Photo Filter settings to choose a custom sepia tint if the default isn't to your liking.
Step 4: Fine-Tuning and Adjustments
After applying the sepia tone, it's essential to review the effect and make any necessary adjustments. The beauty of using adjustment layers and blend options is that all changes are non-destructive. You can go back to any of the adjustment layers and tweak their settings.
- Opacity: Adjust the opacity of the sepia layer (Solid Color or Photo Filter) to control the overall intensity of the sepia effect. Lowering the opacity will create a more subtle toning.
- Color Balance: For ultimate control over the color cast, a Color Balance adjustment layer can be added after the sepia layer. This allows you to fine-tune the Red, Green, and Blue values in the highlights, midtones, and shadows independently, allowing you to push the sepia towards warmer or cooler browns, or even add subtle hints of yellow or magenta.
- Levels or Curves: If further contrast adjustments are needed, additional Levels or Curves adjustment layers can be added non-destructively.
The Image from Florence: A Practical Example
Consider the image taken in Florence, Italy, featuring lion carvings on the wall surrounding Piazza Pitti Palace. This sandstone wall, when illuminated by evening sunlight, exhibits a vibrant orange hue. When applying a sepia tone to such an image, especially if it's initially a color photograph, the professional workflow becomes particularly valuable.
- Black and White Conversion: Convert the color image to black and white using a Black & White Adjustment Layer. You might find that adjusting the red and yellow sliders higher can enhance the warmth of the sandstone in the grayscale conversion, creating a richer base for the sepia tone.
- Contrast Enhancement: Apply a Curves adjustment layer to introduce a gentle S-curve, bringing out the texture of the sandstone and the details in the lion carvings.
- Sepia Application: Add a Solid Color fill layer with a suitable sepia brown. Use the "Blend If" sliders to ensure that the bright evening sunlight hitting the sandstone is not overly toned, preserving its natural luminosity. The "Blend If" technique is crucial here to prevent the vibrant orange from being completely washed out by the sepia.
- Refinement: Adjust the opacity of the sepia layer and perhaps add a final Curves layer to subtly enhance the overall contrast and mood.
This process ensures that the resulting sepia-toned image retains the depth and texture of the original photograph, offering a sophisticated and artistic interpretation rather than a flat, uniformly colored one.
How to create the Perfect Sepia Tone Effect in Photoshop Tutorial
Preserving Nostalgia in the Digital Age
The warm, brown hues of old sepia-tinted photographs have not lost their charm even in the age of digital photography. Whether you aim to add a touch of nostalgia to wedding photography, create vintage-inspired portraits, or simply imbue your images with a timeless appeal, Photoshop offers a versatile toolkit. The key to achieving professional results lies in understanding the underlying principles of tonal adjustment and utilizing non-destructive editing techniques. By mastering these methods, you can effectively harness Photoshop's capabilities to recreate the romantic allure of sepia, ensuring your digital images possess that coveted, classic aesthetic. The ability to work with layers in Photoshop is paramount, as it grants the flexibility to revisit and refine your edits, always having the option to return to the original version of your image. Photoshop provides numerous tools to achieve the sepia tone, allowing you to select options based on your specific requirements and desired outcome.