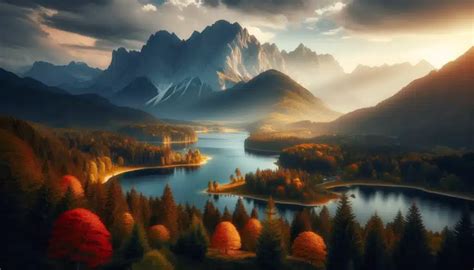
A vignette is a subtle yet powerful photographic tool that can significantly enhance an image's impact. It's defined as a darkening, lightening, or even a slight color shift around the periphery of a photograph, designed to guide the viewer's eye towards the main subject. While natural vignetting can occur due to the physics of camera lenses, particularly at wide apertures, artificial vignettes are frequently employed in post-production to achieve specific artistic goals. Photoshop, a sophisticated image editing program, offers a variety of methods to create this effect, each with its own level of customization. This guide will explore several effective techniques for adding vignettes in Photoshop, allowing photographers to subtly emphasize their subjects and improve compositional flow.
Understanding the Purpose and Nature of Vignettes
At its core, a vignette serves as a compositional device. By gradually darkening the edges of a frame, it creates a visual pathway that leads the viewer’s gaze inward, towards the point of interest. This is particularly effective when the main subject is positioned centrally or when the photograph employs a strong one-point perspective. The principle behind this is that our eyes are naturally drawn to lighter areas within an image. A vignette, by intelligently manipulating light and shadow, capitalizes on this tendency.
While many photographers appreciate the subtle enhancement a vignette can bring, it's also a topic that can be contentious within photographic circles. Some embrace it as a valuable artistic tool, while others view it with skepticism, believing it can appear unnatural if overdone. The key, as emphasized by many professionals, lies in subtlety. A well-executed vignette is often not consciously perceived by the viewer, but rather contributes to the overall mood and focus of the image. The moment a vignette becomes overtly noticeable, it can detract from the photograph's intended message.
Natural Vignetting: The Lens Phenomenon
Optical vignetting is an inherent characteristic of many camera lenses. It arises from the physical limitations of lens design, particularly when shooting at wide apertures. In such scenarios, less light reaches the edges of the camera sensor compared to the center. This disparity in light intensity results in a natural darkening effect around the periphery of the image. The quality of a lens often dictates the degree of vignetting; superior lenses tend to exhibit less of this effect. Photographers may sometimes seek to correct strong optical vignetting using tools like Photoshop's Lens Correction filter. Conversely, some artists intentionally emulate the look of vintage lenses, which often produced more pronounced vignetting, to achieve a specific aesthetic.
Adding Vignettes in Photoshop: Multiple Approaches
Photoshop, despite not having a dedicated "vignette tool," provides numerous flexible ways to achieve this effect. The choice of method often depends on the desired level of control, the complexity of the image, and personal workflow preferences. We will explore several popular and effective techniques.
Method 1: The Lens Correction Filter - A Quick Fix
For those seeking a rapid and straightforward way to apply a vignette, Photoshop's Lens Correction filter offers a surprisingly effective solution. This method is particularly useful for quick adjustments or when working with images that might benefit from a subtle darkening of the edges.
- Open Your Image: Begin by opening your desired image in Photoshop.
- Non-Destructive Editing: It's best practice to work non-destructively. To do this, right-click on the "Background" layer in the Layers panel and select "Duplicate Layer." This ensures your original image remains untouched.
- Access Lens Correction: With the duplicated layer selected, navigate to the Photoshop menu and choose "Filter," then "Lens Correction."
- Custom Tab Adjustments: In the Lens Correction window that appears, select the "Custom" tab on the right-hand panel.
- Vignette Sliders: Under the "Vignette" heading, you'll find two primary sliders: "Amount" and "Midpoint." Adjust the "Amount" slider to control the intensity of the darkening effect, and use the "Midpoint" slider to dictate how far into the image the vignette extends. Experiment with these sliders until you achieve the desired subtle darkening.
- Apply and Refine: Click "OK" to apply the vignette. If the image appears a bit dull after this adjustment, you can further enhance it by adding a "Curves" adjustment layer for a contrast boost or a "Vibrance" adjustment layer to fine-tune color intensity.
This method is excellent for its speed and ease of use, making it ideal for batch processing or for photographers who prefer a less involved approach to adding vignettes.

Method 2: Gradient Fill Layer - Precision and Flexibility
The Gradient Fill layer method offers a more advanced yet highly flexible approach to creating vignettes. It allows for greater control over the gradient's appearance and blend with the underlying image.
- Set Foreground Color: Ensure your foreground color swatch in Photoshop is set to black.
- New Gradient Fill Layer: Go to "Layer" in the main menu, then select "New Fill Layer" > "Gradient." Click "OK" on the initial pop-up.
- Gradient Fill Settings: In the Gradient Fill settings window, make sure to tick the "Reverse" box. This is crucial, as it ensures the gradient darkens the edges rather than the center.
- Radial Style: Change the "Gradient Fill Style" from the default "Linear" to "Radial." This instructs Photoshop to create a circular gradient.
- Scale and Intensity: At this stage, a strong vignette will likely be applied. The "Scale" percentage slider allows you to adjust the strength of the vignette; smaller numbers result in a more intense gradient. Values around 300% to 350% are often a good starting point.
- Opacity Adjustment: To blend the gradient more subtly, select the Gradient Fill layer and reduce its opacity using the "Opacity" slider. A value around 50% often provides a good balance, but this will vary depending on the image.
- Blending Modes: For further refinement and to achieve a more natural integration, experiment with Photoshop's blending modes. By clicking on the blend mode dropdown menu for the Gradient Fill layer, you can explore various options like "Soft Light," "Overlay," or "Hard Light" to see what best complements your image.
- Final Touches: After applying the Gradient Fill layer and adjusting its opacity and blend mode, you might again consider adding a "Curves" adjustment layer for a final contrast boost to ensure the subject remains prominent.
This method is favored for its non-destructive nature and the extensive control it provides over the vignette's appearance, making it suitable for complex edits.
How To Create Vignette Effect In Photoshop (1 Min) | Using Gradient Fill
Method 3: The Shape Tool - Versatile Edge Control
Photoshop's Shape tool, particularly when used with an ellipse, offers a versatile and efficient way to create custom vignettes. This method is excellent for achieving symmetrical or precisely shaped vignetting effects.
- Set Foreground Color: Ensure your foreground color is set to black.
- Select Ellipse Tool: With your image open, select the Ellipse tool from the Shape Tool menu on the far left of the Photoshop toolbar.
- Draw the Ellipse: Click and drag across your image to form an oval or circular shape. When you release the mouse button, the shape will automatically fill with black.
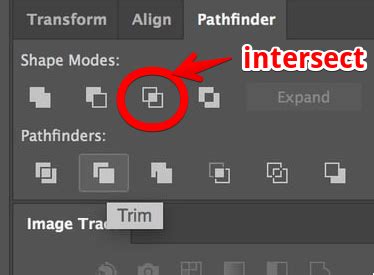
- Subtract Front Shape: With the Ellipse layer selected, open the "Properties" window. Under the "Pathfinder" heading, click the "Subtract front shape" icon. This will reverse the shape, creating a black border around a transparent ellipse.
- Masking and Feathering: Refer back to the "Properties" menu with the Ellipse layer still selected. Click on the "Masks" icon (which resembles a gray circle on a dark background). This "Masks" menu allows you to adjust the "Density" and "Feather" of the ellipse.
- Subtlety and Blending: To increase the subtlety of the vignette, adjust the "Opacity" of the Ellipse layer. Experimenting with different "Blending Modes" can also significantly alter the impact of the vignette, much like with the Gradient Fill method. The "Feather" slider is crucial here for creating a smooth transition from the darkened edges to the center of the image.
This method is highly adaptable, allowing you to modify the shape of the vignette at any time by directly editing its vector path, ensuring the vignetting effect always syncs with your desired composition.
Method 4: Curves and Levels Adjustment Layers - Fine-Tuning Light and Shadow
Utilizing Curves or Levels adjustment layers provides a manual yet highly precise method for creating vignettes, allowing for granular control over tonal ranges. This approach is particularly powerful for achieving natural-looking transitions.
- Create a Selection: Select the Elliptical Marquee Tool and draw a selection around your subject or the central area of the image. For a general vignette, make this selection slightly larger than the intended brightened area.
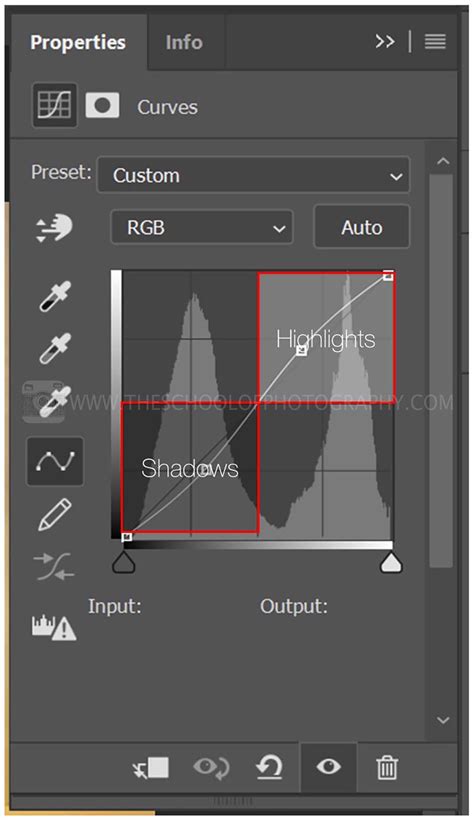
- Add Curves Adjustment Layer: Go to "Layers," then "New Adjustment Layer," and select "Curves Adjustment Layer." The selection you just made will automatically be applied as a Layer Mask to this new adjustment layer.
- Brighten the Center: In the Curves adjustment dialog, click and drag the central line upwards. This will brighten the area within the mask. Be cautious not to overdo it; the goal is subtle enhancement.
- Soften the Transition: The transition between the brightened center and the rest of the image might appear harsh. To soften this, select the Layer Mask of the Curves Adjustment Layer. Go to "Filter," then "Blur," and choose "Gaussian Blur." Zoom out of your image to better judge the transition and adjust the blur radius until the fade looks natural.
- Darken the Edges: To create the classic vignette effect, repeat the process to darken the edges. Create a new Curves Adjustment Layer. This time, make the Elliptical Marquee selection encompass nearly the entire image. Invert the Layer Mask by pressing
Ctrl/Cmd + I. This will target the areas outside your selection. - Darken the Edges: Drag the central line of the Curves adjustment downwards to darken the edges. Again, use Gaussian Blur on the Layer Mask to ensure a smooth, natural transition.
The significant advantage of using Curves or Levels is their non-destructive nature. You can revisit and readjust the darkening and lightening effects at any time by simply editing the respective adjustment layer's mask and curve.
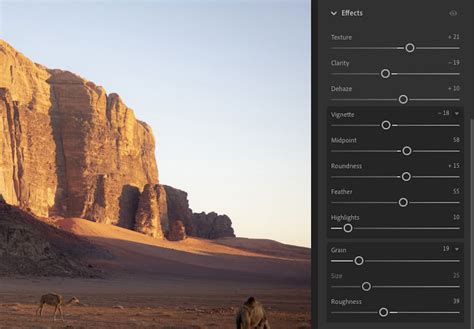
Method 5: Adobe Camera Raw (ACR) - Integrated Vignetting
For photographers who frequently use Adobe Camera Raw (ACR) as their primary editing environment, the built-in post-crop vignetting feature offers a seamless solution. This method is particularly advantageous as it dynamically updates with any cropping applied to the image.
- Open Image in ACR: Open your raw image directly in Adobe Camera Raw.
- Navigate to Effects Tab: Locate the "Effects" tab on the right-hand side of the ACR interface.
- Adjust Vignette Settings: Within the "Effects" tab, you will find the "Post-Crop Vignetting" section. Here, you can add both dark and light vignettes. Utilize the sliders for "Amount," "Feather," "Roundness," "Highlights," and "Midpoint" to precisely control the vignette's appearance.
- Dynamic Updates: A key benefit of this method is that the vignette automatically adjusts if you crop or reframe your image later in the editing process. This ensures the vignette remains balanced and in harmony with the final composition.
This integrated approach is ideal for those who prefer to handle vignetting early in their workflow, especially when working with raw files.
Considerations for Effective Vignetting
Regardless of the method employed, several key principles will help ensure your vignettes enhance, rather than detract from, your images:
- Subtlety is Key: As reiterated, the most effective vignettes are often those that are not immediately obvious. The goal is to guide the viewer's eye, not to draw attention to the editing itself.
- Context Matters: Not every photograph benefits from a vignette. Consider the composition and the story the image is trying to tell. A busy landscape with multiple focal points might be compromised by a strong vignette, whereas a portrait with a clear central subject is often an ideal candidate.
- Non-Destructive Workflow: Always strive to use non-destructive editing techniques, such as adjustment layers or smart filters. This allows for easy modifications and adjustments later in the editing process, accommodating changes in output size or artistic direction.
- Consider the Output: Vignettes can appear differently depending on the final output size and aspect ratio. A vignette that looks perfect on a large monitor might appear too strong or unbalanced on a smaller print. Saving layered files allows you to easily modify vignettes for different applications.
- Experiment with Blending Modes: Blending modes are powerful tools for integrating vignettes seamlessly. Experimenting with "Multiply," "Soft Light," "Overlay," and "Linear Burn" can yield a wide range of subtle and artistic effects.
- Bright Vignettes: While dark vignettes are more common, bright vignettes can also be effective. These are created using similar methods but involve adjusting highlights or using lighter colors and specific blend modes like "Lighten" or "Screen" to draw attention.
By understanding these principles and practicing the various techniques available in Photoshop, photographers can master the art of vignetting, using it to create more compelling and visually engaging images. The ability to add a vignette in Photoshop, whether for a quick fix or a highly customized artistic statement, is an invaluable skill in any photographer's toolkit.