Photoshop's crop tool is a fundamental instrument for any digital artist or photographer. While its primary function is to resize an image or canvas, its capabilities extend far beyond simple dimension changes. Understanding how to effectively crop images and, crucially, individual layers, can dramatically enhance composition, eliminate distractions, and refine focus. This guide delves into the nuances of cropping in Photoshop, from basic canvas adjustments to advanced layer manipulation, ensuring you achieve precise and desired results.
The Versatile Role of Cropping in Image Editing
There are all kinds of reasons to crop an image. You might need to straighten a photo that was taken at a slight angle, thereby correcting off-kilter angles and achieving precise lines like a horizon or a tall building. Cropping can also be employed to resize your canvas, a crucial step for preparing images for different platforms or print. Furthermore, cropping allows you to shift focus and composition. Sometimes, you might want to crop out a distracting object in the background, thereby drawing the viewer's eye to the main subject. Alternatively, you may wish to give the image more vertical or horizontal emphasis, altering its visual impact.
The crop tool is not just for resizing a photo; it's a powerful tool for composition. Recently, while I was conducting a Photoshop seminar tour, I realized that a lot of people were tripping up with the simple crop tool. It’s not that people don’t know how to crop an image, it’s that they don’t know how to do it to get the results they are looking for. In this tutorial, I’m going to show you some tricks with the crop tool, show you how to automatically crop to the exact size you need without math, and then provide a few practical cropping tips in Photoshop.
Navigating the Photoshop Crop Tool
Selecting and Utilizing the Crop Tool
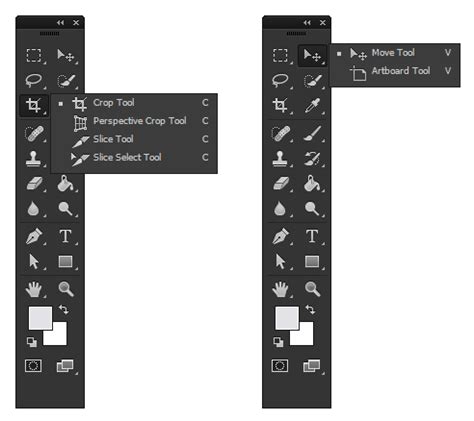
To begin, select the Crop tool from the Photoshop toolbar. You can also activate it by pressing the 'C' key on your keyboard. Once selected, you'll see crop boundaries appear around your image.
Finding Your Perfect Framing
Frame your photo by dragging the corner handles around the part of the image you want to keep. This allows you to adjust the boundaries of your crop. You can also rotate your image left or right by moving your cursor outside one of the corner handles until it turns into a curved double-arrow. This is particularly useful for straightening photos.
Precision Cropping: Specific Sizes and Ratios
When it comes to cropping in Photoshop, you can be as precise as you want to be. If you need to crop an image to a specific size, you can do it directly within Photoshop. In the tool options bar at the top, change the option to "W x H x Resolution." You can now type in your desired aspect ratio, or size. For example, if you type "8 in x 10 in," you are instructing Photoshop to create a crop with those dimensions. Adding "in" forces the scale to inches.
If you don’t enter anything in the resolution field, it will just set an aspect ratio without any resolution, effectively setting a proportional constraint. This is where people often get messed up. For resolution, enter the desired final resolution. For print, it’s usually 300ppi (pixels per inch, often referred to as DPI for printed output). For online use, 72ppi is common. Now, when you change the crop area, it stays locked at the specified aspect ratio, for instance, 8:10. Notice that when you apply this, the resulting image will be exactly 8x10 inches (or your specified dimensions) at the set resolution.
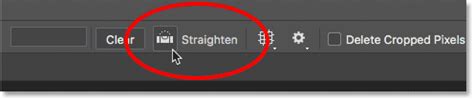
The Straighten Tool for Perfect Alignment
It can be challenging to perfectly straighten an image with precise lines, like a horizon or a tall building, using just the drag handles. In cases like these, use the Straighten tool, which is nested within the Crop tool. Click on the Straighten tool icon, then click and drag along a line in your image that should be straight, such as the horizon. Photoshop will then automatically adjust the cropped area to correct off-kilter angles.
Committing to Your New Crop
Finalize your selection by hitting Enter or Return on your keyboard, or by clicking the checkmark icon in the control bar at the top of the screen. When you apply the crop tool, by default, it deletes the areas that have been cropped away.
Beyond Simple Resizing: Advanced Cropping Techniques
Changing Composition and Focusing Attention
To change the composition of the image, you can use the crop tool to focus on a portion of the photo, while removing distractions. This is similar to digital zoom on your camera, which is why it's often recommended to turn off digital zoom on your camera to avoid losing image quality.
Visualizing Your Crops with Overlays
When you are cropping for composition, there are several tools to help you visualize your crops in Photoshop. You will see six different overlay options that can be toggled on and off when the crop tool is in use. These include the Rule of Thirds, Grid, Golden Ratio, and others, which can guide your compositional choices. Access these overlays by clicking the gear icon in the Options bar while the Crop Tool is active.
8-Step GUIDE: Blend Images and Create Composites Like a Pro with Photoshop ✅🔥
The Nuances of Cropping Layers vs. Images
Why the Standard Crop Tool Doesn't "Crop" Layers
Layers and the crop tool in Photoshop are two of the best reasons to use the software. Therefore, you might think the two features would play well together. If you've ever tried to crop a layer in Photoshop, however, you've found out that just isn't true. And there is a good reason for that.
The crop tool was originally designed to mimic the process of film photography, where the entire frame of film was exposed and then physically cut. The tool was created to match this process as closely as possible with the increased precision that comes with digital photo editing, so you can achieve a pixel-perfect crop. That means it was programmed to work on the whole image or the entire canvas, affecting all layers simultaneously. This is why there is no direct "crop layer" command in Photoshop.
Alternative Methods for Cropping Individual Layers
Although you can't use the standard crop tool to crop individual layers, you can use other tools and techniques that effectively isolate and trim the content of a single layer without affecting other layers or the canvas itself. Let's look at a few methods to achieve this.
Method #1: Cropping with the Marquee Selection Tool (Destructive)
This method is quick but permanent, meaning the cropped pixels are deleted and cannot be recovered.
- Select the Right Layer: First of all, make sure you are working on the right layer in the Layers panel. Each layer holds a different image.
- Make a Selection: Use the Rectangular Marquee Tool (or Elliptical Marquee Tool) to draw a selection around the part of the image you want to keep on that specific layer.
- Invert the Selection: At the moment, everything on the layer that you want to keep is selected. But what you need is for everything you want to crop away to be selected. To do this, go to Select > Inverse (or press Shift + Ctrl + I on Windows, Shift + Cmd + I on Mac).
- Delete the Unwanted Area: Press the Delete key on your keyboard. Everything outside your original selection will be deleted from that layer.
The Problem: This method permanently deletes pixels. If you need to retrieve any of the cropped-away area later, you won't be able to.
Method #2: Using Layer Masks (Non-Destructive)
This is the preferred method as it is non-destructive, meaning the pixels are hidden, not deleted, and can be revealed again later.
- Select the Right Layer: Ensure you have the correct layer selected in the Layers panel.
- Make a Selection: Use the Marquee tool to select the area of the layer you want to keep.
- Add a Layer Mask: With the selection active, click the "Add layer mask" icon at the bottom of the Layers panel (it looks like a rectangle with a circle inside). Photoshop will automatically create a layer mask that hides everything outside your selection. The white area on the mask indicates where the layer's content is visible, and the black area indicates where it is hidden.
- Refine the Mask (Optional): You can further refine the mask by painting on it with black to hide more or white to reveal more.
Benefits of Layer Masks:
- Non-Destructive: Pixels are not deleted, only hidden. You can always edit the mask to bring back parts of the layer.
- Editable: The mask itself can be edited at any time.
- Flexibility: You can unlink the mask from the layer (click the chain icon between the layer thumbnail and mask thumbnail in the Layers panel) to move the layer content independently of the mask, or vice versa. After unlinking, select the mask thumbnail to move it, or select the layer thumbnail to move the layer content. Remember to relink them when you're done if you want them to move together again.

Method #3: Using a Clipping Mask with a Shape
This method is excellent for cropping a layer to a specific shape.
- Create a Shape: On a new layer above the layer you want to crop, draw the desired shape using a shape tool (like the Rectangle Tool or Custom Shape Tool).
- Create a Clipping Mask: Right-click on the layer you want to crop (the one below the shape layer) in the Layers panel and choose "Create Clipping Mask." Alternatively, hold down the Alt (Windows) or Option (Mac) key and click on the line between the two layers in the Layers panel.
- Result: The content of the lower layer will now only be visible within the boundaries of the shape on the layer above. You can move and transform both layers independently or group them to move them as one unit.
Method #4: Converting to a Smart Object
Converting a layer to a Smart Object allows you to apply non-destructive transformations, including cropping.
- Convert to Smart Object: Right-click on the layer you want to crop in the Layers panel and select "Convert to Smart Object."
- Edit the Smart Object: Double-click the Smart Object thumbnail in the Layers panel. This will open the layer's content in a new Photoshop document.
- Crop within the Smart Object: Use the standard Crop Tool within this new document to crop the content as desired.
- Save and Close: Save (Ctrl+S or Cmd+S) and close the Smart Object document. The original layer in your main document will now be cropped, and the cropped layer can be moved around within the larger canvas.
Practical Cropping Tips for Photoshop Elements Users
For users of Photoshop Elements, the approach to cropping individual layers differs slightly. The standard crop tool in Elements, much like in full Photoshop, is designed to affect the entire image canvas.
If you are using Photoshop Elements 14 and trying to crop an image that sits alone on a layer without disturbing anything of the other layers behind it, it seems that when you use the crop tool on the image, you are cropping the entire collection of layers. Is this possible within Elements to crop an image without affecting anything else?
In Photoshop Elements Editor, go to the Expert tab. Open picture B, the one you wish to select something from to add to another picture. Use one of the selection tools, e.g., the selection brush or lasso tool, to select the object. Then, you can copy this selection and paste it into your other image or use it as needed. This method effectively isolates the desired portion of the layer without impacting other layers.
The crop tool is not appropriate for cropping a single layer in Photoshop Elements in the same way you might expect. You need to ensure that the image has the correct proportions before you place it into Elements, or use selection tools to isolate and copy the desired content.
By understanding these various methods, you can effectively "crop" layers in Photoshop to achieve precise compositions, refine your artwork, and maintain a flexible, non-destructive editing workflow.