Adding visual flair to documents can significantly enhance their impact, making them more engaging and memorable. While Google Docs is primarily known for its straightforward text editing capabilities, it also offers methods to incorporate visually interesting text effects like curved or wrapped text. These techniques can elevate presentations, invitations, or any document where a personal or artistic touch is desired. While Google Docs doesn't have a direct "curve text" button, several workarounds allow users to achieve this effect, transforming plain text into dynamic design elements.
Understanding Curved and Wrapped Text
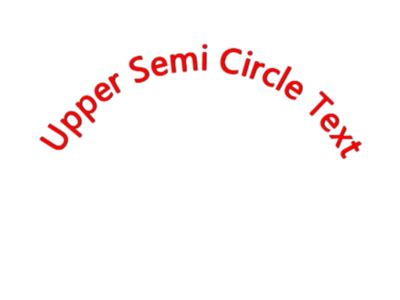
Curved text, as the name suggests, is text that deviates from a straight horizontal line, forming an arc, a circle, or a semi-circle. This effect is particularly useful for creating circular labels, adding decorative titles, or framing images. Wrapped text, on the other hand, refers to text that flows around an object, such as an image or a shape, creating a seamless integration between the text and the visual element. This is commonly seen in magazines and brochures, and can add a professional and polished look to Google Docs.
Method 1: Leveraging External Tools for Curved Text
One of the most effective ways to introduce curved text into Google Docs is by utilizing external tools designed for this purpose. These tools often provide a user-friendly interface to create the desired text curvature before importing it into your document.
Utilizing TroyTube.net for Curved Text
A popular and accessible online tool for creating curved text is troytube.net. This platform simplifies the process, making it achievable even for users with no prior design experience.
Access the Tool: Begin by navigating to troytube.net in your web browser.
Enter Your Text: Locate and click on the prominent orange "Enter Text" button, typically found in the top left section of the screen. Upon clicking, this button will transform to a blue hue, indicating it's active. A designated field will then appear, allowing you to input the text you wish to curve.
Generate and Copy: Once your text is entered, the tool will generate a visual representation of your curved text. You can then right-click on this generated text. A context menu will appear, offering options to copy the curved text.
Import into Google Docs: Open your Google Docs document and navigate to the specific slide or page where you want to insert the curved text. Right-click on the desired location within your document. A context menu will appear. Select the "Paste" option to insert the curved text.
This method essentially creates an image of your curved text, which can then be placed and resized within your Google Docs document. This approach is particularly effective for adding decorative titles or elements that don't require further text editing within Google Docs itself.
How to Curve Text in Google Docs (Step-by-Step Guide)
Method 2: Employing PowerPoint for Curved Text
For users who have access to Microsoft PowerPoint, this application can serve as a powerful intermediary for creating curved text that can then be transferred to Google Docs. This method leverages PowerPoint's robust text formatting features.
Prepare Your Slide in PowerPoint: Open Microsoft PowerPoint and select or create a slide where you intend to design your curved text. The example provided uses the "Kamsupay Google Slides Template," which is a premium template available on platforms like Envato Elements, offering a variety of pre-designed slides and color schemes. While this specific template isn't essential, using a visually appealing template can enhance the overall presentation.
Insert a Text Box: Go to the "Insert" tab located in the toolbar above the ribbon. From the options presented, select "Text Box" and then draw a text box on your slide where you want the text to appear.
Add and Format Your Text: Type the desired text into the newly created text box.
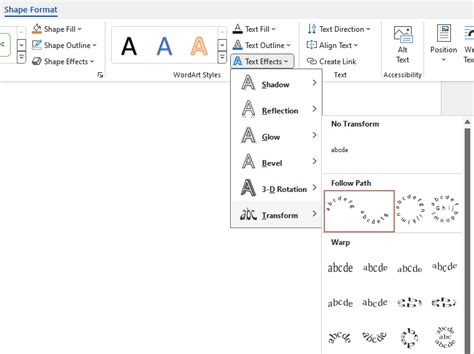
Apply Text Effects: Highlight the text you have just entered. Navigate to the "Shape Format" tab, which appears above the toolbar once a shape or text box is selected. Click on the "Text Effects" button. A dropdown menu will appear. From this menu, select "Transform." Within the "Transform" options, choose the specific curvature or text effect that best suits your needs. PowerPoint offers a variety of pre-set curve shapes.
Copy the Curved Text: Once you are satisfied with the curved text effect, you need to copy it. Select the text box containing the curved text. On macOS, you can use the keyboard shortcut Command+C to copy it. For Windows users, Ctrl+C will achieve the same result.
Transfer to Google Docs: Open your Google Docs document. Navigate to the slide or page where you wish to insert the curved text. If you are working within a presentation context, you might need to add a new slide in Google Slides. To do this, right-click in the space between existing slides (where you want the new slide to appear) and select "New Slide" from the context menu.
Paste into Google Docs: Right-click on the blank slide or the desired location in your Google Docs document and select "Paste." The curved text, now as an image or a formatted object, will be transferred.
This method offers more control over the precise curvature and appearance of the text, as PowerPoint provides a wider array of formatting options compared to direct Google Docs capabilities.
Method 3: Creating Wrapped Text Around Images
While not strictly "curved" text, the effect of text wrapping around an image is another way to achieve dynamic visual integration in Google Docs. This technique is particularly useful for creating a more professional and visually appealing layout, often seen in published materials.
This method typically involves creating an image of the text and then using graphic design principles to integrate it with other elements. For this, external graphic design tools or advanced features within presentation software are often employed.
Acquire Visual Assets: To create a sophisticated layout with wrapped text, you might want to use high-quality images. Platforms like Envato Elements offer a vast library of premium photos and graphic assets that can significantly enhance the visual appeal of your documents. Accessing these assets usually requires a subscription.
Insert Your Image: In Google Docs, go to the "Insert" tab. From the dropdown menu, select "Image" and choose the source from which you want to upload your image (e.g., your computer, Google Drive, or the web).
Add and Position Text Boxes: After inserting your image, you'll need to add text boxes to place your content.
- Click on the "Insert" tab again and select "Text Box." Your cursor will transform into a drawing tool. Draw a text box on your slide where you want to place text.
- To create a wrapping effect, you will often need to position text boxes strategically around your image. This might involve placing text above, below, or to the sides of the image, adjusting the text box size and content to flow naturally.
Advanced Wrapping Techniques: True text wrapping, where text flows seamlessly around the contours of an object, is not a native feature in Google Docs. To achieve this, users often resort to:
- Creating an Image of the Text: Use a graphic design tool (like Adobe Photoshop, Illustrator, or even free alternatives like GIMP or Canva) to create text with the desired curvature or shape. Then, save this as an image (PNG with transparency is often best) and insert it into Google Docs. This image can then be placed and layered with other elements.
- Using Pre-designed Templates: As mentioned earlier, premium templates, such as those found on Envato Elements, often come with sophisticated layouts that incorporate wrapped or curved text elements. These templates are designed by professionals and can save considerable time and effort. Subscribing to services like Envato Elements provides access to a robust library of assets, including templates, which can make your presentations look impressive and stylish.
When using premium templates or advanced design tools, the goal is to create a cohesive and visually appealing document. These services offer a wide range of digital assets that can be downloaded and used without additional cost once subscribed, providing excellent value for those who frequently create presentations or other visual documents.
By employing these methods, users can move beyond the standard linear text format and inject creativity and visual interest into their Google Docs, making their content more engaging and professional. This approach allows for a personalized touch that can make any document stand out.