Photoshop offers a robust suite of tools for creating and manipulating shapes, empowering users to design everything from simple geometric forms to intricate custom illustrations. Whether you're a beginner or looking to refine your skills, understanding these tools is fundamental to unleashing your creative potential within the software. This guide will delve into the core shape-drawing functionalities in Photoshop, covering the geometric shape tools, the versatile Custom Shape Tool, and the modern Shapes panel, ensuring you can confidently bring your visual ideas to life. Adobe has significantly updated its shape tools in recent versions, so for the most streamlined experience, it's recommended to use Photoshop 2022 or newer.
The Foundation: Geometric Shape Tools
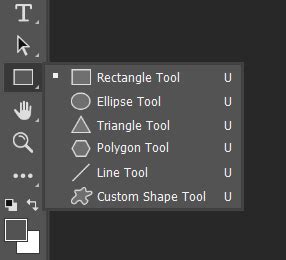
Photoshop's toolbar houses a collection of geometric shape tools, conveniently nested together. To access them, click and hold on the Rectangle Tool's icon. A fly-out menu will reveal the other geometric shape tools: the Ellipse Tool, Triangle Tool, Polygon Tool, and Line Tool.
The options for whichever shape tool is currently active are displayed in the Options Bar, located typically just below the main menu. Many of these options remain consistent across different shape tools, providing a unified workflow. The tool icon on the far left of the Options Bar not only indicates the active tool but also serves as a shortcut to reset the tool to its default settings.
Understanding Tool Modes: Vector, Path, and Pixel
A crucial setting in the Options Bar is the "Tool Mode." This determines how your shape will be rendered:
- Vector Shapes: These are the most flexible and recommended for general use. Vector shapes are constructed from points connected by lines, allowing them to be scaled and edited infinitely without any loss of quality. This makes them ideal for logos, illustrations, and any graphic element that might need resizing.
- Paths: A path is essentially the outline of a shape. It's scalable and editable like a vector shape but lacks any fill or stroke color by default. Paths are often used as guides for selections or for more intricate drawing with the Pen Tool.
- Pixels: When you draw a shape as pixels, it becomes part of the raster image, much like any other pixel-based element. This means it will lose quality if scaled up significantly and cannot be easily edited as a shape afterward. For most shape creation tasks, sticking to vector shapes is the best practice.
Customizing Fill and Stroke
Once you've chosen your tool mode (ideally "Shape"), you can define the appearance of your shape.
The Fill option allows you to select a color for the interior of your shape. The default is black, but you can choose from Solid Color, Gradient, or Pattern fills. Clicking on these options will reveal preset groups; you can then select a preset by clicking its thumbnail or choose a custom color using the Color Picker. For instance, setting the H (Hue) to 295 degrees, S (Saturation) to 70 percent, and B (Brightness) to 70 percent yields a vibrant purple.

The Stroke options control the outline of your shape. By default, Photoshop applies a 1-pixel black stroke. Similar to the fill, you can choose from Solid Color, Gradient, or Pattern for your stroke. You can also select a custom stroke color from the Color Picker. The Size field allows you to set the width or thickness of the stroke, for example, to 16 pixels.
Further stroke customization is available, including setting the stroke Type to Solid, Dashed, or Dotted lines. The Alignment option lets you position the stroke to be Inside, Outside, or Centered on the shape's outline. You can even create and save custom dashed or dotted line presets.
All these fill and stroke properties-color, size, type, and alignment-can be modified later from the Properties panel, offering non-destructive editing.
Advanced Shape Options
The Options Bar also provides access to more advanced controls:
- Path Operations: This icon, often the first one in a set of icons, allows you to combine multiple shapes into more complex forms. Options include Combine Shapes, Subtract Front Shape, Intersect Shape Areas, and Exclude Overlapping Areas.
- Path Alignment: This set of icons enables you to align or distribute multiple selected shapes precisely.
- Gear Icon (Path Options): Clicking the gear icon reveals further settings. The "Path Options" here allow you to change the Thickness or Color of the path outline itself. It's important to note that this path outline is a visual aid within Photoshop and will not print. Increasing its thickness, perhaps to 2 px, can make it easier to see while working.
- Custom Size and Aspect Ratio: Options for setting a custom size or aspect ratio before drawing, and drawing from the center, are available. However, these settings can be "sticky," meaning they remain active until changed, potentially causing annoyance.
- Corner Radius: This option is visible only when using the Rectangle, Triangle, or Polygon tools. It allows you to round the corners of your shape.
- Align Edges: This option aligns your shape's edges to Photoshop's pixel grid, which is helpful for precise alignment.
Drawing with Specific Geometric Tools
With the options understood, let's explore how to use each geometric shape tool:
The Rectangle Tool
The Rectangle Tool is straightforward for drawing four-sided shapes. Click on the canvas to establish a starting point, then drag away to define the shape's dimensions. While dragging, you won't see the fill or stroke. Pressing and holding the spacebar while still holding the mouse button allows you to reposition the shape outline on the canvas. Releasing the mouse button finalizes the shape.
In the Layers panel, each new shape is automatically placed on its own dedicated shape layer, conveniently named by Photoshop (e.g., "Rectangle 1").
To draw a perfect square, start drawing as usual, then press and hold the Shift key. This locks the aspect ratio. Continue dragging until the square is the desired size, then release the mouse button followed by the Shift key.
A Create Rectangle dialog box might also appear, allowing you to enter precise width and height values in pixels.
Tips for Drawing:
- Temporary Path Selection Tool: Hold Ctrl (Win) / Command (Mac) to temporarily access the Path Selection Tool for moving shapes while drawing.
- Drawing from the Center: Click to set a starting point, begin dragging, then hold Alt (Win) / Option (Mac). This will draw the shape outwards from its center.
- Deleting Shapes: Select the shape's layer in the Layers panel and drag it to the Trash Bin icon.
- Reselecting Shapes: Click on the shape's layer in the Layers panel. If the shape is hidden, click its visibility icon.
On-Canvas Controls and the Properties Panel
Since Photoshop 2021, shapes benefit from on-canvas controls, appearing as bounding box handles around the shape after it's drawn. These controls allow for easy scaling, resizing, and rotation without needing the Free Transform command. They also enable adjustment of corner roundness.
- Resizing: Drag any of the square handles. Hold Shift while dragging for proportional resizing (remember to release the mouse button before the Shift key).
- Undoing Transformations: Use Edit > Undo Transform Path or Ctrl+Z (Win) / Command+Z (Mac).
- Rotating: Move your cursor just outside a corner handle until it transforms into a curved double-sided arrow, then click and drag.
- Reference Point: The rotation point (a target icon) can be moved. To make it visible if it's not, go to Edit > Preferences > General (Win) or Photoshop > Preferences > General (Mac) and enable "Show Reference Point when using Transform." Moving this point changes the pivot for rotation.
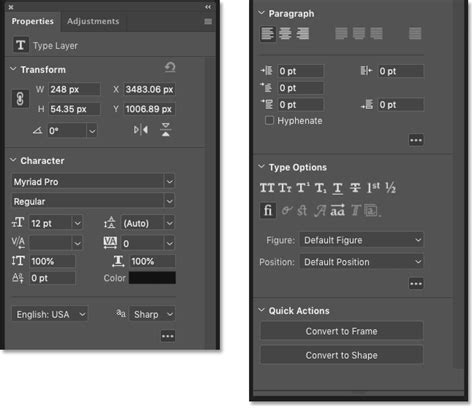
The Properties Panel: This panel is indispensable for live, editable shapes. When a shape layer is selected, the Properties panel displays its specific options, divided into sections:
- Transform: Edit Width (W), Height (H), X and Y coordinates, and Angle (rotation). These values can often be adjusted with Photoshop's "scrubby sliders" by clicking and dragging on the numerical value.
- Appearance: Modify the shape's fill color, stroke color, stroke thickness, type, and alignment. You can also adjust the Corner Radius here. By default, corner radius boxes are linked; unlinking them allows individual corner adjustments. The larger box at the bottom shows all four corner radius values.
- Pathfinder: This section mirrors the Path Operations found in the Options Bar, enabling you to combine and manipulate shapes.
The Ellipse Tool
The Ellipse Tool functions very similarly to the Rectangle Tool but creates oval or circular shapes. Click and drag to draw an ellipse. Holding Shift while dragging will constrain it to a perfect circle. Like rectangles, ellipses have on-canvas controls for resizing and can be edited extensively in the Properties panel. Corner radius options are not applicable to ellipses.
The Triangle Tool
Introduced in Photoshop 2021, the Triangle Tool provides a dedicated way to draw triangular shapes. Previously, this required using the Polygon Tool with 3 sides. To draw, click and drag. Holding Shift creates an equilateral triangle. The Triangle Tool also features the Corner Radius option in the Options Bar and Properties panel for rounded corners.
The Polygon Tool
The Polygon Tool is highly versatile, allowing you to draw shapes with any number of sides, from 3 upwards. It can even be used to create star shapes.
In the Options Bar, you can specify the Number of Sides and the Corner Radius before drawing. After drawing, the Properties panel offers further control. You can change the number of sides and adjust the Star Ratio to convert a polygon into a star. Lowering the Star Ratio pulls the points of the polygon inwards, creating a star effect.
The Line Tool
The Line Tool is specifically for drawing straight lines. A key difference from other shape tools is that the line's color is controlled by the stroke color, not the fill. You can choose Solid Color, Gradient, or Pattern fills for the line (though "fill" is less intuitive here than for enclosed shapes). The stroke size determines the line's weight. The Line Tool also offers options for adding arrowheads to either the start or end of the line.
Beyond Geometric: The Custom Shape Tool and Shapes Panel
Photoshop also provides a vast library of pre-designed shapes, accessible through the Custom Shape Tool and the Shapes panel.
The Custom Shape Tool
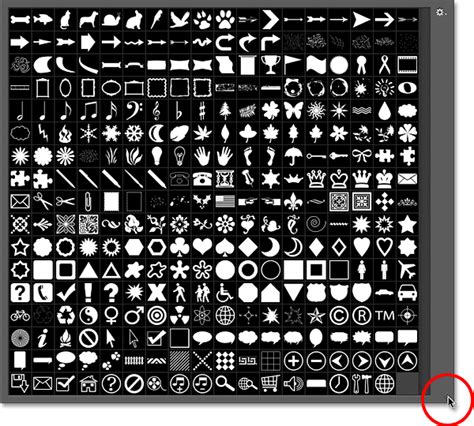
To access the Custom Shape Tool, click and hold on the Rectangle Tool (or whichever shape tool is currently visible) and select it from the fly-out menu. This opens the Custom Shape Picker, displaying various shape categories. By default, only a few groups are visible; you can expand others by clicking the arrow next to their folder icon.
Select a shape by clicking its thumbnail. You can then define its fill color, stroke color, and stroke properties (size, type, alignment) in the Options Bar, much like with the geometric tools. Drawing involves clicking on the canvas and dragging, with options to reposition using the spacebar, resize using transform handles, and rotate by hovering outside the handles. Shapes drawn with this tool also appear on their own shape layers and can be edited in the Properties panel.
The Shapes Panel
In more recent Photoshop versions (starting with 2020), the Shapes panel has become the primary hub for custom shapes. It's not part of the default workspace, so you may need to open it via Window > Shapes.
The Shapes panel contains the same default shapes as the Custom Shape Picker, organized into groups. You can display them as large thumbnails for easier viewing. A "Recents" bar provides quick access to recently used shapes. The "2019 Shapes" group and others contain hundreds of additional shapes.
To add a shape from the Shapes panel to your document, simply click on the desired shape. Photoshop will instantly draw it on a new shape layer, automatically maintaining its aspect ratio. You can then resize, rotate, and reposition it using the on-canvas controls or the Properties panel.
Working with the Shapes Panel:
- Adding Shapes: Click a shape in the panel to add it to your canvas.
- Editing: Shapes added from the panel are "live" shapes, editable via the Properties panel. You can change fill, stroke, and transform properties.
- Color and Style Presets: You can apply colors, gradients, or patterns from the Swatches, Gradients, or Patterns panels by clicking on a shape. Alternatively, you can drag and drop presets directly onto a shape.
- Layering and Merging: By default, each shape gets its own layer. However, you can add multiple shapes to the same layer by holding Shift and dragging a shape from the Shapes panel onto an existing shape layer. Shapes on the same layer will share the same fill and stroke properties. This allows for combining shapes using the Pathfinder options in the Options Bar or Properties panel. Merging shapes can convert them into regular paths, losing their "live" editability but allowing them to be transformed as a single unit.
- Selecting Multiple Shapes: Use the Path Selection Tool, holding Shift while clicking on multiple shapes to select them simultaneously for group transformations or deletion.
Advanced Techniques and Tips
- Saving Custom Shapes: If you create a unique shape or modify an existing one to your liking, you can save it as a preset. In the Shapes panel, create a new group (e.g., "My Shapes"), then drag your modified shape onto that group to save it.
- Closing Shapes: When using tools like the Pen Tool to create custom outlines, ensure you close the path by clicking back on the starting point. This creates a complete, fillable shape. If you only have a stroke, you might be missing a closed path, which can lead to issues when trying to fill or recolor.
- Combining Shapes on a Layer: When multiple shapes reside on the same layer, they are treated as one compound object for fill and stroke purposes. This is powerful for creating complex designs where elements share consistent styling.
- Using PSD Files: For complex shape-based projects, saving your work as a Photoshop Document (.PSD) preserves all layers and editability, allowing you to return and modify shapes at any time.
By mastering these Photoshop shape tools, you gain a powerful ability to create precise, scalable graphics, from simple icons to elaborate illustrations. Experiment with the different tools, explore the extensive options in the Options Bar and Properties panel, and leverage the convenience of the Shapes panel to streamline your design workflow.