In the realm of digital content creation, the ability to locate, trust, and effectively utilize every asset is paramount. This foundational principle applies to photos, videos, and design files alike. At the heart of efficient digital asset management (DAM) lies a seemingly small detail that wields significant impact: file naming conventions. When your assets are consistently named and easily searchable, you unlock substantial time savings and empower every individual within your organization to articulate your story with clarity and confidence. Filenames, in essence, establish the very infrastructure for compelling storytelling.
File naming conventions represent the most straightforward yet potent method for imposing order upon your content library. They foster a shared lexicon across diverse teams, mitigate confusion, and ensure that every asset remains discoverable and reusable, irrespective of who uploaded it or when. This guide aims to illuminate the path toward creating naming conventions that resonate with your team, establishing simple, scalable systems that streamline DAM and accelerate the delivery of your narrative. You will gain a deep understanding of what file naming conventions are, why they are critically important, and how to construct a framework that your entire organization can readily adopt.
What Exactly is a Filename?
A filename serves as an identifying label assigned to a digital file, functioning to uniquely distinguish each asset within a collection of digital files. Users customize filenames to facilitate easy identification and access to desired content, thereby establishing an organized system for file management. It is crucial to note that filename extensions, such as .jpg, .tiff, or .psd, are integral components of a filename that denote the file type and are not subject to user customization.
The Importance of Organization in Digital Asset Management
The manner in which assets are organized within your library stands as one of the most crucial elements of effective digital asset management. The majority of library platforms, whether they are server-based or cloud-based DAM solutions, employ file names as the primary means of organizing files. Consequently, the development of a standardized file naming convention for your organization will instantly contribute to the reorganization of your files, thereby enhancing the efficiency of your library.
Accessible and Efficient Search Capabilities
A core objective of effective file management is to enable users to swiftly search for and retrieve high-quality, relevant assets. While several methods can contribute to an effective search strategy, one of the most direct and impactful is through the utilization of file names. Unlike alternative search mechanisms such as metadata tagging or folder structures, filenames possess inherent searchability across virtually any platform used for asset storage. By implementing a standardized file naming convention, users can consistently know precisely how to search for and locate the correct asset.
Achieving Universal Understanding Through Standardization
With standardized filenames, individuals across an organization, regardless of their department or level of experience, will possess a foundational understanding of what file names signify even before accessing the library. This eliminates the necessity of recalling disparate naming conventions employed by different departments or contributors. Furthermore, users will be able to rapidly discern the purpose, origin, and content of an asset simply by examining its filename.
Establishing a Standardized File Naming Convention: A Three-Step Process
The process of establishing a robust file naming convention can be effectively segmented into three distinct yet interconnected steps:
Step 1: Build Your File Naming Convention
This initial phase involves the strategic design of your naming system. It requires a thorough understanding of your core file types and their respective use cases. Within your digital asset management program, it is common to encounter various teams utilizing different file types for dissimilar purposes. To ensure that these nuances are addressed, each team should have a representative present within the stakeholder group responsible for constructing the convention.
Identify Your Core Components: Every filename inherently shares certain standard components, which typically include the creation date, a sequence number, and the file extension. Beyond these fundamental elements, determine what other descriptive components are essential for your specific needs. These might encompass the creator's name or initials, the location, the project name or number, the intended channel or use case, and/or a version number.
Limit the Number of Components: While incorporating descriptive elements into your filenames is necessary, it is imperative to limit the total number of components to a manageable range, generally between 4 to 5, including the standard ones. Different file types may necessitate slightly varied components, but simplicity should always be a guiding principle, especially when your organization is simultaneously implementing metadata tags and descriptions. As a general guideline, filenames should ideally not exceed 25 characters in any given use case, as many systems may struggle to recognize or process assets with excessively long names.
Step 2: Apply New and Improved File Names
Once your convention is established, the next critical step is the consistent application of these new standards.
Utilize Underscores and Capitalization, Avoiding Special Characters: As exemplified in subsequent sections, each component within a filename should be logically separated by an underscore, and each component should be capitalized as appropriate. When files are organized into folders, they are sorted based on their names. If a filename begins with a number, such as a date formatted with the year first, files will be sorted chronologically, with the oldest assets appearing at the top. This default sorting can be easily reversed to display the newest assets first, significantly improving discoverability. Conversely, if filenames are sorted alphabetically without a numerical prefix, navigating through them can become considerably more challenging for users.
Batch Rename Files to Save Time: Tools such as Adobe Bridge, PhotoMechanic, or dedicated DAM platforms offer the capability to rapidly rename entire folders of files. This efficiency is invaluable for renaming new files as they are ingested into your DAM system. These tools also provide users with a preview of the impending new filenames, simplifying the quality control process. Some DAM platforms even allow you to pre-configure file naming conventions directly within the software, thereby ensuring user adherence to your established standards.
Step 3: Develop and Define a Process for Using and Managing File Names
The final, yet equally crucial, step involves formalizing the adoption and ongoing management of your file naming conventions.
Document Your File Naming Conventions and Make Information Accessible: All relevant digital asset management standards should be meticulously documented in a single, easily accessible location for every member of your organization. It is highly recommended to incorporate real-world examples whenever possible, as a visual illustration is invariably the most effective method for ensuring end-users comprehend the correct asset naming procedures.
Match Descriptive Keywords with Your Taxonomy and Controlled Vocabulary: For instance, if your organization utilizes "Action" as one of its file naming components, the terms used to populate this field should not be arbitrary or left to the discretion of the individual naming the asset. The options for this field ought to be drawn from a predetermined list of keywords that align with the organization's existing language. Failure to do so could result in images depicting a quarterback passing a football being named inconsistently, such as "20211231ThrowPD0001.jpg" and "20211231PassJS0001.jpg." This inconsistency would severely impair searchability, as users would be forced to guess which action word the photographer employed.
Crafting and Implementing Effective Filenames
Once your naming convention is firmly established, the practical application of naming your files can commence.
1. Consider the Length of Your Filenames
It is advisable to keep your filenames concise. A practical rule of thumb suggests that each filename should ideally be under 25 characters.
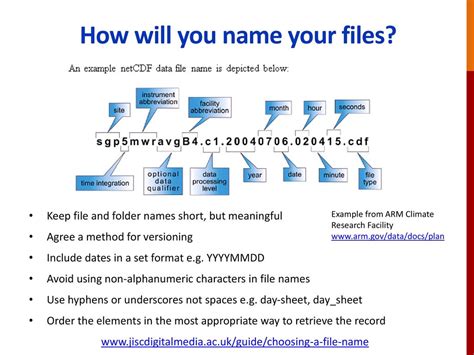
2. Start With the Date
To ensure your files automatically organize themselves chronologically within folders, whether from newest to oldest or vice versa, initiating filenames with the date is an effective strategy. Dates should be formatted consistently, either as YYMMDD or YYYYMMDD, to facilitate filtering by year, then month, and finally day. For an image captured on May 15, 2021, the filename would commence with either "210515" or "20210515," depending on your preferred format.
3. Incorporate Relevant Keywords
An effective filename should encapsulate the most critical information that describes the digital asset it represents. Employ specific, descriptive words that add value to the files and are pertinent to your project or team. For example, if you are naming an image of a cat perched on a roof at night in Paris, different teams might extract distinct keywords.
4. Use Capitals, Underscores, and Dashes for Readability
Employing these characters is the most effective way to enhance the readability of filenames, especially when quickly scanning for a specific image. Certain software applications may not recognize spaces within filenames, potentially leading to an inability to open the file. For instance, if you intend to name a file depicting a cat used for marketing purposes, it should be named "20210515MarketingCat.jpg" rather than "20210515marketingcat.jpg."
5. Preserve File Type Extensions
These extensions provide crucial information regarding how files can be shared, altered, and preserved. Common examples include .jpg, .tiff, .txt, and .pdf.
File Naming Convention Best Practices
As you have learned, establishing a clear, well-thought-out, and understandable standard for naming files is invaluable. Here are some best practices to guide the development of your file naming convention:
Gather Input from All Stakeholders and End-Users: Dedicate time to bring together all relevant parties, whether in person or remotely, to brainstorm the fields and information necessary for your file naming strategy to function effectively across your entire organization.
List All Potentially Relevant Fields, Then Eliminate: Create a comprehensive list of all fields that could potentially be useful, and then systematically narrow it down to include only the most essential ones. Collaborate with other stakeholders to determine which fields are optional and which are mandatory.
Use Abbreviations and Acronyms (with Clear Definitions): Abbreviations and acronyms can efficiently represent various types of information, such as names, departments, file types, and intended usages. Crucially, ensure that all users understand the meaning of these abbreviations and acronyms.
Employ Underscores to Separate Information Fields: Underscores serve to clearly demarcate the distinct pieces of information contained within a filename. A convention like "YYYYMMDDFirstLastInitialDepartmentDescription001.jpg" is far more comprehensible than "YYYYMMDDFirstLastInitialDepartmentDescription001.jpg."
Always Use Sequence Numbers for Visual Assets: Sequence numbers should consistently appear at the conclusion of a filename. This practice allows your assets to be instantly sorted in sequence, enabling users to efficiently locate the specific asset they require.
Practical File Naming Convention Examples
While the concept of file naming conventions has been explored in depth, seeing them in practice through applicable real-world examples can be highly beneficial.
Example 1: Baltimore Ravens Game Photos
The Baltimore Ravens employ an easily understandable file naming convention for their weekly game photos, structured as follows:
- Date: The date the game was played.
- Week of the Season: The specific week number within the NFL season.
- Team Abbreviation: A concise identifier, such as "BR" for the Baltimore Ravens.
- Number in Sequence: A sequential number for each photo taken during the game.
- Corporate Event (if applicable): For non-game related content, a descriptor for the event.
Example 2: Corporate Event Photography
This example illustrates a file naming convention tailored for a corporate event:
- Creation Date: Formatted as YYYYMMDD (e.g., 20220212).
- Event Name: A descriptive name for the event (e.g., Leadership Brunch).
- Photographer Initials: The initials of the photographer (e.g., JS).
- Sequence Number: A four-digit sequential number (e.g., 0001).
- Filename Extension: The file type (e.g., .jpg).
An example filename based on this convention would be: 20220212LeadershipBrunchJS_0001.jpg
Enhancing Your File Naming Conventions and DAM with Stacks
File names are a fundamental and powerful tool for organizing your visual assets. The creation and implementation of clear, relevant standards for naming your files enable superior organization, rapid searching, and more effective utilization.
Establishing a logical file naming convention is a discipline that is often more intricate than many initially assume. By leveraging the insights provided in this guide, your team will find it easier to build, apply, and manage easily understandable file names, regardless of your industry or specific use case. Adopting these practices will also proactively eliminate the need for time-consuming and resource-intensive file reorganization projects in the future.
Adjusting your current file naming protocols, if any exist, and implementing new conventions can initially appear to be a daunting undertaking. Depending on the sheer volume of files requiring renaming or the number of new files being generated weekly, this task could indeed be substantial. However, with the right approach and potentially expert assistance, it becomes a manageable and highly rewarding process.
Leveraging Professional DAM Solutions
When preparing files for professional printing, particularly for complex custom prints, investing time and effort into utilizing software like Photoshop can significantly contribute to achieving professional, high-quality results. By employing this software effectively, designers can ensure their creations are optimized for print and meet all specified requirements.
For instance, when saving files in Photoshop, you generally encounter two primary options: "Save…" and "Save As…". The initial dialog box presented is typically your operating system's standard "Save/Save As.." dialog. Subsequently, upon saving your file as a TIFF for the first time, Photoshop's TIFF Options dialog box will appear. Generally, the settings within the TIFF Options dialog rarely require modification. Therefore, adhering to the principle of "Keep It Simple, Stupid" (K.I.S.S.), for all practical intents and purposes, there is often no discernible difference between the TIFF format and the PSD format in terms of their fundamental nature for many workflows.
It is highly recommended to develop the habit of saving your image frequently as you work. The frustration of experiencing a computer crash or freeze after dedicating significant time to a particularly challenging function can be immense. A common practice is to save every few minutes during active work sessions.
Differentiating Master and Print-Ready Files
Establishing and consistently using an easy-to-understand naming convention is crucial. For unflattened "Master" or "Archive" files, a common practice is to append "M" to the end of the filename. Conversely, for flattened files prepared for printing, a print size, such as "11x14", is appended.
Consider these examples:
- Yos12306-11M.tif: This represents an unflattened "Master" file, meticulously prepped for optimal contrast, color balance, and other essential adjustments.
- Yos12306-1111x14.tif: This file would originate from the master file, subsequently flattened, sharpened, and cropped specifically for an 11 x 14 inch print.
- Yos12306-115x7_72ppi.jpg: Similarly, this file would also be derived from the master, flattened, sharpened, and cropped for a 5 x 7 inch print, with an indication of its resolution (72ppi) suitable for web use.
How to use the "save for web" feature in Photoshop
Organizing Layers and Design Elements
When engaging in graphic design, particularly with software like Photoshop, the process often involves a multitude of tools, layers, brushes, typefaces, and other resources that contribute to the uniqueness of each design. However, this complexity can inadvertently create disarray when it comes time to locate a specific file or implement modifications requested by a client. You may have invested considerable time perfecting your project and achieving the design details precisely as envisioned, but the subsequent step of preparing these assets for professional printing requires careful organization.
Keeping layers, brushes, paths, and effects within your design organized can present a significant challenge. This is often due to practices like duplicating layers, resulting in filenames like "layer 1," "copy of layer 1," and "copy of copy of layer 1" within the file structure â a precursor to a potential organizational nightmare.
A fundamental principle for properly organizing your archives is to establish coherent folder structures. Create a dedicated folder for each distinct project and ensure all files are named according to their intended use. Each time a significant change is made, delete previous versions and retain only the latest iteration and the one immediately preceding it, allowing clients to review modifications. Crucially, avoid using ambiguous names such as "final version," "latest version," or "latest latest version" for your PSD files.
Collaborating with Printers and Managing Fonts
No two printing firms operate identically. Therefore, it is most prudent to contact your printer in advance and inquire about their specific requirements before submitting your job. Ask pertinent questions to understand how they prefer files to be set up, thereby avoiding potential complications during the printing process. Ultimately, the goal is to prevent wasted time on revisions and to focus on progressing to your next project.
For an enhanced workflow, consider naming your layers within Photoshop. This practice, much like naming personal possessions, is incredibly useful whenever you need to alter an element of your design. Strive for simplicity and ensure layer names directly relate to their actual content.
Furthermore, it is vital to manage your fonts effectively. When downloading typefaces, do not leave them in a general download folder. Instead, maintain them in a specific folder dedicated to font files. Ensure that you possess the appropriate licenses for sharing these fonts. Employ separate subfolders for each distinct typeface, facilitating easier modifications to their style or size at a later stage.
Ensuring Image Quality and File Size Management
Whether you are a professional designer or an enthusiast working in your spare time, your professional image is paramount. To consistently achieve excellent results, ensure that your images are set to a resolution of 300 dots per inch (dpi). This guarantees that the quality of the image you are designing translates beautifully to the printed page.
Begin by selecting a suitable name for your file and storing it within the designated project folder, thereby preventing it from being mistaken for extraneous items on your desktop. Maintain all files within a consistent size range. When saving archives, aim to optimize their quality and colors to be either small or medium, depending on their intended purpose. Remember that for web use, smaller image sizes are generally preferred, while for print design, high-quality images are essential.
Obtaining Approval Before Saving or Deleting
Once your design is finalized or when the client has approved all aspects of the project, confirm whether they require any further adjustments before proceeding to erase any preliminary files. Any files that have remained on your desktop for an extended period, perhaps several months, should be either deleted or archived onto a portable hard drive. Retain only the essential elements that might be included in your portfolio; the rest should be removed.
Begin practicing these useful tips, and you will notice a significant difference when it comes time to locate your archives or a specific layer within your PSD file â a key strategy for curating the best graphic design portfolio.
Professional Printing Services and DAM Systems
Printing companies typically offer a diverse range of professional digital printing services, including digital printing, offset printing, large format printing, and specialized printing methods such as screen printing or flexography. When it comes to preparing files for highly customized prints, investing time and effort into effectively utilizing software like Photoshop can be instrumental in achieving professional and high-quality outcomes. By leveraging this software proficiently, designers can ensure their creations are optimized for print and meet all the desired specifications.
The association between graphic design and Photoshop is strong, likely due to their widespread use together. However, many may not realize that creating unique designs often requires a combination of numerous tools, layers, brushes, typefaces, and other resources. This intricate process can sometimes lead to significant disorganization when searching for a file or making client-requested modifications. After dedicating substantial time to a project and perfecting the design details, preparing these assets for professional printing becomes the next critical step.
A graphic design portfolio is a curated collection of a designer's most accomplished work, designed to showcase their skills and expertise to potential clients or employers. This is often presented on a personal portfolio website or platforms like Behance. It is generally recommended to include a variety of 8 to 12 examples of your best design work within your portfolio.
Ultimately, an effective digital asset management system can significantly boost productivity, enabling you and your employees to accomplish more. This can translate into savings on labor costs and a reduction in operational headaches. Furthermore, presenting your work through your own branded asset management system reinforces the seriousness with which you approach your profession and business, making a strong impression on clients.
However, it is important to recognize that a DAM system is not a panacea. Like any tool, its effectiveness is contingent upon the skill of the user. Whether you utilize an asset management system specifically designed for photography and commercial use or a consumer-grade option, it must be complemented by an effective file management system, robust file naming conventions, a sound file structure, and other best practices.