Adobe InDesign stands as a cornerstone in the realm of professional design, empowering creators to craft visually compelling layouts and publications. Central to this creative process is the judicious selection and integration of typography. If you've ever found yourself pondering "how to import a font into InDesign" or "how to add fonts to Adobe InDesign," this comprehensive guide is designed to demystify the process, exploring various methods and considerations to ensure a seamless typographic experience.
Understanding Font Formats and Compatibility
Before diving into the mechanics of adding fonts, it's crucial to grasp the different font formats and their compatibility with Adobe InDesign. Each format possesses unique characteristics that influence design flexibility. While there's no need for undue concern, as Adobe InDesign and Adobe FrameMaker DITA support a wide array of font types, familiarizing yourself with these formats is essential for a smooth integration.
Adobe InDesign supports a variety of font types, including:
- OpenType (.otf): A highly versatile format developed by Adobe and Microsoft, offering an expanded character set and advanced typographic features.
- OpenType SVG: This format allows for multi-color and gradient glyphs, making it ideal for emoji fonts and other graphically rich characters.
- TrueType (.ttf): A widely compatible font format developed by Apple and Microsoft.
- Variable Fonts: A newer OpenType format that supports custom attributes like weight, width, and slant, allowing for a single font file to encompass a range of styles.
- Adobe Fonts (formerly Typekit): A subscription-based service offering a vast library of fonts integrated directly with Creative Cloud applications.
- Type 1: An older PostScript font format.
- Multiple Master: A legacy PostScript format that allows for interpolation between different font designs.
- Composite: A font format that combines multiple glyphs into a single character.

It is important to note that while InDesign supports these formats, the actual availability and functionality of specific features within a font depend on its design and the application's capabilities. For instance, OpenType fonts can include an expanded character set and layout features, such as ligatures, ordinals, and fractions, to provide richer linguistic support and advanced typographic control. OpenType fonts from Adobe that include support for central European (CE) languages are often labeled with "Pro" in their names, while those without CE language support are labeled "Standard" with an "Std" suffix.
Sourcing Your Typography: Reputable Font Resources
Choosing the right fonts for your design project is paramount. Fortunately, numerous reputable sources offer extensive font libraries for both personal and commercial use. These platforms provide a wide spectrum of styles, from classic serifs to contemporary sans-serifs and unique decorative fonts.
Popular and reliable sources include:
- Adobe Fonts: Integrated directly with Adobe Creative Cloud, this service offers a vast, curated library of high-quality fonts that can be activated and used across all your Adobe applications, including InDesign.
- Google Fonts: A comprehensive collection of open-source fonts, freely available for commercial and personal use, with extensive customization options.
- DaFont: A popular site offering a wide variety of free fonts, though it's crucial to check the licensing for each font, as many are for personal use only.
- Font Squirrel: Known for its curated selection of high-quality, free fonts for commercial use, often accompanied by detailed licensing information.
When selecting fonts, consider factors such as readability, the project's overall aesthetic, licensing requirements, and the font's intended use. For example, serif fonts, characterized by small strokes or "feet" at the end of letterforms (like Times New Roman or Garamond), are often perceived as more traditional and are excellent for long-form text. Sans-serif fonts, lacking these strokes (like Arial or Helvetica), tend to appear more modern and are highly versatile. Decorative fonts, on the other hand, possess unique and distinctive styles, best suited for headlines or specific design elements where impact is key.
Method 1: System-Wide Font Installation
The most common and straightforward method for making fonts available in Adobe InDesign is to install them directly onto your computer's operating system. Once installed system-wide, these fonts will be accessible not only in InDesign but also in all other applications that utilize your system's font library, such as Microsoft Word, Adobe Photoshop, and Illustrator.
Installing Fonts on Windows
- Locate Font Files: Font files are often compressed in ZIP format. Extract the font files from the ZIP archive.
- Access the Fonts Folder: Navigate to the "C:\Windows\Fonts" folder in File Explorer.
- Install the Font:
- Drag and Drop: Simply drag and drop the extracted font files into the "C:\Windows\Fonts" folder.
- Right-Click Install: Alternatively, right-click on each font file and select "Install" or "Install for all users."
- Verification: The font should now appear in your system's font list and be available in Adobe InDesign. If you don't see the panel on the screen, click Type in the menu panel at the top, followed by Character. Click the arrow pointing down, which is to the right of the current font at the top of the Character panel.
Installing Fonts on macOS
- Locate Font Files: Extract any compressed font files.
- Use Font Book:
- Double-Click: On macOS, the easiest way to install a font is to double-click the font file. This will open the font in Font Book, the default font management utility.
- Click Install: Within Font Book, click the "Install Font" button.
- Manual Installation (Alternative): You can also manually install fonts by copying the font files into the "~/Library/Fonts" folder in Finder. To access the Library folder, click "Go" in the Finder menu bar, hold down the Option key, and select "Library."
- Verification: The installed font will be available in Font Book and across your applications, including InDesign.
Important Consideration: After installing new fonts on your system, it is highly recommended to close and reopen Adobe InDesign. This ensures that the application refreshes its font cache and recognizes the newly installed typefaces.
Method 2: Utilizing Adobe Fonts
Adobe Fonts (formerly Typekit) offers a streamlined and integrated approach to font management for Creative Cloud subscribers. This service provides access to an extensive library of high-quality fonts that can be activated directly through the Creative Cloud desktop application and made available in InDesign and other Adobe software without manual installation on your system.
Activating Fonts from Adobe Fonts
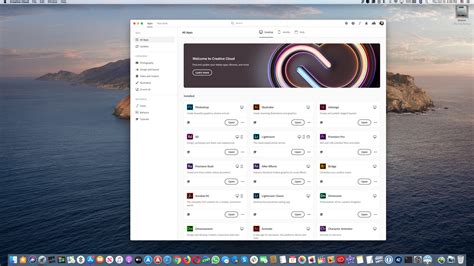
- Open Creative Cloud Desktop App: Launch the Adobe Creative Cloud desktop application.
- Browse the Font Library: Navigate to the "Fonts" tab. Here you can browse the extensive library, using tags and filters to refine your search based on classification (Serif, Sans Serif, Handwritten), style, or visual similarity.
- Find and Select Fonts: When you find a font you like, click on it to view its family page. You can preview samples of the font in various styles and weights.
- Activate Fonts: To activate a font, click the toggle switch or the cloud icon next to its name. The font will then be added to your "Added Fonts" list.
- Use in InDesign: Once activated, the font will appear in the font menus of all your desktop applications, including Adobe InDesign, alongside your locally installed fonts.
Managing Adobe Fonts:
- Performance Optimization: While you can add numerous fonts, keeping your activated font list relatively short can help optimize application performance.
- Reinstallation: Adobe Fonts that haven't been used in several months may need to be reinstalled for use in non-Adobe applications. You can quickly reinstall them from the Creative Cloud desktop app by clicking the "Install" button next to the font name in your "Added Fonts" list.
- Auto-Activation: InDesign can be configured to automatically activate missing Adobe Fonts when you open a document containing them. This feature, typically found in the Preferences dialog, can be enabled to avoid the "Missing Fonts" dialog box and ensure that documents display correctly even if some fonts are not locally installed. If only some of the missing fonts are available in Adobe Fonts, they will be activated in the background, and the rest will be substituted with default fonts.
Method 3: Document Fonts Folder
For specific projects, especially when collaborating with others or transferring files between computers, using the "Document Fonts" folder is an invaluable method. This approach allows you to embed fonts directly within your InDesign project folder, ensuring that those specific fonts are available only for that particular document, without cluttering your system's font library.
Creating and Using a Document Fonts Folder
- Locate the InDesign Document: Find the InDesign file (.indd) you are working with.
- Create the Folder: Inside the same folder where your InDesign document is saved, create a new folder named "Document Fonts" (with a capital 'D' and 'F').
- Copy Font Files: Copy the font files you want to use exclusively for this document into the "Document Fonts" folder.
- Open the InDesign Document: When you open the InDesign document, InDesign will automatically detect and temporarily install the fonts from the "Document Fonts" folder. These fonts will be available within InDesign for that specific document.
- Package for Sharing: When you use the "Package" command in InDesign (File > Package), you have the option to include a "Document Fonts" folder. This is crucial for ensuring that anyone who opens your packaged project on a different computer will have access to all the necessary fonts.
Key Characteristics of Document Fonts:
- Document-Specific: Fonts placed in the "Document Fonts" folder are only available when that specific InDesign document is open. They do not install system-wide.
- Temporary Installation: These fonts are temporarily installed upon opening the document and are uninstalled when the document is closed.
- Superseding System Fonts: Fonts in the "Document Fonts" folder will supersede any system-installed fonts with the same PostScript name, but only within the context of that document.
- Limitations: Some older font formats, like certain Type 1 fonts, may not be fully supported when packaged as Document Fonts.
This method is particularly useful for maintaining design consistency across different workstations or for clients who may not have the required fonts installed on their systems. It prevents potential font conflicts and ensures that your layout appears exactly as intended.
Adobe InDesign Course - Class 35 (Font Mastery)
Troubleshooting Font Issues in InDesign
Occasionally, you might encounter situations where installed fonts do not appear in InDesign's font menus, or documents display with substituted fonts. Here are some common issues and their solutions:
Font Not Appearing in InDesign
- Restart InDesign: As mentioned earlier, always restart InDesign after installing new fonts.
- Check Font Cache: Corrupted font caches can prevent fonts from displaying correctly. You can clear your system's font cache (instructions vary by operating system) and then restart InDesign.
- Font Location: Some fonts might be listed with their foundry name preceding the font name. This can affect alphabetical sorting. Try searching for the font by typing its name directly into the font search field in the Character panel.
- Adobe's Font Folder: InDesign also has its own font directory. You can try placing font files into the Adobe-specific font folder:
- Windows: "Program Files/Common Files/Adobe/Fonts"
- macOS: "~/Library/Application Support/Adobe/Fonts"Fonts placed here are generally available only to Adobe applications.
- Corrupt Font File: The downloaded font file might be corrupt. Try downloading the font again from the source.
- Font Licensing: Ensure the font license permits installation and use in design software.
Missing Fonts Dialog Box
When you open an InDesign document that contains fonts not available on your system, a "Missing Fonts" dialog box will appear.
- Activate Adobe Fonts: If the missing fonts are available through Adobe Fonts, InDesign will prompt you to activate them. Ensure that "Auto-activate Adobe Fonts" is enabled in your Creative Cloud application preferences.
- Substitute Fonts: If the missing fonts are not available via Adobe Fonts, InDesign will offer to substitute them with similar fonts already installed on your system. You can then choose to replace them permanently or temporarily.
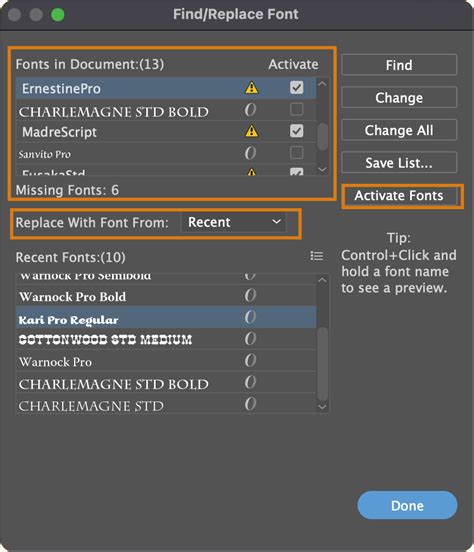
- Manual Replacement: You can also manually replace missing fonts by going to Type > Find Font. This dialog box allows you to see all missing fonts in the document, view which fonts will be used as substitutes, and select alternative fonts from your installed library or Adobe Fonts.
Advanced Typography with OpenType Features
Adobe InDesign's robust support for OpenType fonts unlocks a world of advanced typographic possibilities, allowing for greater control over text appearance and linguistic nuance.
Exploring OpenType Attributes
Within the Character panel (Window > Type & Tables > Character), you can access a range of OpenType features by selecting a font and then clicking the gear icon or the "OpenType" button. These features can dramatically enhance your typography:
- Ligatures: Optional ligatures can be turned on to create aesthetically pleasing combinations of certain letter pairs (e.g., "fi," "fl").
- Ordinals: Automatically formats numbers followed by ordinal suffixes (e.g., "1st," "2nd") in a more refined manner.
- Fractions: Provides proper formatting for fractions (e.g., 1/2, 3/4).
- Proportional Figures: Allows numbers to have varying widths, aligning better with surrounding text.
- Tabular Figures: Assigns a fixed width to all numeric characters, ensuring alignment in tables and financial data.
- Small Caps: Converts lowercase letters to small capital letters, maintaining their intended size relative to uppercase letters.
- Contextual Alternates: Adjusts characters based on their position within a word or sentence for improved readability and flow, common in handwriting styles.
- Discretionary Ligatures: Offers additional ligatures for purely stylistic purposes.
- Swashes: Adds decorative flourishes to characters.
- Oldstyle Figures: Provides numerals that blend more harmoniously with lowercase text.
Working with OpenType SVG Fonts
InDesign also supports OpenType SVG fonts, which are capable of displaying multiple colors and gradients within a single glyph. This is particularly relevant for:
- Emoji Fonts: Such as EmojiOne, these fonts allow you to incorporate colorful graphical characters like smileys, flags, animals, and more directly into your InDesign documents. You can combine individual glyphs to create composite characters, such as national flags based on ISO codes.
- Colored Fonts: These fonts can be used for various graphical elements, logos, or icons that require color within the type itself.
To use these features, select an OpenType SVG font and then utilize the Glyphs panel (Type > Glyphs) to find and insert the desired characters.
Font Management within InDesign
Beyond adding new fonts, InDesign offers features to help you manage and utilize your existing typography efficiently.
Favorites and Recently Used Fonts
To quickly access fonts you frequently use:
- Favorites: Star individual font families as favorites. These will appear at the top of the font list under a dedicated "Favorites" section.
- Recently Used Fonts: InDesign automatically lists the fonts you've recently used at the very top of the Font Family menu, making them easily accessible.
Filtering and Searching Fonts
When dealing with a large font library, the font search and filter options in InDesign are indispensable:
- Classification Filtering: You can filter fonts by classification (e.g., Serif, Sans Serif, Handwritten, Script, Decorative) to narrow down your choices.
- Visual Similarity Search: InDesign can analyze the visual characteristics of a font and display other fonts in your library that are visually similar, aiding in font pairing.
- Direct Search: You can type the first few characters of a font name into the Font Family menu or the search bar in the Creative Cloud desktop app to quickly locate it.
By mastering these methods of importing, managing, and utilizing fonts, you can significantly enhance the visual appeal and communicative power of your Adobe InDesign projects, bringing your creative visions to life with sophisticated typography.