Working with digital images often necessitates resizing them to fit specific dimensions for various purposes, from web display to print. Photoshop, a powerful and versatile image editing software, offers multiple methods to achieve this, each with its own strengths and applications. Understanding these techniques is crucial for maintaining image quality and achieving desired results without unwanted distortions. This guide will delve into the various ways you can resize images in Photoshop, ensuring you can confidently handle different scenarios and project requirements.
The Nuances of Image Resizing: Understanding Key Concepts
Before diving into the specific tools and methods, it's important to grasp some fundamental concepts related to image resizing. When you resize an image, you are essentially altering the number of pixels it contains. This process can involve either adding pixels (upscaling) or removing pixels (downscaling). The way Photoshop handles this pixel manipulation is critical to the final image quality.
Pixels, Resolution, and Quality
At its core, a digital image is a grid of pixels. The "size" of an image is often described by its pixel dimensions (e.g., 1920 pixels wide by 1080 pixels high). Resolution, measured in Pixels Per Inch (PPI), refers to the density of these pixels when the image is displayed or printed. A higher PPI generally indicates a higher quality image, especially for printing, where it translates to more detail. When resizing, especially when downscaling, Photoshop attempts to intelligently remove pixels to maintain as much detail as possible. Conversely, upscaling involves Photoshop creating new pixels based on existing ones, which can sometimes lead to a loss of sharpness or the introduction of artifacts.
Resampling: The Engine of Pixel Manipulation
Resampling is the process by which Photoshop either adds or subtracts pixels to change the overall dimensions of an image. When resampling is enabled (the "Resample" checkbox is ticked in the Image Size dialog), Photoshop uses algorithms to calculate the new pixel values. If you uncheck this box, the image's pixel dimensions remain the same, but the resolution changes, which can lead to the image being squashed or stretched without any pixel compensation, significantly impacting overall image quality.
Photoshop offers several resampling methods, each suited for different situations:
- Automatic: This is the default setting and allows Photoshop to choose the best algorithm based on whether you are enlarging or reducing the image.
- Enlarge - Preserve Details / Enlarge - Preserve Details 2.0: These are specifically designed for upscaling images, aiming to retain detail and reduce noise. Preserve Details 2.0 is generally considered more advanced.
- Reduce - Bicubic Sharper: Ideal for reducing the size of images, this method sharpens the image to compensate for the loss of pixels.
- Bicubic (smooth gradients): A good general-purpose algorithm that aims for smooth transitions between colors and tones.
- Nearest Neighbor (hard edges): The simplest algorithm. It duplicates existing pixels and is best for images with sharp edges and solid colors, such as pixel art, as it avoids introducing new colors or smoothing.
- Bilinear: A basic averaging method that can be faster but may result in softer images than Bicubic.
Understanding these options allows for more informed decisions when resizing, ensuring the chosen method best preserves the integrity of the original image.
Method 1: Image > Image Size - The Primary Resizing Tool
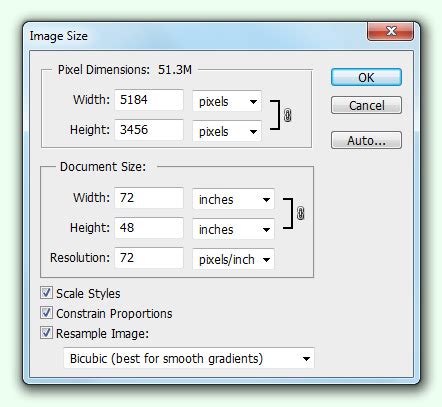
The most direct way to resize an image in Photoshop is through the "Image Size" dialog box. This powerful tool provides comprehensive control over pixel dimensions, resolution, and resampling methods.
To access it, navigate to Image > Image Size from the top menu bar. This will open a dialog box with several key options:
Adjusting Dimensions and Units
At the top of the dialog, you'll find fields for "Width" and "Height." Crucially, there's a dropdown menu that allows you to select the unit of measurement. While pixels are the most common for digital work, you can also choose inches, centimeters, millimeters, points, picas, and percentages. This flexibility is essential for preparing images for different media.
The "Constrain Proportions" (or "Maintain Aspect Ratio") checkbox is vital for preventing unwanted stretching or squashing. When this is enabled, changing the width will automatically adjust the height proportionally, and vice-versa, preserving the original aspect ratio of your image. If you need to fit an image into a specific, non-proportionate frame, you would uncheck this option, but be aware that this will inherently distort the image.
Modifying Resolution
The "Resolution" field allows you to change the image's PPI. As mentioned earlier, 72 PPI is standard for web and screen display, while 300 PPI or higher is generally recommended for high-quality printing. Changing the resolution without resampling will affect the physical print size of the image. For example, an image with a fixed pixel dimension will become smaller in print at a higher PPI.
The Role of Resampling
Below the dimension and resolution settings, you'll find the "Resample" checkbox. When checked, you can select one of the resampling algorithms discussed previously. This is where Photoshop actively adds or removes pixels to achieve the new dimensions. When unchecked, changing the resolution will alter the print size without changing the pixel count, effectively stretching or compressing the existing pixels.
Presets for Efficiency
The "Image Size" dialog also includes a "Preset" dropdown menu. This is incredibly useful for quickly applying common resizing settings or for saving your own custom presets. If you frequently resize images to a specific dimension and resolution, creating a custom preset can save significant time and ensure consistency. For example, if you consistently need to resize images to 550x800 pixels, you can create a preset for this exact dimension.
Method 2: Image > Canvas Size - Adjusting the Workspace
While "Image Size" changes the actual pixel dimensions of the image content, "Canvas Size" alters the overall dimensions of the canvas on which the image resides. This is useful when you want to add or remove space around your image without changing the image itself.
To access this function, go to Image > Canvas Size. This dialog box allows you to adjust the Width and Height of the canvas.
Expanding or Shrinking the Canvas
Similar to "Image Size," you can select your desired units (pixels, inches, etc.) and input new dimensions. When increasing the canvas size, you'll need to specify how the new space is added.
The Anchor Point: Controlling Expansion Direction
The "Anchor" setting is a visual representation of your current image within the canvas. It's a grid with a central dot representing your image. By clicking on different points within this grid, you dictate where the new canvas space will be added. For instance, if you click the top-middle square, the canvas will expand downwards. If you click the center dot, the canvas will expand equally in all directions.
Canvas Extensions: Filling the New Space
At the bottom of the "Canvas Size" dialog, you'll find the "Canvas extension color" option. This allows you to choose the color that will fill any newly added canvas space. Common choices include white, black, or the foreground/background color. You can also select "Other" to choose any custom color. This is particularly useful for creating borders or adding space for text overlays without affecting the original image content.
For instance, if you have a photograph of a pet and need to add a border for a print, you would use "Canvas Size" to expand the canvas and then select a border color.
Three Simple Ways to Add Image Borders in Photoshop
Method 3: The Crop Tool - Precision Framing and Resizing
The Crop Tool is not just for removing unwanted parts of an image; it can also be used to resize the canvas to a specific aspect ratio or dimension.
Select the Crop Tool from the toolbar (or press 'C'). In the options bar at the top of the Photoshop window, you'll find several dropdown menus.
Aspect Ratio and Dimension Constraints
You can choose a specific "Aspect Ratio" (e.g., 16:9, 4:3) or set "W x H x Resolution" to define exact dimensions. When you set a specific aspect ratio, the cropping handles will constrain the crop box to maintain that ratio as you drag its corners. If you input specific W x H values, the crop box will adhere to those dimensions.
Resizing and Cropping
Once you've set your desired crop dimensions or aspect ratio, you can drag the handles of the crop box to frame the area of the image you want to keep. As you adjust the box, Photoshop will show you the resulting dimensions. Pressing Enter or Return will apply the crop, effectively resizing the canvas to the cropped area. If you're using the "W x H x Resolution" setting, Photoshop will resize the image to those exact dimensions while maintaining the aspect ratio by default, or allowing distortion if you uncheck that option.
It's important to note that when using the Crop Tool with a resolution setting, it can affect the PPI of the final image, similar to the "Image Size" dialog.
Method 4: Export Options - Resizing for Output
When you're ready to save your image for a specific purpose, Photoshop's export options provide convenient ways to resize and optimize your image without altering the original working file.
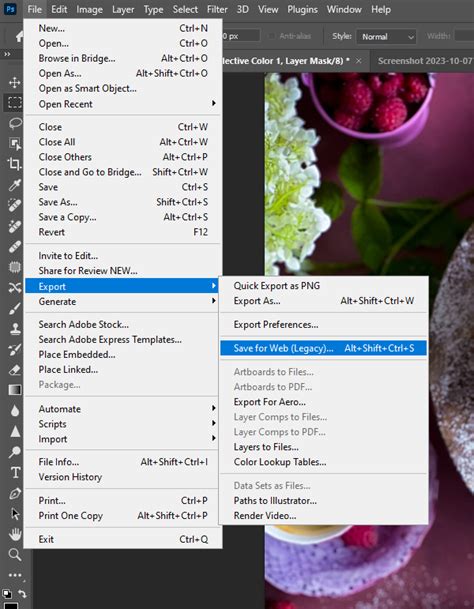
File > Export > Export As
The "Export As" dialog (File > Export > Export As) is a modern and flexible way to export images. It offers a preview of your image with various settings applied, allowing you to see the impact of resizing and compression before committing to the save.
In this dialog, you can:
- Change File Type: Select from JPEG, PNG, GIF, and SVG.
- Adjust Image Size: You can directly input new pixel dimensions or a percentage scale. This is a convenient way to downsize for web use.
- Adjust Canvas Size: Similar to the "Canvas Size" function, you can modify the canvas dimensions.
- Control Resampling: Choose the resampling method.
- Manage Metadata: Remove EXIF data if necessary for privacy or file size reduction.
When you click "Export," you'll be prompted to choose a destination folder for your resized image.
File > Export > Save for Web (Legacy)
The "Save for Web (Legacy)" dialog (File > Export > Save for Web) is an older but still very capable tool, especially for optimizing images for web use. It provides a side-by-side comparison of different settings and file formats, showing you the estimated file size and visual quality.
Here, you can experiment with various compression levels for JPEG, PNG, and GIF to find the best balance between file size and image quality. You can also directly input new pixel dimensions for your exported image. This tool is excellent for quickly assessing how different optimization strategies will affect your final output.
Method 5: Automating Resizing with Actions and Batch Processing
For users who need to resize a large number of images to the same specifications, manual resizing can be incredibly time-consuming. Photoshop offers powerful automation features to handle these repetitive tasks.
Recording Actions
An "Action" in Photoshop is a recorded sequence of commands that can be played back on any image. To create an action for resizing:
- Open the "Actions" panel (
Window > Actions). - Click the "Create New Action" button.
- Give your action a descriptive name (e.g., "Resize to 550x800").
- Click "Record."
- Perform the resizing steps you want to automate. For example, go to
Image > Image Size, enter your desired dimensions (e.g., 550 pixels wide, 800 pixels high, with "Constrain Proportions" checked and a suitable resampling method selected). - Once you've completed the resizing, stop recording by clicking the "Stop" button in the Actions panel.
Now, you can select this action and play it on any open image by clicking the "Play" button.
Batch Processing
To apply an action to an entire folder of images, you can use Photoshop's Batch command:
- Go to
File > Automate > Batch. - In the Batch dialog:
- Play: Select the Set and the Action you just created.
- Source: Choose the folder containing the images you want to resize. You can also choose to process open files.
- Destination: This is crucial. You can choose to save the processed files into a different folder, overwriting the originals (use with extreme caution!), or saving them with a new file name. If you choose a destination folder, you can also specify file naming conventions.
- Error Handling: Decide how Photoshop should handle errors during the batch process.
This Batch command is a powerful tool for efficiently resizing large volumes of images according to a predefined workflow, ensuring consistency across your entire collection.
Three Simple Ways to Add Image Borders in Photoshop
Method 6: Neural Filters - AI-Powered Resizing (Super Zoom)
Photoshop's Neural Filters introduce artificial intelligence to image editing, and one of these filters, "Super Zoom," can be used for intelligent resizing, particularly for upscaling or focusing on specific areas.
To access Neural Filters:
- Go to
Filter > Neural Filters. - In the Neural Filters panel that appears, you'll see a list of available AI-powered filters. If "Super Zoom" isn't installed, you'll see a cloud icon to download it.
- Enable "Super Zoom."
The "Super Zoom" filter allows you to zoom into a specific area of your image. As you adjust the zoom, Photoshop's AI analyzes the surrounding pixels and attempts to intelligently add detail, minimizing the artifacts often associated with traditional upscaling.
Within the Super Zoom options, you might find additional controls:
- Remove JPEG Artifacts: If you're working with a compressed JPEG, this option can help clean up the image during the resizing process.
- Enhance Face Details: While primarily trained on human faces, this can sometimes improve details in other subjects.
You can choose to output the processed image as a new document or a new layer, ensuring your original image remains unaffected. When comparing a Super Zoomed image to a standard resize, the AI-powered approach can often yield crisper results, especially around edges and fine details.
Beyond Photoshop: Adobe Express for Quick Resizing
While Photoshop is the professional standard, for simpler resizing tasks, especially for social media or quick web graphics, Adobe Express (formerly Adobe Spark) offers a user-friendly, web-based alternative.
Adobe Express provides straightforward tools to:
- Crop: Adjust aspect ratios and crop to specific dimensions.
- Resize: Scale images to preset dimensions or custom sizes.
- Change Aspect Ratio: Quickly adapt an image for different platforms like Instagram stories, Facebook posts, etc.
You can upload your JPG or PNG image, select the desired size from a dropdown menu or enter custom dimensions. Adobe Express also offers a warning banner if resizing up might affect image quality. It's important to note that while resizing down in Adobe Express generally maintains quality, upscaling can sometimes lead to a noticeable decrease in image fidelity. The platform offers a free plan with access to many of its tools, making it an accessible option for basic image manipulation.
Choosing the Right Method for Your Needs
The "best" way to resize an image in Photoshop depends entirely on your specific goals:
- For precise control over pixel dimensions and resolution, while maintaining aspect ratio: Use
Image > Image Sizewith "Constrain Proportions" checked and a suitable resampling method. - To add space around an image without changing its content: Use
Image > Canvas Sizeand the Anchor point to control expansion. - To crop an image to a specific aspect ratio or dimension: Use the Crop Tool.
- To resize and optimize for web or specific output formats: Utilize
File > Export > Export AsorFile > Export > Save for Web. - To resize many images with the same settings: Employ Actions and the Batch command.
- For intelligent upscaling or detail enhancement using AI: Explore the "Super Zoom" Neural Filter.
- For quick, simple resizing, especially for social media: Consider Adobe Express.
By understanding these various methods and the underlying principles of image resizing, you can confidently manipulate your images in Photoshop to achieve professional and visually appealing results, avoiding the common pitfalls of stretching and distortion.