When embarking on the journey of creating print-ready designs, understanding the nuances of color models is paramount. While Canva is an intuitive and powerful tool for graphic design, its native environment operates within the RGB (Red, Green, Blue) color model, which is optimized for digital displays. For professional printing, however, the CMYK (Cyan, Magenta, Yellow, Key/Black) color model is essential. This article delves into the intricacies of making your Canva designs CMYK-friendly, ensuring your printed materials accurately reflect your creative vision.
The Fundamental Difference: RGB vs. CMYK
At its core, the discrepancy between RGB and CMYK lies in their fundamental mechanisms for color creation. RGB is an additive color model. It works by combining red, green, and blue light in various proportions to produce a spectrum of colors. When all three lights are at their maximum intensity, they create white; the absence of light is black. This model is ideal for screens - monitors, smartphones, and televisions - because these devices emit light.
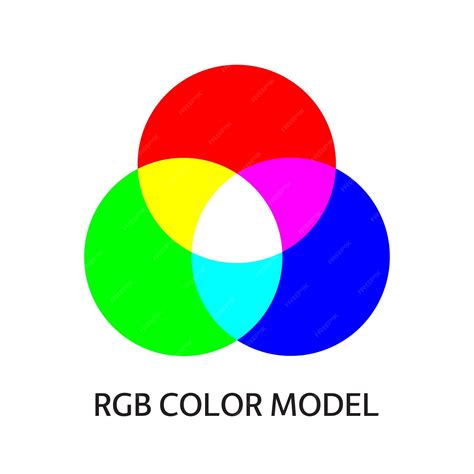
Conversely, CMYK is a subtractive color model. It operates by layering inks on a white surface. The inks absorb (subtract) certain wavelengths of light and reflect others. Cyan ink, for instance, absorbs red light and reflects green and blue. Magenta absorbs green light, and yellow absorbs blue light. Black ink is added as "Key" to deepen shadows and achieve richer blacks, as mixing the three primary inks doesn't produce a pure black. In this model, the white of the paper is the starting point, and inks are added to reduce the amount of light reflected.
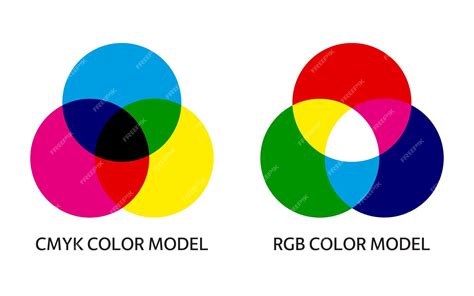
The practical implication of this difference is the color range, or "gamut," each model can reproduce. RGB, with its reliance on light emission, boasts a wider and more vibrant color range. This allows for brilliant, highly saturated colors, including neon hues and electric blues, that appear exceptionally vivid on digital screens. However, CMYK, limited by the physical properties of ink and paper, has a more restricted color range. Colors that appear dazzling on screen can translate into muted or "washed-out" tones when printed if not properly managed. This is why converting to CMYK before printing is crucial to ensure your colors appear as intended on paper.
Designing with CMYK in Mind within Canva
While Canva's editor primarily operates in RGB, it offers functionalities to accommodate CMYK requirements for print. The key is to be mindful of color choices and to export your designs correctly.
Choosing CMYK-Friendly Colors
To mitigate the "out of gamut" issue, where ultra-bright RGB colors cannot be replicated in CMYK, it's advisable to select colors that are known to perform well in both models. This involves using Canva's color picker strategically.
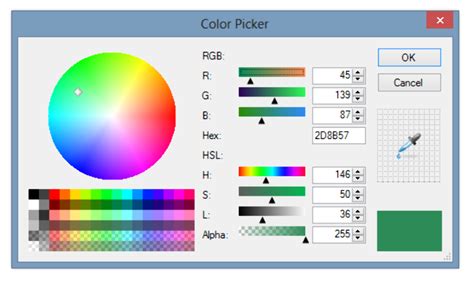
When you click on any element in your Canva design, the color panel appears. Here, you can add your desired color by entering a specific hex code or choosing from the suggested palette. For print-friendly designs, it's beneficial to use online color converters to find the CMYK equivalents of your desired colors and then input their corresponding hex codes into Canva. Websites like Colorffy or ConvertAColor can assist in converting CMYK values into hex format.
For users with Canva Pro or Canva Teams/Business accounts, a more integrated approach is available through Brand Kits. Within your Brand Kit, you can set up color palettes and, importantly, add the CMYK equivalents for your brand colors. This allows for consistent on-brand color usage across all your designs, ensuring that your professional prints align with your brand identity.
Steps to Add CMYK Colors to Brand Palettes (Canva Pro and above):
- From the homepage side panel, select Brand.
- If you have multiple Brand Kits, choose the one you wish to edit from the dropdown.
- Under the Colors section, select a color tile from your existing palette.
- Click Add CMYK. This will prompt you to input the CMYK values, which Canva will then convert to a usable hex code for your design.
- To add a completely new color with its CMYK equivalent, you'll first select "Add to category" or "Add new" and then input the CMYK values.
These created CMYK-friendly palettes will then be readily available within the Canva editor for easy access, ensuring that all members of a team can utilize them. Free Canva users are limited to one color palette with up to three colors, while Pro and higher-tier users can create up to 100 palettes, each containing up to 100 colors.
Understanding and Utilizing Brand Kit Color Palettes
Brand Kits are instrumental for maintaining brand consistency, especially when preparing designs for professional printing. They allow you to create and manage color palettes that can be used across all your designs, ensuring that your team adheres to your brand's specific color scheme.
- Creating and Editing Palettes: From the homepage side panel, navigate to Brand, select your Brand Kit, and then click on Colors. Here, you can add new palettes, add individual colors to existing palettes, rename palettes, or delete them.
- Applying Brand Colors: In the Canva editor, select an element, and then click the color tile in the toolbar. Your brand color palettes will appear, allowing you to select a color. You can also choose to apply the selected color to all pages of your design.
- Managing Colors in the Editor: You can also manage your Brand Kit colors directly within the editor. Select an element, click on its color, and then select "Edit" in the Brand Kit dropdown. This allows you to add, change, or delete colors and palettes on the fly.
Exporting Your Canva Designs for Print
The export process is as critical as the design phase when it comes to achieving high-quality prints. Canva provides specific settings to ensure your files are print-ready.
The Importance of PDF Print Format
When you're ready to export your file for professional printing, saving it as a PDF Print is the recommended method for the highest quality. This file format is designed to include high-resolution settings, ensuring that your design prints clearly and at the correct size.
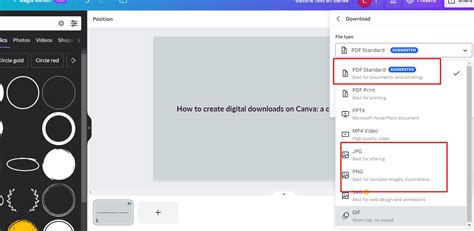
To download your design:
- Create or open your design in Canva.
- Click the Share button in the editor menu bar.
- Select Download.
- In the File type dropdown menu, choose PDF Print.
Understanding Bleed and Crop Marks
For designs that extend to the edge of the page, such as business cards or flyers with full-bleed backgrounds, incorporating bleed and crop marks is essential.
- Bleed: Bleed is an extra area of your design that extends beyond the trim edge of the page. This is typically 3mm to 6mm, depending on the printer's requirements. It ensures that when the paper is trimmed, there are no unwanted white edges left on the design. Canva offers a "bleed" option when designing for print, and it's vital to enable this. While Canva automatically sets a 3mm bleed, you cannot manually adjust this amount within the platform. If your printer requires a different bleed size, you might need to create a new file with custom dimensions that accommodate the additional bleed.
- Crop Marks: Crop marks are lines printed on the corners of your design that indicate where the paper should be trimmed to achieve the final size. When you select "PDF Print" and tick the "Crop marks and bleed" option, these marks will appear on your downloaded PDF. They are purely for the printer and will not be visible on the final printed product.
Flattening PDFs: To Flatten or Not to Flatten?
Canva offers an option to "Flatten PDF." This process combines all layers of your design into a single image. While it can reduce file size and potentially avoid font or layer issues, it is generally not recommended for professional printing. Flattening a PDF prevents the printer from being able to edit or adjust individual elements within your design if necessary. It's best to leave this option unchecked unless specifically advised otherwise by your printer.
Printing Your Design: In-House vs. Professional Services
Canva provides options for both home printing and professional printing services.
Printing at Home or in the Office
If you choose to print your Canva design using your own printer, follow these steps:
- Download your design as a PDF Print file, ensuring "Crop marks and bleed" is ticked if applicable.
- Open the downloaded PDF file on your device.
- Select Print or the printer icon within your PDF viewer.
- From your printer options, select your specific printer model. Verify that it supports the paper size and border settings required for your design.
- Crucially, set the print scale to 100% scale or Actual Size. Avoid "Fit to page" or similar options, as these can distort the dimensions of your design.
- Select Print.
Troubleshooting Home Printing Issues:
- Too Small or Cut Off: Ensure your scale is set to 100% and not "Fit to page."
- Colors Look Different: Try selecting CMYK-friendly colors during the design process and ensure you are exporting as PDF Print.
- Edges Not Printing: Your printer might not support full bleed. You may need to deselect "Crop marks and bleed" or scale down your design slightly.
Professional Printing Services (e.g., Little Rock, Panda Press)
For professional-quality prints, utilizing dedicated printing services is highly recommended. These services often have advanced equipment and expertise to ensure the best possible output.
New to Print Production?! Here's What You Need to Know
When submitting your Canva designs to a professional printer:
- Provide PDF Print Files: Always provide your files in the PDF Print format with crop marks and bleed enabled.
- Communicate Color Expectations: Understand that colors viewed on screen (RGB) will inevitably appear brighter than their printed counterparts (CMYK). Discuss your color expectations with your printer.
- Utilize Printer Proofs: Many professional printers offer free proofs (like Little Rock's offer with code "FREEPROOF") or digital proofs. These allow you to see your printed colors before committing to a full order, helping to catch any discrepancies.
- Professional File Checks: Reputable printers often perform a "preflight check" on your files before printing. This process identifies potential issues such as low-resolution images, text outside safe areas, or incorrect color profiles, ensuring your artwork is print-ready. Companies like Panda Press offer this service.
Common Pitfalls to Avoid
Several common mistakes can compromise the quality of your printed designs created in Canva. Being aware of these can save you time and resources.
- Designing Only in RGB Without Considering CMYK: This is the most frequent issue. Relying solely on vibrant RGB colors without considering their CMYK equivalents can lead to disappointing results when printed. Always keep CMYK in mind for print products.
- Ignoring Bleed Areas: Failing to include bleed when your design extends to the edge of the page will result in unwanted white borders after trimming.
- Using Over-Saturated RGB Colors: RGB can display highly saturated colors that are simply impossible to replicate in CMYK. Selecting slightly less saturated versions of these colors during the design phase is a proactive measure.
- Low-Resolution Images: Using images that are too low in resolution will appear pixelated or blurry when printed, significantly detracting from the professionalism of your design. Always aim for high-quality images.
- Font Issues: While Canva uses Google Fonts which are generally open-source and safe for commercial use, some less common or custom fonts might not transfer well to print. If you import custom fonts, ensure you have the correct licensing. Canva does not allow for outlining or embedding fonts, which can sometimes be a requirement for printers. Using the PDF Print export option with high resolution generally mitigates most font transfer issues.
By understanding the fundamental differences between RGB and CMYK, strategically using Canva's features, and adhering to best practices for exporting and printing, you can create stunning print designs that accurately reflect your vision. When in doubt, always consult with your professional printing service for specific guidelines and assistance.