Adobe Photoshop is an indispensable tool for photographers, designers, and digital artists, offering unparalleled control over image manipulation. One of the most frequent tasks users encounter is resizing an image, whether to make it larger for printing or to optimize it for web use. This guide will walk you through the essential techniques and considerations for effectively increasing the size of an image in Photoshop, ensuring quality and precision.
Understanding Image Dimensions and Resolution
Before diving into the "how," it's crucial to grasp the fundamental concepts of image dimensions and resolution. Images are composed of pixels, the smallest individual units of color that form a digital picture.
Width and Height (Pixels): For images intended for online display or digital use, measuring width and height in pixels is paramount. This directly dictates how many pixels the image will occupy on a screen. For instance, a 1920x1080 pixel image will appear at that resolution on a display.
Width and Height (Physical Units): When preparing images for print, it's more practical to measure dimensions in physical units like inches or centimeters. This relates the pixel data to a tangible size on paper.
Resolution (Pixels per Inch - PPI): Resolution refers to the density of pixels within a given physical area, typically measured in pixels per inch (PPI). A higher PPI means more pixels are packed into each inch, resulting in a sharper and more detailed image when printed. For printing to a typical desktop inkjet printer, setting the resolution to 300 PPI is a widely accepted standard for achieving good quality. Lower resolutions, such as 72 PPI, are often sufficient for web use where screen display limitations are a factor.
The Image Size Dialog Box: Your Primary Tool
The core of resizing an image in Photoshop lies within the "Image Size" dialog box. This powerful tool allows you to control the dimensions, resolution, and pixel data of your image.
To access this dialog box, navigate to Image > Image Size in the Photoshop menu.
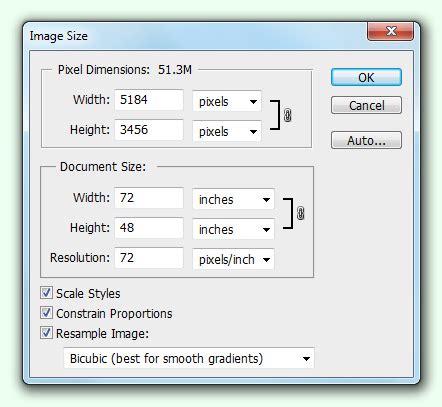
Within the Image Size dialog box, you'll find several key options:
Dimensions: This section displays the current width and height of your image in your chosen units (pixels, inches, centimeters, etc.). You can directly input new values here to change the image's physical size or pixel dimensions.
Resolution: As discussed, this field allows you to set the PPI for your image. Adjusting this value will affect the print size and detail.
Resample: This is perhaps the most critical option when you intend to change the number of pixels in an image. When "Resample" is selected, Photoshop will either add new pixels (upscaling) or remove existing pixels (downscaling) to match your desired dimensions and resolution. If "Resample" is unchecked, changing the dimensions or resolution will only alter the relationship between them without adding or removing pixel data, which is useful for understanding how a current pixel count would print at a different resolution.
Preserving Proportions: The Chain Link Icon
When resizing, it's often essential to maintain the original aspect ratio of your image to avoid distortion. This means that as you change the width, the height should adjust proportionally, and vice-versa.
- Keep the link icon highlighted: To ensure proportions are preserved, look for a chain link icon next to the width and height fields in the Image Size dialog box. When this link is active (highlighted or closed), changing one dimension will automatically adjust the other to maintain the original ratio. If you need to distort the image, you can click the link icon to break the connection.
Resampling Methods: The Art of Pixel Interpolation
When you select "Resample," Photoshop employs algorithms to create or discard pixel data. The choice of resampling method can significantly impact the quality of the enlarged image.
Automatic: Photoshop's default setting, which intelligently chooses the best resampling method based on whether you're enlarging or reducing the image.
Preserve Details (Enlargement): This is often the preferred method when making an image significantly larger. It uses a sophisticated algorithm designed to minimize noise and preserve detail during upscaling. You can often adjust a "Reduce Noise" slider within this option for further refinement.
Bicubic Smoother (Enlargement): A good general-purpose enlargement method that tends to produce smoother results.
Bicubic Sharper (Reduction): Ideal for reducing image size, as it helps to retain sharpness.
Bicubic (Smooth gradients): A balance between smoother and sharper results, suitable for general resizing.
Nearest Neighbor (Hard edges): The simplest method, which essentially duplicates existing pixels. It's rarely used for photographic images but can be useful for pixel art or graphics where hard edges are desired.
Bilinear: A basic interpolation method that can lead to softer results.
When enlarging an image, particularly a digital photograph, using "Preserve Details" or "Bicubic Smoother" is generally recommended to achieve the best possible quality.
Expanding the Canvas: Adding Space Without Resizing Pixels
Sometimes, you don't need to make the image itself larger in terms of pixel count, but rather you need to add more space around it. This is where the "Canvas Size" function comes in.
To access this, go to Image > Canvas Size.
The Canvas Size dialog box allows you to:
Add Canvas: Enter the amount of width and height you wish to add to your existing canvas. You can specify these values in pixels, inches, centimeters, or other units.
Anchor Point: This is a crucial setting. Select an anchor point in the canvas diagram to determine where the existing image will be positioned on the new, larger canvas. For example, if you place the anchor in the center, the new canvas will expand equally in all directions around your image. If you select an anchor point on the left edge, the canvas will expand to the right.
Relative: Checking the "Relative" box means the width and height values you enter will be added to the current canvas dimensions, rather than replacing them with absolute values.
Canvas Extension Color: You can choose the color that will fill the newly added canvas areas. This can be background color, foreground color, white, black, gray, or custom colors.
The Canvas Size function is invaluable for creating space for text overlays, adding borders, or preparing images for specific layouts without altering the original pixel data of the image content itself.
The Crop Tool: Resizing and Refining
While primarily used for trimming images, the Crop Tool can also be used to resize and add canvas space in a more interactive way.
Select the Crop Tool: Locate the Crop Tool in the Tools panel (it looks like two overlapping right angles).
Adjust the Crop Box: Drag the handles on the bounding box that appears around your image to adjust its dimensions.
Adding Canvas with the Crop Tool: If you drag the handles outward beyond the original image boundaries, you are effectively adding canvas. Photoshop will prompt you to choose a fill color for the new areas, similar to the Canvas Size dialog.
Setting Dimensions and Resolution: In the Options bar at the top of the screen, while the Crop Tool is active, you can set specific Width, Height, and Resolution values. You can choose to enter these values in pixels, inches, or centimeters. Ensure the "W x H x Resolution" option is selected to define these parameters.
Preserving Proportions: The Crop Tool's options bar also offers a "Ratio" or "W:H:R" field where you can input aspect ratios (e.g., 16:9) or specific pixel dimensions to guide your cropping and resizing.
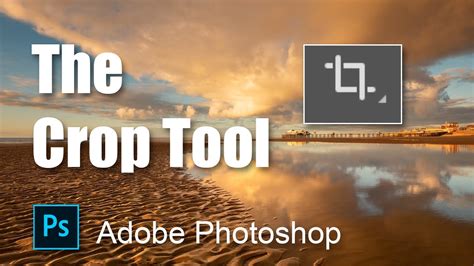
The Crop Tool provides a visual and intuitive method for both trimming and expanding images, offering flexibility for various creative needs.
Considerations for Enlarging Images
While Photoshop offers powerful tools for resizing, it's essential to understand that enlarging an image beyond its original pixel dimensions will always involve some degree of interpolation, which can lead to a loss of sharpness and detail.
Source Image Quality: The quality of the original image is paramount. A high-resolution, sharp image will yield better results when enlarged than a low-resolution, blurry one.
Degree of Enlargement: Small enlargements (e.g., 10-20%) are generally less noticeable in terms of quality degradation than significant enlargements.
Content of the Image: Images with smooth gradients, solid colors, or simple graphics tend to tolerate enlargement better than photographs with fine textures, intricate details, or noise.
Post-Resizing Sharpening: After enlarging an image, a subtle sharpening pass can often help to restore some of the lost detail and improve perceived sharpness. Use the "Sharpen" filter (Filter > Sharpen > Unsharp Mask or Smart Sharpen) judiciously, paying close attention to avoid introducing artifacts or over-sharpening.
Workflow Example: Preparing an Image for a Large Print
Let's say you have a digital photograph taken with a camera and want to print it as a large poster.
Initial Assessment: Open the image in Photoshop. Go to Image > Image Size. Note the current pixel dimensions and resolution. Let's assume it's 3000x2000 pixels at 72 PPI.
Determine Print Dimensions: Decide on the desired print size. For a poster, you might want it to be 24x16 inches.
Calculate Required Resolution: To print at 24x16 inches with a standard 300 PPI, you would need an image of (24 inches * 300 PPI) x (16 inches * 300 PPI) = 7200x4800 pixels.
Enlarge the Image:
- Go to Image > Image Size.
- Ensure "Resample" is checked.
- Set the "Width" to 7200 pixels and the "Height" to 4800 pixels (or vice-versa, depending on your desired orientation). Make sure the link icon is active to maintain proportions.
- Choose "Preserve Details (Enlargement)" from the "Resample" dropdown menu.
- Click "OK."
Review and Refine: Examine the enlarged image closely. If it appears too soft, apply a subtle sharpening filter. If there's noticeable noise introduced by the enlargement, you might use noise reduction tools before or after sharpening.
Set Print Resolution: With the image now at the desired pixel dimensions for your print size, go back to Image > Image Size.
- Change the unit for "Resolution" to "Pixels/Inch."
- Enter "300" in the Resolution field.
- Ensure "Resample" is unchecked this time.
- The Width and Height fields should now automatically update to show your desired print dimensions (24x16 inches) at 300 PPI.
- Click "OK."
This workflow ensures your image has the necessary pixel data to be printed at the target size with good quality.
Workflow Example: Optimizing an Image for the Web
Suppose you have a high-resolution image from a camera that you want to use on a website, perhaps as a banner image measuring 1200 pixels wide.
Initial Assessment: Open the image in Photoshop. Go to Image > Image Size. Note the current pixel dimensions and resolution.
Determine Web Dimensions: You need the image to be 1200 pixels wide. Let's assume the original image is 5000 pixels wide.
Reduce Image Size:
- Go to Image > Image Size.
- Ensure "Resample" is checked.
- Set the "Width" to 1200 pixels. The height will adjust automatically if the link icon is active.
- Choose "Bicubic Sharper (Reduction)" from the "Resample" dropdown menu for optimal results when downsizing.
- Click "OK."
Save for Web:
- Go to File > Export > Save for Web (Legacy).
- Choose a suitable file format (JPEG is common for photographs, PNG for images with transparency or sharp lines).
- Adjust the quality settings for JPEG to balance file size and visual quality. Aim for a file size that loads quickly without significant loss of detail.
- Observe the estimated file size in the lower-left corner of the Save for Web dialog.
- Click "Save."
By understanding these tools and principles, you can effectively manage image sizes in Photoshop, ensuring your visuals meet the specific requirements of both print and digital media. Remember that while Photoshop is powerful, the quality of the final result is always influenced by the quality of the source material and the degree of manipulation.