InDesign's Layers panel is an indispensable tool for managing complex documents, offering a robust framework for organizing content, streamlining workflows, and overcoming production challenges. Far beyond a simple organizational utility, layers provide a powerful mechanism for enhancing design control and efficiency. This article delves into the fundamental concepts of using layers in InDesign, exploring advanced techniques to unlock their full potential.
The Foundation of Layering: Building Your Document Structure
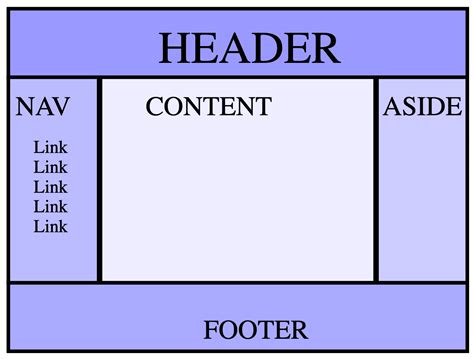
Imagine your InDesign document as a multi-story building, where each layer represents a distinct floor. When you open the Layers panel, it's akin to viewing this transparent structure from street level. The default layer, often named "Layer 1," is the ground floor. Every subsequent layer you create is stacked above, sequentially numbered, much like adding new stories to a building.
Within each layer, you can house numerous InDesign objects. Just as multiple items can occupy a single floor in a building, your document's elements reside on their designated layers. While objects on the same layer can be freely repositioned, objects on higher layers will naturally appear above those on lower layers. This hierarchical stacking order is a fundamental aspect of layer functionality.
The Layers panel provides a bird's-eye view of your document's structure. Objects on the top floors (layers) will generally obscure those on the bottom floors. Understanding this inherent stacking order is crucial for effective document management.
Navigating the Layers Panel: Disclosure Triangles and Object Visibility
To gain a granular view of the content within a specific layer, you can expand it by clicking the disclosure triangle next to its name. This action reveals a list of all objects contained within that layer, along with their individual stacking order. This detailed breakdown allows for precise manipulation and understanding of object placement.
Groups, buttons, and multi-state objects also feature disclosure triangles, enabling you to expand them and view their constituent elements. This nested structure further enhances organizational capabilities.
Objects residing on parent pages, while global to the document, are positioned at the bottom of their respective layers. However, parent page objects can appear in front of document page objects if the parent page objects are situated on a higher layer within the document's overall hierarchy.
Controlling Content: Locking and Hiding Layers and Objects
The Layers panel offers powerful tools for controlling the visibility and editability of your document's content through locking and hiding mechanisms.
Hiding and Showing Content
You can hide an entire layer or specific objects within a layer by clicking the eye icon next to it. This action makes the layer or object disappear from view, though it remains within the document structure. Toggling the eye icon back on will restore its visibility. This is particularly useful for managing complex layouts or temporarily removing elements without deleting them.
Locking and Unlocking Layers and Objects
To prevent accidental modifications, you can lock entire layers or individual objects. By default, layers are unlocked. Clicking in the column between the eye icon and the layer name will reveal a lock icon, effectively locking all objects on that layer. This feature is invaluable for safeguarding critical elements while working on other parts of the document. The same locking functionality applies to individual objects on an active spread.
To see the objects on each layer of a specific page, click the disclosure triangle to the left of the layer name. This expands the layer to display its contents, allowing you to lock or unlock individual objects. Importantly, this view pertains only to the current spread, not the entire document.
Working with Parent Pages and Layers
Parent pages, much like layers, are global to an InDesign document and interact with the layer system. Objects on a parent page reside at the bottom of their layer's hierarchy. This means they are positioned below any other objects on the same layer but above elements on layers situated below them. Understanding this hierarchy is key to leveraging layers for creative and time-saving workflows.
A helpful tip for managing parent pages and layers is to establish a foundational parent page upon which all other parent pages are based. This ensures that edits made to the foundational parent page propagate across the entire document. When employing layers for elements like guides and grids, this approach ensures consistency across all pages.
It's important to note that the Layers panel does not directly display objects from applied parent pages when you are viewing a regular document page. To view all objects on a parent page within the Layers menu, you must double-click that parent page to make it the active page.
Advanced Layering Techniques for Enhanced Workflow
Beyond basic organization, InDesign layers offer sophisticated solutions for various design and production challenges.
Headers and Footers Above All Else
To ensure that essential elements like headers, footers, and page numbers are never obscured by other page content, you can create a dedicated layer for them. By default, Layer 1 is used for routine page elements. To create a new layer that consistently appears above your default layer, navigate to the Layers panel and Option/Alt-click the plus sign at the bottom. Rename this new layer descriptively, such as "Header and Footer." You can then place your header text and page numbers on this layer via the parent page. This guarantees that objects on lower layers will not cover them.
The color assigned to an object's frame is determined by the layer it resides on, indicated by a colored vertical bar to the left of the layer name in the Layers panel. This visual cue aids in quickly identifying which objects belong to which layer. These colors can be customized by right-clicking the layer and selecting "Layer Options."
Watermarking Pages with Ease
The ability to show and hide individual objects or entire layers provides immense flexibility. For instance, to apply a "Top Secret Draft" watermark across all pages until client approval, create a new layer at the top of the layer stack, name it "Watermark," and place the watermark text on the parent page within this layer. Upon approval, simply hide the "Watermark" layer, and the text will disappear without needing to be manually deleted.
Managing Guides and Grids
For documents with numerous guides and grids, the Layers panel can bring order to chaos. Create a new layer for your primary guides and grids, and then create additional layers for different column or grid configurations (e.g., three columns, 3x3 grid). When you require specific guide setups, simply toggle the visibility of the corresponding layer. This prevents a cluttered visual field and allows you to access the precise guides needed for your layout.
After creating guides, you can customize their color. Select the guides, right-click, and choose "Ruler Guides." Matching guide colors to layer colors can further enhance visual organization.
Improving In-House Printing Appearance
When faced with the necessity of printing full-bleed documents on printers that cannot print to the edge of the page, layers offer a professional solution. Create a new layer above all others, named "In-House Printing." Add an empty frame the size of the page and apply a substantial stroke (e.g., 48 points) with the "[Paper]" swatch, aligning the stroke to the inside. This creates a consistent, clean border around the pages, mimicking a professional print output.
Hidden Layers for Tables of Contents
Text intended solely for a table of contents (TOC) can be placed on a hidden layer without appearing in the document's layout. Add this text to your page, assign it to a hidden layer, and then include it in your table of contents generation by activating the "Include Text on Hidden Layers" option in the Table of Contents dialog box.
Generate a Table of Contents in InDesign
Secrets and Notes on Nonprinting Layers
InDesign allows for the creation of nonprinting layers, ideal for embedding notes, screenshots, or instructions intended for collaborators but not for final output. These layers are visible in Normal view but are excluded from printing and exporting. To create a nonprinting layer, right-click the layer in the Layers panel, select "Layer Options," and deselect the "Print Layer" option. The layer name will appear in italics in the Layers panel, signifying its nonprinting status. This is a safer alternative to relying on manual hiding before sharing a document.
Saving and Sharing Layers
While InDesign's Swatches and Paragraph Styles panels offer direct methods for loading and saving, the Layers panel does not have a similar built-in function. However, a workaround involves adding an object to each layer you wish to save. Select all these objects and drag them to a Creative Cloud Library. In a new document, navigate to the Layers panel menu and enable "Paste Remembers Layers." Then, drag the objects from the Library onto a page. The layers associated with these objects will be created in your new document. You can then delete the objects, leaving the layers intact for your layout.
Conclusion: Unlocking Efficiency with Layers
Structuring InDesign documents with layers offers significant advantages, providing confidence that essential content remains visible and accessible. Layers facilitate the global hiding and revealing of content, quick selection of objects on the current spread, and the locking or hiding of specific elements throughout the document. By leveraging Creative Cloud Libraries, layers can be saved and reused across multiple files. Furthermore, nonprinting layers prevent production notes or other extraneous information from appearing in the final output. While initial planning and setup of layers may take a few minutes, the long-term benefits in terms of saved work hours are substantial. Embracing the habit of using layers in InDesign will undoubtedly transform your workflow, making you wonder how you ever managed without them.
Layers and Object Stacking
InDesign's layering system provides an enhanced level of control over document objects by allowing you to subdivide them into logical or functional pieces. The complexity of a layout directly correlates with the difficulty and time required to manage it. There is no single correct method for utilizing layers; their application is limited only by your imagination.
A common strategy is to assign all graphics to one layer and all text to another. Projects with multiple versions of text for different clients but shared graphics can benefit from distinct text layers and a single common graphics layer. This configuration allows for quick production of design variations by simply hiding specific layers.
Another powerful approach is to create a "Master Items" layer and place all objects from a master page onto this layer, positioning it above all other layers in the document.
Creating and Configuring New Layers
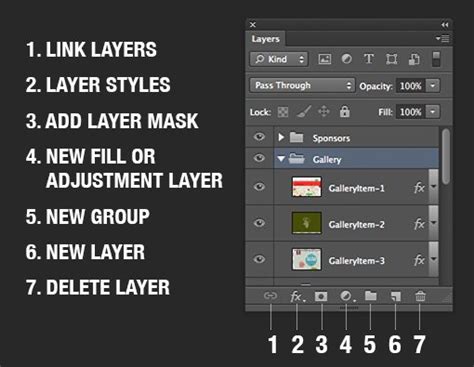
To add a new layer, click the "Create New Layer" button located at the bottom of the Layers panel. This action introduces a new layer, typically named "Layer 2" by default. You can double-click a layer to access the "Layer Options" dialog box, where you can assign a more descriptive name, control its visibility (hide/show), lock it, and determine whether it will print. You can even modify the layer's color, which dictates the color of the bounding box for selected artwork.
When you click on a layer to make it activeâindicated by a pen icon next to its nameâany new objects you place, draw, or create will be added to that active layer. However, moving objects between layers is straightforward. Select an object in your InDesign document, and in the Layers panel, you'll see a small square icon to the right of the layer name. Dragging this square to another layer in the panel will move the selected object(s) to that layer while preserving their position on the page. Holding down the Option (Mac) or Alt (Windows) key while dragging creates a copy of the selected object(s) on the target layer. Clicking this icon on any layer also selects the corresponding object in your document, providing an easy way to locate items within the Layers panel.
Layer Hierarchy and Object Stacking Order
Just as objects within a layer have a stacking order, so do the layers themselves. Content on a layer positioned higher in the Layers panel will appear above content on any layer below it. The stacking order of objects within a layer becomes more visually manageable when you expand the layer's disclosure triangle. This reveals each object on that layer, allowing you to see their relative positions from top to bottom.
While top-level layers can be renamed for clarity, individual objects within a layer can also be renamed. Although InDesign automatically names objects with default labels like "polygon," "rectangle," and "text frame," renaming them facilitates easier manipulation.
Although it is possible to work in InDesign without ever opening the Layers panel, understanding and utilizing its capabilities can significantly enhance your productivity and the quality of your output. InDesign layers are a fundamental tool for achieving professional results and efficient workflows.
Organizing Elements with Layers
The InDesign Layers panel is instrumental in keeping all elements on your pages or cover organized. You can easily arrange elements so that some are in front of others, such as text being in front of a shape. You can also lock layers to keep certain elements in place while you manipulate others. The layer itself is transparent; the objects on the layer are not. It is useful to have two layers for your pages if you're adding shapes: one for text and one for shapes. The "Shapes" layer would include all your elements that are behind everything else.
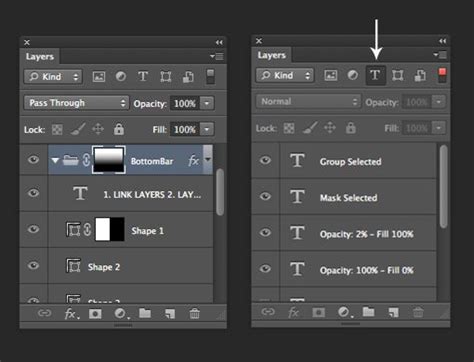
To set up your InDesign layers, open your Layers panel (Window > Layers). You will see one layer, called "Layer 1." Select any text frame with your Selection Tool, and its outline will be the same color as shown for Layer 1.
Understanding Layer Colors and Object Selection
The color associated with a layer in the Layers panel (a colored vertical bar) is applied to the bounding box of selected objects on that layer. This visual distinction helps in quickly identifying which layer an object belongs to. For instance, Layer 1 frames are typically blue by default, and a newly created Layer 2 might be red. If you want to change these default colors, right-click on the layer in the Layers panel and choose "Layer Options."
When an object is selected, a small colored square appears to the right of its layer name in the Layers panel. This indicates which layer contains the selected item. You can click this square to select the object in your document, which is a useful way to locate an item if you only see its name in the Layers panel.
Layers: An Optional but Powerful Organizational Tool
While some users choose to ignore them, InDesign layers are an optional but highly beneficial organizational tool. In any new document, InDesign creates a single layer named "Layer 1," visible in the Layers panel. As design elements are added to a spread, they are typically placed on this default layer, hence the blue bounding box color unless otherwise specified. Additional elements are added above earlier elements, all on Layer 1.
The Difference Between Locked and Hidden Layers
It's important to distinguish between locked and hidden layers. A locked layer prevents modifications, while a hidden layer is simply not visible. Frames on a locked layer will display a padlock icon near the top left corner when "View > Extras > Show Frame Edges" is enabled. Locked layers are generally more straightforward to manage than individual locked elements within a layer.
Object Arrangement Commands
Crucially, the "Object > Arrange > Bring to Front" and "Object > Arrange > Send to Back" commands operate within a layer. They do not affect the stacking order across different layers. This reinforces the importance of using layers to manage the overall hierarchy of your document.
Moving and Copying Objects Between Layers
To move or copy objects to another layer, use the Selection tool to select one or more objects on a document page or parent page. Then, in the Layers panel, drag the small colored square to the right of the layer name to the desired target layer. To copy, hold down the Option (Mac) or Alt (Windows) key while dragging.
When you duplicate a layer, its contents and settings are copied, and the duplicate appears above the original layer in the Layers panel. You can also drag a layer name and drop it onto the "New Layer" button to create a duplicate.
To delete layers, select them in the Layers panel and click the Delete icon, or choose "Delete Layers" from the Layers panel menu. You can also merge layers by selecting multiple layers and then choosing a target layer; objects from all selected layers will be moved to the target layer, and the selected layers will be deleted.
Layers and Their Implications
Layers involve all pages of a document, including parent pages. When you create new objects with the Type tool or drawing tools, or import, place, or paste text or graphics, these actions are performed on the currently active, visible, and unlocked layer.
You can select any object on any layer by default. Dots in a layer's color mark layers that contain selected objects. This color coding helps identify an object's layer. To select individual objects on a layer, click the triangle icon next to the layer to display all its contents and then select the target object.
Other Layer Functionalities
- Visibility Control: Select this option to make a layer visible.
- Printing: You can choose to print hidden and nonprinting layers.
- Layer Colors: Use layer colors to distinguish the layers of different selected objects. A colored dot next to the layer name serves this purpose.
- Targeting Layers: You can target a visible, unlocked layer. This gives you the choice of showing or unlocking the target layer.
- Deselecting Layers: Clicking outside the selection in the Layers panel deselects the other layers.
- Hidden or Locked Layers: Objects cannot be created on a hidden or locked layer.
- Layer Display: Layers are displayed over the document window.
- Object Indication: Dots mark layers that contain selected objects.
- Layer Color Coding: Color helps you identify an object's layer.
- Selecting Objects on a Layer: To select individual objects on a layer, click the disclosure triangle next to the layer to display all objects, and then select the target object.
- Moving/Copying Objects: To move or copy objects to another layer, use the Selection tool to select one or more objects on a document page or parent page. Drag the colored dot on the right side of the layer list to the other layer.
- Interacting with Layers: You can interact with existing layers.
- Pasting Objects: Objects are pasted to the new page or position. You can paste objects from one layer into another layer in the second document, and then paste each object on its layer.
- Duplicating Layers: When you duplicate a layer, you copy its contents and settings. The duplicated layer then appears above the original layer in the Layers panel.
- Layer Menu Options: Access options like "Layer [layer name]" in the Layers panel menu.
- Repositioning Objects: Layers allow for repositioning objects within the layer.
- Non-Displaying Content: Objects on a layer that is hidden or set to nonprinting donât appear on screen or in print.
- Alternate Versions: Hide alternate versions of a document by using layers.
- Editing Other Parts: Use layers to edit other parts of the document while keeping certain elements out of the way.
- Preventing Printing: Prevent a layer from printing, ensuring it doesn't appear in the final output.
- Text Wrap: Text wrap can be set to flow around objects on hidden layers.
- Showing/Hiding Objects: Toggle the eye icon to show or hide an object.
- Locking/Unlocking: Lock or unlock objects in a layer. The layer displays a crossed-out pencil icon in the Layers panel, indicating it is locked.
- Accidental Changes: Locking a layer is useful for preventing accidental changes to a layer.
- Visibility of Locked Layers: When an object is locked, it will not move or be selected.
- Unlocking Options: You can unlock objects in a layer.
- Locking/Unlocking Layers: Click to the left to show (lock) or hide (unlock) the layer.
- Lock Others: Use "Lock Others" in the Layers panel menu to keep all layers except the selected one unlocked.
- Unlock All Layers: Use "Unlock All Layers" in the Layers panel menu to unlock all layers.
- Deleting Layers: Choose "Delete Layers" from the Layers panel menu or select layers in the Layers panel and click the Delete icon.
- Merging Layers: Merge layers by moving objects by merging layers. Objects from all selected layers are moved to the target layer, and the selected layers are deleted.
- Regions: Layers can be used to organize different regions of content.
- Other Content: Layers can house various kinds of content.
- Object Stacking: Objects on layers behind it are affected by objects on layers in front.
- Disclosure Triangle: Each document layer has a disclosure triangle that can be expanded to reveal the objects and their stacking order on that layer for the active spread.
- Parent Items: Objects on parents appear at the bottom of each layer.
- Equitable Language: Adobe is committed to equitable language, with replacements implemented from InDesign 2022 (version 17.0) onwards. Each document includes at least one named layer.