The concept of a "Clipping Mask" is a powerful layer composition technique that allows artists to limit the visibility of a layer based on the transparency of another layer. While Krita, a free and open-source digital painting and animation application, does not feature a tool explicitly named "Clipping Mask" as found in software like Photoshop, it offers robust alternative methods to achieve the same or even more advanced effects. This article delves into the various ways to create clipping mask-like functionality in Krita, focusing on shortcuts, essential features like "Inherit Alpha," and exploring a range of blend modes and masking techniques.
Understanding the Core Concept: What is a Clipping Mask?
At its heart, a clipping mask functions by using one layer (the "base layer") to define the visible areas of another layer (the "clipped layer") positioned directly above it. Imagine a layer containing a circular image. If you create a new layer above it and draw on this new layer, by default, your drawings would cover everything beneath without any restrictions on transparency. However, when the upper layer is turned into a clipping mask, any marks made on it are constrained by the transparency or alpha channel of the layer below. This means you can only see the parts of the upper layer that fall within the opaque areas of the base layer.

Krita's Approach: Inherit Alpha and Group Layers
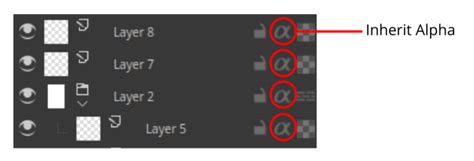
In Krita, the primary feature that replicates the clipping mask effect is "Inherit Alpha." This functionality is not a direct one-to-one replacement but rather a different implementation that can be equally, if not more, powerful.
To utilize "Inherit Alpha," you typically begin with a base layer containing your desired shape or image. Then, create a new layer above it. For the "Inherit Alpha" effect to work as a clipping mask, these layers are often placed within a group.
The "Quick Group" Shortcut
A common workflow involves selecting both the base layer and the new layer you intend to clip. Pressing Ctrl + G on your keyboard will create a group layer, enclosing both selected layers. Once grouped, you activate the "Inherit Alpha" feature on the upper layer within the group. You will notice that the visibility of this upper layer is now precisely constrained by the opacity of the layer below it, mirroring the clipping mask behavior.
If you forget the shortcut, you can access this functionality through the Krita interface: right-click on the layers, navigate to "Group," and then select "Quick group."
The "Quick Clipping Group" Shortcut
Krita further streamlines this process with the "Quick Clipping Group" command. This is arguably the most direct shortcut for achieving a clipping mask effect. The shortcut for this command is Ctrl + Shift + G.
To use this shortcut, first, select the layer you want to serve as the base layer. Then, press Ctrl + Shift + G. Krita will automatically create a group layer and, within that group, create a new layer with the "Inherit Alpha" option already activated. This allows you to immediately start drawing on the new layer as a clipped layer, directly applying your strokes within the boundaries of the base layer.
Understanding the Nuances of Inherit Alpha
While the "Quick Clipping Group" shortcut is efficient, it's important to understand the underlying mechanics of "Inherit Alpha," as it differs from Photoshop's clipping mask in a crucial way.
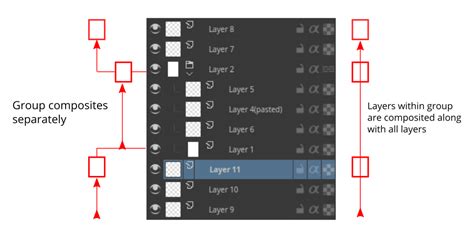
In Photoshop, a clipping mask typically refers to a single layer directly below it. Krita's "Inherit Alpha," however, considers all layers below it within the same hierarchical level. This means that if you have multiple layers beneath a layer with "Inherit Alpha" enabled and they are not enclosed within a separate group, the "Inherit Alpha" layer will be clipped by the combined transparency of all those layers.
The Role of Group Layers
This behavior explains why group layers are often employed when using "Inherit Alpha" for clipping. A group layer in Krita, by default, functions as a separate composite image. This isolates the layers within the group, allowing the "Inherit Alpha" layer inside the group to be constrained only by the layers within that specific group. Without a group, a solid background layer, for instance, would affect the "Inherit Alpha" layer, potentially rendering it entirely opaque if the background is solid and not transparent.
Advanced Applications of Inherit Alpha
The fact that "Inherit Alpha" considers all layers below can be leveraged for complex image compositions. For example, in an illustration project, layers for "color reflection," "global shadows," and "ambient occlusion" might all appear to have a clipping mask effect. However, they are not necessarily clipped to a single base layer. Instead, they can be clipped to the combined transparency of multiple layers, allowing for intricate shading and lighting effects.
Similarly, in shading workflows, artists often create separate layers for shading (using blend modes like "Multiply") and highlights (using blend modes like "Addition" or "Screen"). Because "Inherit Alpha" is not bound to a single layer, these shading and highlight layers can be easily clipped to the underlying base colors, and it becomes straightforward to create grayscale versions of the artwork by simply swapping or adjusting the visibility of the base color layers.
Beyond Inherit Alpha: Exploring Other Clipping Techniques
While "Inherit Alpha" is the most common method, Krita offers other blend modes and techniques that can achieve similar clipping effects, sometimes with unique advantages.
Blend Modes for Clipping
Several blend modes can be used to achieve clipping or masking effects:
Destination In: This blend mode clips the layers below to the alpha of the current layer. Crucially, it does not blend the RGB colors, meaning you won't see the colors of a layer set to "Destination In" directly. This is particularly useful with vector layers. Drawing a vector shape (like a circle or square) on a vector layer set to "Destination In" will effectively clip your entire artwork to that vector shape. Rotating the vector shape will dynamically change the clipped area.
Krita tutorial: Understanding Krita's blending modes
Erase: Similar to "Destination In," the "Erase" blend mode can be used to mask layers. When a layer with the "Erase" blend mode is inside a group, it can affect layers outside its group if the group layer's "Pass Through" mode is enabled. This allows for more complex masking scenarios, especially when working with sprite sheets or characters that require specific masked areas.
Alpha Darken: This blend mode is somewhat counter-intuitive. It doesn't consider the alpha of the pixels directly but rather the overall opacity of the layer. The resulting opacity will not exceed the opacity of either of the layers involved.
Behind: This blend mode effectively swaps the positions of the top and bottom layers in the blending function.
Destination Atop: This mode renders only the current layer, but it draws the pixels underneath it on top of the current layer's pixels. This can be useful for skipping the creation of additional group layers in certain masking situations.
Transparency Masks and Grayscale Images
Krita allows you to add transparency masks to layers. When you create a transparency mask, it is initially generated from the current selection. This means you can create a selection of a layer's alpha channel, copy it, and then use it to create a transparency mask.
While Krita doesn't immediately allow direct use of grayscale images as clipping masks in the same way some other software might, there's a workaround. By adding a filter mask or filter layer to a grayscale image and applying the "Cross-channel color adjustment" filter, you can manipulate the alpha channel. Dragging the curve's left side to the bottom-left corner maps 0% lightness to -100% alpha, effectively making black transparent.
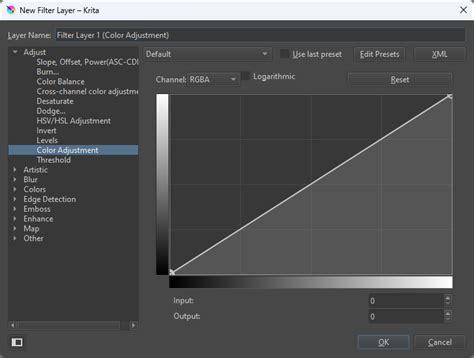
This filter can be adjusted to make other colors transparent as well by changing the "Driver channel" from Lightness to Red, Green, or Blue. This opens up possibilities for using color information within an image to control transparency. For instance, you can use hue shifting to convert green areas into red, and then make red the alpha value, resulting in green areas being opaque and less green areas being transparent.
Clipping to Strokes and Edges
You can also clip layers to the outlines or edges of other layers. One method involves cloning a layer, applying a stroke layer style to the clone, and then using a second clone to erase the original layer's content from the composite image. To clip to just the edges, you can clone a layer twice, add an inner stroke with 0% opacity to the upper clone, and then use this upper clone as an eraser for the lower clone, effectively isolating the edges.
Considerations for Performance and Workflow
When working with textures or patterns, be mindful of how Krita handles fill layers. Using a fill layer to cover the entire canvas with a pattern and then clipping it can be RAM-intensive, as Krita regenerates the canvas-sized image each time. For simpler patterns, using Krita's layer styles to add a pattern overlay is often more RAM-efficient. However, layer styles have limitations compared to the full functionality of fill layers.
Alpha Channel and Opacity Explained
Understanding alpha channels and opacity is fundamental to clipping. A fully opaque color has 100% opacity (or alpha, or 1.0). A fully transparent color is invisible, with 0% opacity (or alpha, or 0.0). In Krita and many graphics applications, color channels (RGB and Alpha) are often stored using 8 bits of memory per channel. This allows for values ranging from 0 to 255 for each channel. When displaying alpha in the user interface, it might be shown in this 0-255 range.
When layers are composited, blend modes dictate how the RGBA values of layers are combined. The alpha value of the top layer plays a critical role in determining how much its color contributes to the final image. For example, a red pixel with 80% opacity (0.8 alpha) composited with a blue pixel with 20% opacity (0.2 alpha) will result in a blended color where the red pixel's contribution is weighted by its opacity.
Conclusion: A Flexible System for Creative Control
While Krita may not have a tool explicitly named "Clipping Mask," its "Inherit Alpha" feature, combined with a variety of blend modes and masking techniques, provides artists with a highly flexible and powerful system for layer composition. The "Quick Clipping Group" shortcut (Ctrl + Shift + G) offers an efficient entry point, while a deeper understanding of how "Inherit Alpha" interacts with group layers and other blend modes unlocks more advanced creative possibilities. By mastering these tools, artists can achieve precise control over their artwork's visibility and composition within Krita.