Vector graphics, digital designs that remain perpetually sharp regardless of their size, represent a fundamental distinction in the world of digital imagery. Unlike raster images, which are composed of fixed-size pixels that become apparent and degrade quality upon magnification, vector graphics are constructed from geometric shapes and mathematical equations. This inherent mathematical foundation allows them to scale infinitely while maintaining crispness and clarity. This makes vectors indispensable for graphic design and digital art, particularly for assets like logos and branding elements that must perform flawlessly across a diverse range of contexts and sizes. While raster images excel at capturing intricate detail, forming the basis for digital photographs and paintings, Photoshop primarily operates within the raster domain. For true vector creation, Adobe Illustrator is the industry-standard application. However, for those who wish to leverage Photoshop's familiar interface to work with or convert to vector formats, a comprehensive understanding of its capabilities is essential.
Understanding the Vector vs. Raster Paradigm
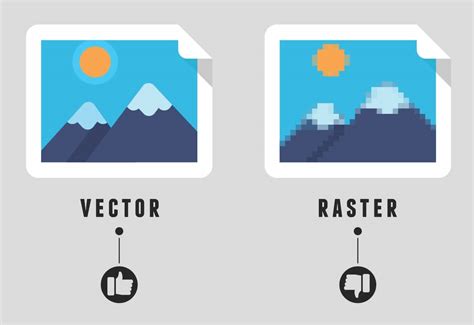
At its core, the digital art world is divided into two primary formats: raster and vector. Raster graphics, often referred to as bitmap images, are essentially grids of individual pixels. Each pixel possesses a specific color value, and when you zoom into a raster image, these pixels become visible, leading to a blocky or pixelated appearance. This is why digital photographs and intricate digital paintings, which rely on subtle gradations of color and detail, are typically raster-based.
Vector graphics, on the other hand, are built upon mathematical formulas. Instead of pixels, they utilize paths - lines, curves, and points - to define shapes and colors. These paths are governed by mathematical equations, meaning that when you scale a vector graphic, the software recalculates the equations to render the image at the new size, ensuring that the edges remain perfectly smooth and sharp. This resolution independence is what makes vector graphics ideal for elements that will be used across various media and at different scales, such as logos, icons, typography, and illustrations that need to be consistently clear whether displayed on a business card or a billboard.
Photoshop's Role in Vector Creation and Manipulation
While Adobe Illustrator is the dedicated vector design application within the Adobe Creative Cloud suite, Photoshop does possess tools that allow for the creation and manipulation of vector elements. It's crucial to understand that Photoshop fundamentally remains a raster-based program. Even when you create vector shapes or paths within Photoshop, the application often embeds this vector data within a raster file. This means that while the vector edges themselves will remain sharp, the surrounding raster information might not scale as seamlessly outside of Photoshop without interpolation.
This distinction is particularly relevant when considering file formats. True vector files, such as those created in Illustrator, contain zero raster data and are entirely resolution-independent. Photoshop, conversely, creates raster files that may contain embedded vector data. This means you can create a vector square in Photoshop, and its edges will remain crisp. However, if that square has a gradient fill, the gradient itself is likely rasterized. When such a file is exported or used in another application, the vector edges will scale, but the rasterized interior might not behave as expected without further processing.
Applications like Illustrator, Inkscape, CorelDraw, Xara, and Sketch are designed from the ground up to create files that contain only 100% resolution-independent vector data. This is not a matter of preference but a fundamental difference in how these applications function and the types of files they produce. While Photoshop's vector tools are generally robust for creating specific vector elements, they are not a direct replacement for dedicated vector software when the goal is to produce purely vector files.
Preparing Your Image for Vectorization in Photoshop
Successful vectorization in Photoshop begins with proper preparation. The quality of your final vector graphic is heavily influenced by the source image. For the best results, it's recommended to start with images that are inherently simple and possess relatively few colors. Think of logos, icons, or clean illustrations rather than complex, high-detail photographs. Images with crisp edges and minimal gradients are ideal. If you are working with a low-resolution raster image that you intend to vectorize, consider upscaling it before proceeding to ensure you have enough detail to work with.
Before diving into the vectorization process, optimizing your Photoshop environment is beneficial. Opening your chosen image and converting it into a Smart Object is a good first step. This allows for non-destructive scaling and filtering, preserving the original image data. Ensure your workspace is uncluttered, and utilize guides and grids to maintain accuracy and alignment as you work. Zooming in closely on your image is crucial for precise tracing and selection.
Key Tools and Techniques for Vector Creation in Photoshop
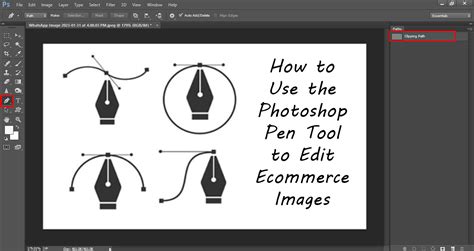
Photoshop offers several tools that are instrumental in creating and manipulating vector elements. The Pen Tool is arguably the most powerful and versatile of these. It allows for the creation of precise vector paths, which are the building blocks of vector graphics.
- Creating Paths with the Pen Tool:
- To draw a straight line, click once to place an anchor point. Click again in another location to create a second anchor point and a straight line segment between them.
- To create a curved line, click once to place an anchor point. Then, click and drag in another location to create a curved line segment. The direction and curvature of the line are controlled by Bézier handles that appear from the anchor point.
- The Freeform Pen tool offers a more intuitive, brush-like drawing experience, allowing you to draw shapes organically.
- Shape Tools: Photoshop provides a suite of dedicated Shape Tools for creating common geometric vector shapes. These include:
- Rectangle Tool: For creating squares and rectangles.
- Rounded Rectangle Tool: For rectangles with adjustable corner rounding.
- Ellipse Tool: For creating circles and ovals.
- Polygon Tool: For creating polygons with a specified number of sides.
- Line Tool: For drawing straight vector lines.
- Custom Shape Tool: This tool grants access to a library of pre-defined vector shapes that can be scaled and modified.
These Shape Tools create vector objects directly on Shape Layers. This is a significant advantage, as shapes created this way are inherently vector-based and can be easily edited, resized, and restyled without affecting other elements in your image.
- Text Tool: Text in Photoshop is also typically vector-based. When you use the Text Tool (indicated by a "T" icon), the characters are rendered as vector outlines. This ensures that text remains sharp and legible at any size, a critical factor for branding and design.
Converting Raster Images to Vector Graphics in Photoshop
While Photoshop is not a dedicated vector converter like Illustrator's Image Trace, it does offer methods to approximate vectorization, particularly for simpler images or when the goal is to create flat, icon-like graphics. The process generally involves simplifying the image's color palette and then tracing its outlines.
Simplify the Image: Vector graphics, especially those created through conversion, often work best with a limited color palette.
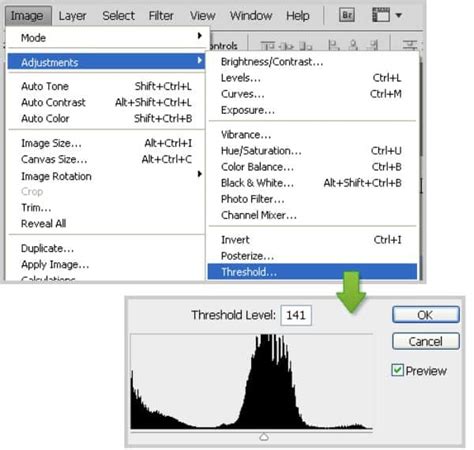
- Posterize Adjustment: Apply a Posterize adjustment layer to reduce the number of colors in your image. You can control the number of tonal levels. The fewer colors you can get away with, the better for vectorization.
- Hue/Saturation or Color Balance: If the colors aren't to your liking after posterization, you can use Hue/Saturation or Color Balance adjustment layers to fine-tune them.
- Levels Adjustment: The Levels adjustment can help control highlights, midtones, and shadows, further refining the image for simplification.
- Artistic Filters: Filters like Oil Paint, Palette Knife, Dry Brush, Poster Edges, and Surface Blur can help reduce detail and create a more graphic, posterized look, making the image easier to vectorize. Unsharp Mask can be used to enhance sharpness if needed.
Isolate and Select Areas: Once the image is simplified, you need to select the areas you want to convert into vector shapes.
- Selection Tools: Tools like the Rectangular Marquee Tool, Magic Wand Tool, or Quick Selection Tool can be used to select specific areas.
- Color Range Command: For more precise color-based selections, the Select > Color Range command is invaluable. This allows you to select all pixels that share a similar color, which is crucial for isolating different color components of your image.
- Select Subject: For isolating the main subject of an image, the Select Subject feature can be a powerful automated option.
Convert Selections to Paths:
- Make Work Path: After making a selection, right-click within the selection and choose Make Work Path. This converts your pixel-based selection into a vector path. A tolerance value can be set here, determining how closely the path adheres to the contours of your selection.
- Paths Panel: You can also create and manage paths in the Paths panel.
Create Vector Shapes:
- Solid Color Fill Layer: With a path selected, you can create a new Fill layer or Adjustment layer and choose Solid Color. This will fill the shape defined by your path with a solid color, effectively creating a vector shape.
- Vector Mask: Applying a Vector Mask to a layer based on a path creates a crisp, scalable outline that defines the visible area of that layer. This is a non-destructive way to isolate elements.
Repeat for Each Color: If your image has multiple colors, you will need to repeat the selection and path creation process for each distinct color you wish to convert into a separate vector element.
Exporting Vector Graphics from Photoshop
Once you have created your vector elements or converted raster images into paths, you can export them in formats suitable for vector use.
SVG (Scalable Vector Graphics): Photoshop can export SVG files, which are a web-standard vector format. To do this, right-click on the layer containing your vector shape or path and select Export As, then choose SVG. It's important to note that for a clean, 100% vector SVG export from Photoshop, the file construction generally needs to be quite basic, without complex layer styles, filters, or blurs. SVG is most effective in Photoshop for simple, flat designs like icons.
EPS (Encapsulated PostScript): While Photoshop's handling of EPS has evolved, it typically exports a rasterized version with embedded vector data, rather than a pure vector EPS file. For true vector EPS, Illustrator is the preferred tool.
PDF (Portable Document Format): Photoshop can save files as PDF, which can contain both raster and vector information. When saving vector elements from Photoshop as PDF, ensure you select options that preserve vector data.
Exporting for Illustrator: If your goal is to further refine or use your vector elements in Adobe Illustrator, you can often export your Photoshop document. While direct "vector export" to AI is not a primary function, saving as PSD and then opening in Illustrator can sometimes work for basic shapes, or you might need to copy and paste paths.
Limitations and Alternatives
It's crucial to reiterate that Photoshop is not a true vector illustration application. While it has vector tools and the ability to create vector paths and shapes, it fundamentally operates on a raster foundation. This means that when you enlarge or transform vector objects within Photoshop, the program interpolates the raster data to suit the transformation. This interpolation does not occur when a true vector file is scaled in another application.
For complex vector illustrations, intricate logos, or any project where pure, resolution-independent vector output is paramount, Adobe Illustrator remains the industry-standard and recommended tool. Illustrator's Image Trace feature is specifically designed to automatically convert raster images into editable vector graphics with a high degree of control.
Similarly, for vector graphics intended for web use, formats like SVG are ideal, but creating them with the most robust results is often best achieved in dedicated vector applications. Even with Photoshop's SVG export capabilities, the complexity of the design will significantly impact the quality and usability of the resulting vector file.
Adobe Illustrator Image Trace Tutorial For the Real World
Conclusion: Choosing the Right Tool for the Job
Transforming raster images into vector graphics is a valuable skill that opens up a world of design possibilities, primarily due to the scalability and crispness of vector art. Photoshop can be a useful tool in this process, especially for creating simple vector shapes, icons, or for preparing an image with simplified colors before a more advanced vectorization step in another application. The Pen Tool, Shape Tools, and careful selection techniques allow for the creation of vector elements within Photoshop.
However, for professional-grade vector work, especially with complex designs or when the absolute highest fidelity of vector data is required, leveraging dedicated vector applications like Adobe Illustrator is essential. Think of it like using a versatile multi-tool versus a specialized power tool; both have their uses, but for a specific, demanding task, the specialized tool will always perform better. Understanding the strengths and limitations of Photoshop in the realm of vector graphics empowers designers to make informed decisions and choose the most effective tools for their creative endeavors.