Removing unwanted objects or elements from video footage can be a complex and time-consuming task. Traditionally, this often involved intricate processes like rotoscoping, manual painting, creating clean plates, and then meticulously tracking these elements back into the shot. These methods, while effective, could become particularly challenging when dealing with camera movement or objects that exhibited significant motion themselves. The advent of After Effects' Content-Aware Fill feature has revolutionized this process, offering a powerful and significantly more automated solution for object removal and scene cleanup. This tutorial will guide you through the intricacies of using Content-Aware Fill in After Effects CC, empowering you to enhance your video clips by seamlessly erasing unwanted elements and achieving professional-looking results.
Understanding the Core Concept of Content-Aware Fill
Content-Aware Fill is an intelligent feature within After Effects designed to automatically remove undesired objects from video sequences. The fundamental principle behind it is straightforward: you identify and mask out the object you wish to eliminate, and After Effects then analyzes surrounding frames to generate new imagery that fills the resulting "hole." This synthesized imagery is derived from the existing visual information in other frames, effectively making the unwanted object disappear. This functionality is particularly useful for tasks such as removing the shadow of a drone from your shot, erasing individuals who have inadvertently entered the frame, or cleaning up any distracting elements that detract from your intended visual narrative.
The effectiveness of Content-Aware Fill, like many advanced tools, is contingent upon several factors. However, the underlying mechanism remains consistent: masking the target area and allowing After Effects to intelligently reconstruct the scene.
Getting Started with Content-Aware Fill in After Effects
Before diving into the practical application, ensure the Content-Aware Fill panel is accessible. If it's not already open, navigate to Window > Content-Aware Fill in the After Effects menu bar.
For demonstration purposes, let's consider a scenario involving drone footage flying over a campsite, where a Jeep enters the frame and needs to be removed. A clip of a car moving on a beach, provided by Pond5 artist randomoperator, also serves as an excellent example for practicing this technique.
Step 1: Masking the Unwanted Object
The initial and crucial step in utilizing Content-Aware Fill is to precisely mask the area that contains the object you want to remove. After Effects offers several robust tools for this purpose:
- Rotobrush Tool: This intuitive tool allows you to quickly draw a rough mask around an object, and After Effects intelligently refines the edges over time.
- Mocha AE: For more complex masks and precise tracking, Mocha AE, a powerful planar tracking tool integrated within After Effects, can be employed to generate highly accurate masks.
- Shape Tools: Alternatively, you can select your video layer and utilize the built-in shape tools, such as the Ellipse or Rectangle tool, to draw a mask directly around the object. For instance, to isolate the Jeep in our drone footage example, we could use the Ellipse tool to draw a mask surrounding the vehicle.
Once the mask is created, it's imperative to ensure its mode is set to "Subtract." This setting is essential for the Content-Aware Fill algorithm to function correctly, as it defines the area that will be analyzed for removal.
Step 2: Understanding the Content-Aware Fill Panel
With the mask in place, the Content-Aware Fill panel will now display a preview of your masked area under the "Fill Target" section. This "Fill Target" visually represents the region that After Effects will analyze. You'll also notice a pink outline around the transparent area, indicating the region to be filled.
Several key options within the panel allow you to fine-tune the fill process:
Alpha Expansion: This parameter enables you to expand the area that After Effects analyzes for filling. This can be beneficial if the initial mask is slightly too tight or if you need to ensure a broader area is considered for seamless blending.
Fill Method: This is a critical setting that determines how After Effects approaches the reconstruction of the missing pixels. You have three primary choices:
- Object (Default): This method is highly effective for removing moving objects from your footage. It analyzes the current and surrounding frames, estimates the motion of the scene behind the object, and uses this information to synthesize appropriate color values for the replacement pixels.
- Surface: This method is particularly useful for static shots and flat surfaces. It works by analyzing pixels from surrounding frames but specifically uses the motion estimated in the composition under the transparent area to guide the fill. This is ideal when the surface itself has a consistent texture or pattern.
- Edge Blur: This method excels with static objects and surfaces that lack distinct textures. It functions by sampling pixels at the edges of the transparent area and blending them together. This often results in a faster render time and is effective for subtly blending areas where precise detail isn't paramount.
Range: This setting allows you to define the scope of the analysis. You can choose to have Content-Aware Fill operate on the entire composition or limit it to a specific "work area" that you define. For shorter shots, using the entire composition is often practical, as demonstrated in our example of the Jeep entering the frame.
Step 3: Generating the Fill Layer
Once you have configured the mask and adjusted the Content-Aware Fill panel settings to your satisfaction, it's time to initiate the object removal process. Click the "Generate Fill Layer" button. After Effects will then begin its analysis of the shot, examining the frames and rendering a new "fill layer." This automatically generated layer, typically a PNG sequence, is placed directly above your original footage in the Timeline panel. Its purpose is to seamlessly fill the areas where the unwanted object was previously located.
Upon completion of the process, the unwanted object should no longer be visible in your scene.
Advanced Techniques and Troubleshooting
While Content-Aware Fill is remarkably powerful, there are instances where it might not produce ideal results on its own. This can occur with complex backgrounds, intricate object movements, or challenging lighting conditions. In such cases, leveraging reference frames can significantly improve the outcome.
Creating and Utilizing Reference Frames
A reference frame acts as a guide for the Content-Aware Fill algorithm, providing it with a pre-determined visual target for how the filled area should look.
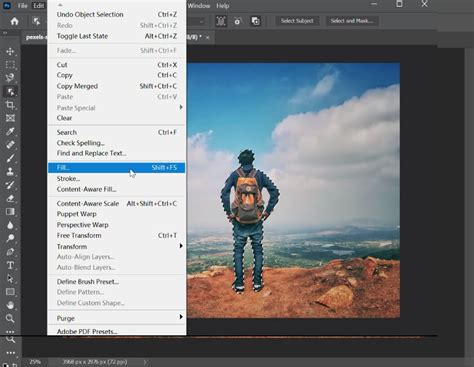
- Create a Reference Frame: After you have created your mask, select a frame in your timeline where the object you wish to remove is most prominent. Then, click the "Create Reference Frame" button within the Content-Aware Fill panel. This action will generate a single-frame fill layer and automatically open it in Adobe Photoshop.
- Edit in Photoshop: In Photoshop, you have the full suite of tools at your disposal to manually refine this reference frame. Tools like the Clone Stamp tool or the Patch tool are invaluable for painting in the desired fill, ensuring it matches the surrounding environment perfectly.
- Save and Return: Once you are satisfied with your manual edits in Photoshop, save the file. It is crucial to save the changes with the same name and location as the original reference frame to ensure After Effects can locate it. Avoid using "Save As" to prevent potential issues.
- Generate Fill Layer Again: Return to After Effects. The reference frame you edited will now be incorporated into the Content-Aware Fill process. Select "Generate Fill Layer" again. After Effects will use your manually refined reference frame as a strong guide, leading to a far more accurate and seamless fill.
This process can be particularly effective for shots with complex backgrounds, variable lighting, or rapidly changing camera angles. You can even create multiple reference frames at different points in your timeline to account for significant shifts in lighting or perspective.
Mocha Pro: Tips for Faster, Better Object Removals
Bonus Tips for Optimal Results
To maximize the effectiveness of Content-Aware Fill and streamline your workflow, consider these additional tips:
- Segment Complex Objects: For objects that are complicated or have distinct moving parts (like a person and their shadow), it's often beneficial to create separate masks for each component. This allows After Effects to analyze and process each element more independently, leading to cleaner results, especially if their movements differ significantly.
- Smaller Masks, Faster Renders: Generally, smaller masks tend to render faster. While you need to ensure the mask adequately covers the unwanted object, avoid making it unnecessarily large, as this can increase processing time.
- Manage Fill Layer Files: Fill layers, especially those generated as PNG sequences, can consume a considerable amount of drive space. Be mindful of this and periodically delete fill layers that you no longer need to keep your project organized and conserve storage.
- Feathering for Soft Edges: If you notice harsh or visible borders in your generated fill layer, try feathering the mask. Applying a feather to your mask creates a softer edge, allowing Content-Aware Fill to blend the filled region more subtly with the original content, based on the alpha value (semi-transparency).
- Diverse Masking Methods: Remember that you can create selections for Content-Aware Fill using various methods, including masks drawn with the Pen tool, selections generated by the Rotobrush, the Eraser tool, or even through keyframing masks.
- Lighting Correction: After Effects' Content-Aware Fill has been enhanced to better handle dynamic lighting shifts in footage. When the "Lighting Correction" option is enabled, After Effects can adjust the fill layer to seamlessly integrate with changing lighting conditions from frame to frame. You can choose from "Subtle," "Moderate," and "Strong" correction strengths. This feature is particularly useful in footage where lighting changes frequently, eliminating the need to generate multiple fill layers to compensate for these variations. The "Strong" setting is a good starting point, but be aware that in footage with highly flickering or inconsistent lighting, it might sometimes over-correct.
- Output Depth and Path Settings: For advanced users, the "Output Depth" setting allows you to specify the color depth (8-, 16-, or 32-bpc) for the generated fill layer sequence files. The "Path Type" and "Path" settings control where these files are saved, offering options for project-relative paths or absolute paths, which can be crucial for managing large projects and ensuring file accessibility.
- Reference Frame Saving Options: You can choose to save reference frames as PSD files, which are then opened in Photoshop. Additionally, the "Create Photoshop Sequence for Output" option allows fill layer sequences to be saved as PSD files, offering greater flexibility in post-processing if needed. The "Auto-manage Unused Fill Footage" feature prompts you to delete fill layer footage that is not actively being used in any composition, helping to keep your project clean.
The Power and Limitations of Content-Aware Fill
Content-Aware Fill is an incredibly powerful tool that significantly simplifies object removal tasks in After Effects. It automates much of the laborious work, saving considerable time and effort, especially for VFX artists, motion graphics designers, and editors who frequently encounter cleanup tasks in commercial and film projects. The ability to remove elements like microphones, poles, or unexpected people with just a few clicks is a game-changer. Powered by Adobe Sensei, its temporal awareness allows it to analyze frames over time and synthesize new pixels from other parts of the video, ensuring a seamless integration.
However, it's crucial to acknowledge that Content-Aware Fill is not a magic bullet for every situation. While it excels in many scenarios, particularly with the "Object" fill method for moving elements and the "Surface" method for static planes, there are limitations. Footage with highly complex backgrounds, extreme motion blur, or very dynamic and unpredictable lighting can still pose challenges. In such cases, the manual refinement offered by reference frames becomes indispensable.
Ultimately, the most effective approach often involves a combination of proper planning during the initial shot capture and the skillful application of After Effects' advanced tools. By understanding the nuances of Content-Aware Fill, mastering its various settings, and knowing when to employ supplementary techniques like reference frames, you can achieve professional-grade results and significantly enhance the quality of your video productions. Remember, while technology provides powerful assistance, a solid understanding of visual principles and meticulous attention to detail remain paramount in achieving truly polished visuals.