CorelDRAW is a powerful and versatile vector graphics editor that empowers designers to create everything from simple logos to intricate illustrations and complex print layouts. This comprehensive tutorial delves into the core functionalities and advanced features of CorelDRAW, offering insights and practical guidance for users of all skill levels, from beginners to seasoned professionals. We will explore a wide array of tools and techniques, covering fundamental drawing and editing operations, advanced effects, text manipulation, and efficient workflow management.
Navigating the CorelDRAW Interface: Toolbars and Dockers
Understanding the CorelDRAW interface is the first step towards unlocking its full potential. The application is equipped with several key components designed to streamline the design process.
The CorelDRAW Toolbox: Your Creative Arsenal
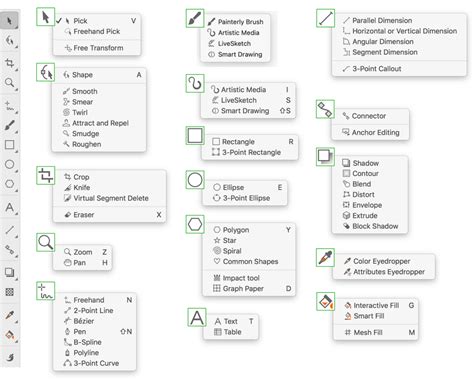
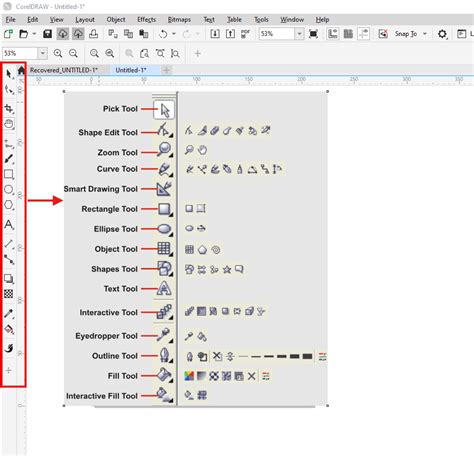
The CorelDRAW Toolbox is the central hub for all drawing and editing tools. This main toolbar contains a comprehensive collection of essential instruments that enable you to create and manipulate vector graphics. From basic shapes to complex drawing instruments, mastering the Toolbox is fundamental. In this section, we’ll review the key tools within the CorelDRAW Toolbox, providing an overview of their functions and how they contribute to the overall design workflow.
The Property Bar: Context-Sensitive Power
The Property bar is a dynamic and context-sensitive toolbar. It intelligently changes to display the most common functions specific to the currently active tool, providing immediate access to relevant options. This feature significantly enhances productivity by placing crucial controls at your fingertips, eliminating the need to hunt through menus. We will explore how the Property bar adapts to different tools and how you can leverage its context-specific nature to your advantage.
The Status Bar: Essential Information at a Glance
The Status bar, located at the bottom of the CorelDRAW window, provides vital information about your document, selected objects, and current tool settings. In this tutorial, we’ll review the features of CorelDRAW’s Status bar and demonstrate the different options for display preferences and customization, ensuring you have the information you need readily available.
Standard Toolbar: Shortcuts and Customization
The Standard toolbar offers quick access to frequently used commands and features. We’ll review the tools and features on CorelDRAW’s Standard toolbar, along with common shortcuts and options for display preferences and customization. Understanding these elements allows for a more efficient and personalized user experience.
Dockers: Organized Control Panels
Dockers are floating or docked panels that provide access to a wide range of tools and settings. They are essential for managing complex projects and applying effects. We will delve into several key dockers:
- Hints Docker: For new users, the Hints docker provides valuable information about the specific tool you have activated, offering a built-in learning resource directly within the application. This allows you to learn how to use tools as you encounter them.
- Objects Docker: This tutorial will introduce you to the Objects docker, demonstrating how it is used to manage objects, layers, and pages within your CorelDRAW documents, offering a clear hierarchical view of your project's structure.
- Pages Docker and Multipage View: Learn how you can easily view, manage, and edit all your project’s digital assets in one consolidated view using CorelDRAW’s Pages docker and Multipage View. This is particularly useful for documents with multiple pages or complex layouts.
- Assets Docker: Discover how to sync and share symbols with CorelDRAW’s Assets docker, ensuring design teams remain in sync and always work with the most current assets. This is crucial for collaborative projects and maintaining design consistency.
- Adjustments Docker: The Adjustments docker and Adjust menu make it easy to apply a variety of filters and effects to an image or a specific image area, providing non-destructive editing capabilities.
Precision Drawing and Object Manipulation
CorelDRAW offers a robust set of tools for creating and manipulating vector objects with precision and ease.
Fundamental Drawing Tools
- Rectangle and Ellipse Tools: Learn the basics of drawing rectangles and squares with the Rectangle tools and ellipses with the Ellipse tools in CorelDRAW. This includes how to resize, fill, and change corner shapes for rectangles, and how to resize, fill, and create pie and arc shapes for ellipses.
- Polygon Tools: We’ll show you how to draw and edit polygons in CorelDRAW, plus how to transform them into complex and interesting shapes.
- Curve Drawing Tools: Watch this helpful tutorial to learn how to use CorelDRAW’s curve drawing tools, and how to utilize different types of nodes to edit and manipulate curves, forming the basis of intricate vector artwork.
Advanced Drawing and Transformation
- Perspective Drawing Tools: Learn how to use CorelDRAW’s perspective drawing tools to easily draw objects or scenes in perspective, eliminating the need to set up complex grids. This feature is invaluable for creating realistic depth and dimension.
- Symmetry Mode: Discover how to use CorelDRAW’s Symmetry Mode to significantly speed up your design workflow, whether you're creating a simple mirrored image or a complex kaleidoscope effect. This tool allows for simultaneous editing on multiple mirrored objects.
- Shaping Tools: CorelDRAW’s shaping tools allow you to transform objects by welding or combining them, using one object to trim another, and performing other Boolean operations. This is fundamental for creating unique and complex forms from basic shapes.
- Edit Shape Tool Group: We’ll review the seven tools in the Edit Shape tool group and demonstrate how they can be used to meticulously shape objects within your CorelDRAW designs, offering fine-grained control over vector paths.
Object Positioning and Alignment
- Guidelines, Align and Distribute: Learn about the various CorelDRAW tools that will help you position objects with precision and ease, including guidelines, align and distribute options, and live guides. These features ensure your elements are perfectly placed and spaced.
- Fit Objects to Path: Learn how to use the Fit Objects to Path command in CorelDRAW, which allows you to fit any type and number of objects along a path of your choice, creating dynamic and flowing designs.
Cropping and Deleting
- Crop and Eraser Tools: You’ll learn how to use CorelDRAW’s Crop and Eraser tools to quickly remove unwanted areas from objects, images, or entire designs.
- Virtual Segment Delete Tool: Discover how to use CorelDRAW’s Virtual Segment Delete tool to efficiently remove sections of lines or curves between intersection points with other objects, cleaning up complex vector paths.
Pan and Zoom Tools
When working on large design files, the ability to navigate efficiently is crucial. Learn how to use the Pan and Zoom tools in CorelDRAW to smoothly zoom in and out and pan to specific areas of your canvas.
Enhancing Designs with Effects and Fills
CorelDRAW provides a rich array of tools for applying fills, outlines, and special effects to your designs.
Fills and Outlines
- Interactive Fill and Smart Fill Tools: Learn how to use the Interactive Fill and Smart Fill tools in CorelDRAW to fill objects and enclosed areas with a variety of color, pattern, and texture fills.
- Outline Pen Tool: Access and adjust the settings for the Outline Pen tool in CorelDRAW, which is used to precisely control the appearance of lines and outlines, including color, width, and style.
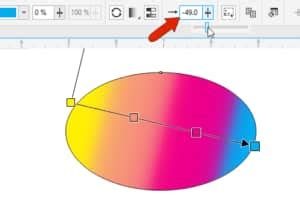
- Fountain Fills (Gradients): Learn how to create a multi-color gradient fill, also known as a fountain fill, that can be applied to shapes, text, and other objects in CorelDRAW, adding smooth color transitions.
- Object Properties and Edit Fill Tools: Learn how to apply and edit outlines, transparencies, and fills quickly and easily in CorelDRAW, using the Object Properties and the Edit Fill tools.
Creative Effects
- Shadow Tools: With CorelDRAW’s shadow tools, it’s easy to add depth and dimension to your design elements. Learn how to apply and fine-tune a drop shadow or inner shadow effect.
- Block Shadow Tool: See how easy it is to add depth to your designs with CorelDRAW’s Block Shadow tool. Learn how to apply a block shadow and adjust settings for depth, color, and more.
- Blend Tool: Learn how to use the Blend tool in CorelDRAW to create smooth transitions from one object to another, including transitions between colors, shapes, and other properties.
- Envelope Tool: Discover how to use CorelDRAW’s Envelope tool to reshape objects, text, and bitmaps so that they conform to the shape of another object, allowing for creative distortions.
- Extrude Tool: CorelDRAW’s Extrude tool is used to give objects a 3D appearance. Learn how to add, edit, copy, modify, and enhance extrusions on objects and text.
- Impact Tool: Learn how to create graphic effects in a style inspired by comic books and contemporary illustrations with the Impact Tool in CorelDRAW.
- Art Style Effects: We experiment with CorelDRAW’s Art Style effects, which utilize artificial intelligence to replicate popular artistic genres, transforming your designs with painterly qualities.
- Non-Destructive Effects: Learn how to apply, adjust, and experiment with CorelDRAW’s non-destructive effects to achieve the desired look without altering your original artwork.
- Gaussian Blur Lens: Learn how to use the Gaussian Blur lens and enhanced drop shadows with Gaussian blur feathering in PHOTO-PAINT, a complementary application often bundled with CorelDRAW.
Color Management
This written tutorial provides an introduction to color theory, an overview of RGB and CMYK color modes, and essential color management tools within CorelDRAW, ensuring your designs are accurate for both screen and print.
Working with Text
Text is a critical component of most designs, and CorelDRAW offers extensive tools for its creation and manipulation.
Text Types and Formatting
- Artistic vs. Paragraph Text: Get an overview of artistic and paragraph text, understanding their distinct uses and capabilities. We will cover the various text formatting options available with CorelDRAW’s Text tool and Text docker.
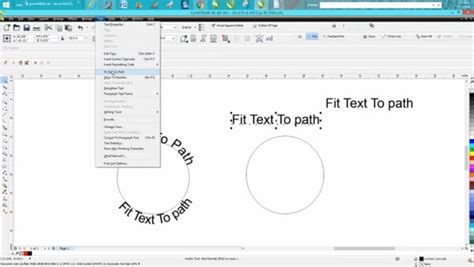
- Adding and Editing Text: This tutorial is dedicated to adding and editing artistic and paragraph text in CorelDRAW. You’ll also learn how to fit text to curves and shapes, integrating text seamlessly into your designs.
Advanced Text Effects
- Variable Fonts: Learn how to use CorelDRAW’s new variable fonts to fine-tune the look of text by changing font properties such as width, slant, weight, and more, offering unprecedented typographic control.
- Text Effects: We’ll explore some of the fun effects you can apply to text in CorelDRAW, using the Interactive Effects and Shape toolboxes.
- Mosaic Text Effect: Learn how to use the Text tool, Fountain Fill tool, and PowerClip in CorelDRAW to create unique titles with a mosaic text effect.
- Distressed Text Effect: This tutorial will show you how easy it is to add a funky, distressed look to your text using CorelDRAW.
- Interlaced Effect: Learn how to create an interlaced effect in CorelDRAW to give the appearance that text and objects are intertwined or woven together.
- Chiseled Wood Effect: Discover how to use the Outline, Drop Shadow, and PowerClip tools in CorelDRAW to create a chiseled wood effect, adding texture and depth to your design projects.
Font Management
- Font Overview and Sources: Learn about the various types of fonts, where to find free fonts, and how to download and install fonts from other sources onto your PC or Mac.
- Font Sampler and Preview: Learn about installed vs. non-installed fonts, how to preview and filter fonts, and how to use the Font Sampler to compare fonts effectively in CorelDRAW.
- Corel Font Manager: See how you can preserve your font collections with Corel Font Manager, which includes new features to import and export font collections and folders, simplifying library management.
- Using Font Manager: Learn how to use the Font Manager included in CorelDRAW Graphics Suite to easily manage your font library and keep your font collections organized.
- Insert Character Docker: Learn how to find the perfect font for your project and how to use the Insert Character docker to filter and add special characters and symbols.
- Special Characters and Glyphs: This tutorial will show you how to find and use special characters and symbols, stylistic sets, and characters from other languages in CorelDRAW.
Writing Tools
- Spell Check, Thesaurus, and QuickCorrect: In this tutorial, we’ll examine several CorelDRAW writing tools that will help you create error-free text content, such as Spell Check, Thesaurus, and QuickCorrect.
Image Editing and Manipulation
While CorelDRAW is primarily a vector editor, it also offers tools for working with raster images.
Image Adjustments
- Adjustments Docker and Menu: Learn how to use the Adjustments docker and Adjust menu to easily apply a variety of filters and effects to an image or a specific image area. This includes adjusting light, color, white balance, hue, and saturation, or converting an image to black and white with a click.
- Resizing and Cropping: Rotate, crop, and resize images to fit your design needs.
How to Make Realistic Mockup in Coreldraw | Professional Mockup Design | Corel draw tutorial
PowerTRACE: Bitmap to Vector Conversion
- Converting JPG to Vector: Learn how to use the PowerTRACE feature in CorelDRAW to convert JPGs to vector graphics, producing an image that can be enlarged without losing quality. This is essential for preparing scanned logos or low-resolution images for professional use.
- Creating Custom Clipart: Want to make your own custom clipart from a photo? Learn how to use the PowerTRACE feature in CorelDRAW to achieve this in a few quick and easy steps.
- Enhanced PowerTRACE: See how CorelDRAW’s enhanced PowerTRACE feature uses upsampling and JPEG artifact removal to convert low-resolution bitmaps into high-quality vector images.
Workflow and Productivity Enhancements
CorelDRAW offers features designed to optimize your workflow and boost productivity, especially in team environments.
Template Workflow
This tutorial reviews the template workflow in CorelDRAW, including where to download free templates and how to organize and manage your template library. Templates provide a starting point for consistent design projects.
Print Merge
Learn how to use CorelDRAW’s print merge feature to insert variable data, such as text, images, and QR codes, into a single design to create personalized documents, ideal for mailers, invitations, and marketing materials.
Focus Mode
Learn how to use CorelDRAW’s Focus Mode to isolate an object, or group of objects, making it easy to work on only those specific elements of your artwork without distraction.
Duplicating and Selecting Objects
Do you know all the ways to duplicate an object? Or how to select an object within a large group? Boost your productivity with these essential tips from a CorelDRAW Master.
Find and Replace
With the Find and Replace docker in CorelDRAW, you can efficiently search a document for specific objects and then easily make page-wide modifications or replacements, saving significant time on repetitive tasks.
Syncing and Sharing Symbols
Learn how to sync and share symbols with CorelDRAW’s Assets docker, ensuring design teams stay synchronized and always work with the most current assets, preventing version control issues.
Designing Specific Projects
CorelDRAW is used to create a vast range of professional and personal projects. Here are some examples and guides:
Logo Design
Learn how to use CorelDRAW to create an effective and professional logo tailored to your unique business needs and enhance your brand recognition.
Business Cards
Learn how to design a business card in CorelDRAW, with tips for document setup, adding and editing text, and incorporating a logo and QR code.
Posters and Brochures
- This step-by-step tutorial shows you how to make a poster in CorelDRAW, using a simple design to introduce key tools and techniques.
- In this written tutorial, CorelDRAW Master Silvio Gomes shows you how to create a poster with a halftone effect on the background.
- This guide to brochure design is packed with helpful tips from CorelDRAW Master Ariel Garaza Diaz, covering document setup to finished, print-ready PDFs.
Magazine Layouts and Covers
- CorelDRAW Master Ariel Garaza Diaz provides step-by-step instructions to design a magazine layout, from document setup to finished, print-ready PDF.
- This tutorial will show you how to create a custom magazine cover - perfect for professional and personal projects!
Letterheads and Restaurant Menus
- In this tutorial, CorelDRAW Master Ariel Garaza Diaz provides design tips and step-by-step instructions to design a letterhead for corporate communications.
- CorelDRAW Master Anand Dixit shares his process for designing a restaurant menu, including tips for document setup, design assets, and printing considerations.
Vehicle Wraps
Want to use your vehicle to promote your business? This advanced tutorial will show you how to design a custom vehicle wrap using a CorelDRAW template.
Custom Clipart
Learn how to customize clipart to perfectly suit your designs by changing colors, lines, and shapes, adding texture and fills, and more with CorelDRAW.
Brand Image Development
In this written tutorial, Joe Diaz demonstrates how to use custom typesets and imagery to create a unique brand image for a women’s clothing store.
Sign Design
In this written tutorial, CorelDRAW Master Joe Diaz walks you through the process of designing a sign with CorelDRAW.
Advanced Techniques and Features
CorelDRAW Graphics Suite includes specialized tools and features for more advanced design work.
CorelDRAW DESIGNER
CorelDRAW DESIGNER is a full-featured application with dedicated technical illustration tools and industry-standard output support. Learn how to create objects with a 3D appearance and work with projected drawings, and how to utilize exact size and position values for precise technical diagrams. From concept to compliance, details matter. Learn how to use DESIGNER’s Projected Axes docker and Transform toolbar to work with exact size and position values while drawing in Parallel Perspective. Learn how to modify the settings and properties of a 3D model in XVL Studio to convert it into a 3D illustration and import it into Corel DESIGNER.
Stylus and Tablet Integration
See how to use the pressure, bearing, tilt, and rotation of your stylus to control a variety of tools and effects when working in CorelDRAW, enhancing your creative input and precision.
Node Editing
With the revamped node editing features in CorelDRAW, it’s now easier to identify different node types and work with them, offering more intuitive control over vector paths.
Web Graphics
Learn how to design clean, crisp web graphics with CorelDRAW, using Pixels view and enhanced features such as align to pixel grid and pixel snapping, ensuring sharp and optimized results for online use.
CorelDRAW Go
This guide will help you master the basics with CorelDRAW Go, from creating designs to customizing your work. Whether you’re a newbie or a design enthusiast, follow these simple steps to create something spectacular. Pick a design template for inspiration. Note: You can access existing projects by selecting "My projects." Change the background color. Edit any object (shape, text, or image) on the template and customize it to your style. Interested in learning more? Click anywhere to drop them. Or, click and drag to place it as a specific size. Choose from various line styles, from solid to dotted and dashed. Click, drag, and release to draw on your canvas. Double-click on it and adjust the nodes and handles. Use the Properties panel to customize fills, colors, outline styles, and transparency. Select the Text icon from the Toolbox. Change the text fill and/or outline. Add shadows, brushstrokes, or other effects for a personalized touch. Selecting a fill color and applying a gradient. Changing the outline color, style, and weight. Modifying your object's transparency and exploring transparency effects. Applying an inner or outer shadow and playing around with its positioning. Open the Draw panel by selecting the Drawing Tools icon in the Toolbox. Adjust the size, color, and transparency of the brushstroke. Experiment by changing the brush type. Fun fact: Brushstrokes can also be added to a shape outline or to text directly from the Properties panel. Adjust light, color, white balance, hue, and saturation, or make your photo black and white with a click. Rotate, crop, and resize to your needs. Get creative by playing with transparency, shadows, and adding a brushstroke as a border. An X will appear on the frame. Double-click on the shape to adjust or delete the image. Or, open the Objects panel on the bottom right of your screen, and click the New page icon. Your work is auto-saved to the cloud, so you never have to worry about losing progress. Download an editable .CDR file, the native format for CorelDRAW Go. Download your designs in other formats from the Export panel, accessed by clicking on Export on the top right of your screen. Now, it’s time to put your creativity to the test! Try CorelDRAW Go free for 15 days and experience the ultimate design freedom. Still have questions? Check the CorelDRAW Go community.
This extensive guide covers a broad spectrum of CorelDRAW's capabilities, providing a solid foundation for users to explore and master this powerful graphic design software. From fundamental tools to advanced effects and workflow optimizations, the journey into CorelDRAW is one of continuous learning and creative exploration.