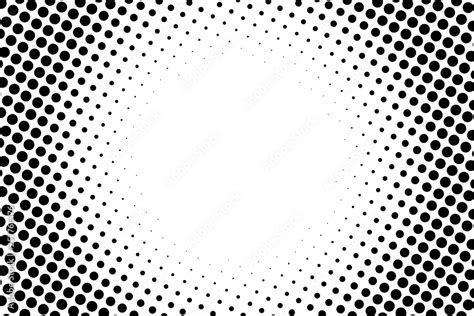
The halftone effect, a technique born from the limitations of early 20th-century printing, continues to be a powerful artistic tool in the digital age. By using patterns of tiny dots, primarily in cyan, magenta, yellow, and black (CMYK) inks, printers could simulate a vast spectrum of colors and shades on presses that were otherwise restricted to these base inks. This method of creating images from fields of dots, positioned closely together, allowed them to appear to mix and form other shades when viewed from a distance. Halftone images are a staple of pop art, screen printing, and graphic design, referencing printing styles of a bygone era. In Adobe Photoshop, this classic technique can be recreated with remarkable ease, allowing artists and designers to imbue their work with a distinct retro aesthetic or add unique textural depth. This tutorial will delve into the intricacies of creating a halftone effect in Photoshop, exploring various methods and offering insights into their application.
Understanding the Core Principles of Halftoning
At its heart, halftoning is a simulation. It's about tricking the eye into perceiving continuous tones and colors by arranging discrete elements - the dots - in specific patterns and densities. When printing presses were limited to a few solid ink colors, the halftone process became indispensable. Printers developed the halftone as a way to print a wider spectrum of colors. Fields of tiny dots in those four colors (CMYK) created every shade that could be printed. The size and spacing of these dots, along with their precise angles of placement, determined the final appearance of the image.
Halftones are made up of fields of tiny dots in those four colors, positioned closely together. When grouped together, the dots appeared to mix and form other shades. This fundamental principle remains the same whether you're using a traditional printing press or digital software like Photoshop. The software replicates this process by generating patterns of dots that mimic the way ink would be applied to paper.
The Significance of Halftones in Printing and Design
The impact of halftones extends beyond mere aesthetic appeal; they are a foundational element in many printing processes, particularly screen printing. Many people fail to realize that the depth of screen printing is often achieved with halftones. While learning how to halftone an image in Photoshop for screen printing might seem demanding, this skill can help transform a simple image into a screen-printing masterpiece.
Halftoning is a creative tool that adds depth and texture to screen-printed images. By converting images into halftones, we can reproduce photographs, gradients, and complex illustrations with screen printing, which would otherwise be impossible. So what does this all mean? Essentially, halftones allow us to use just a single color and create the illusion of using multiple shades. This is why halftoning is essential for screen printing, allowing for richer, more nuanced visuals even with limited ink palettes.
Method 1: Utilizing the Color Halftone Filter in Photoshop
One of the most direct ways to achieve a halftone effect in Photoshop is by using the built-in "Color Halftone" filter. This method is particularly effective for creating the classic CMYK dot pattern.
Step 1: Preparing Your Image
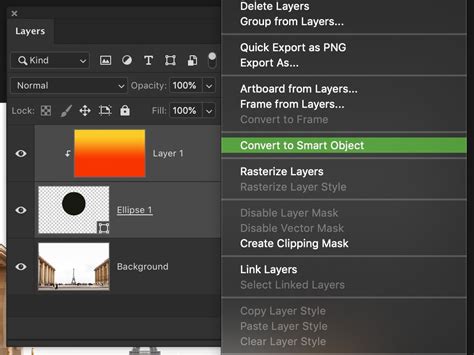
Before applying any filters, it's crucial to prepare your image. For optimal results, convert your image to a Smart Object. This is achieved by right-clicking on the image layer in the Layers panel and selecting "Convert to Smart Object." This non-destructive approach allows you to revisit and adjust filter settings later without degrading the image quality. We chose to use a photo of a woman in a garden, but you can create a halftone effect with any image, such as one from this list of adventure photos.
Step 2: Applying the Color Halftone Filter
Navigate to Filter > Pixelate > Color Halftone. This action will immediately apply a basic halftone pattern. The dialog box that appears offers several key settings to control the effect:
- Max. Radius: This setting directly influences the size of the halftone dots. The dots can only be as large as or smaller than the value you enter. The Max Radius can be between 4 and 127. Adjusting the size of the dots changes the gradient and blur of the color and image.
- Screen Angle: For each color channel (Cyan, Magenta, Yellow, and Black), you can define a specific angle at which the dots are placed. The value is listed in degrees. Adjusting the value changes the angle at which the Cyan, Magenta, Yellow, and Black dots are added to the pattern. The Channel setting adjusts the way the dots are placed and how they overlap. Each Channel is controlled by a Screen Angle setting.
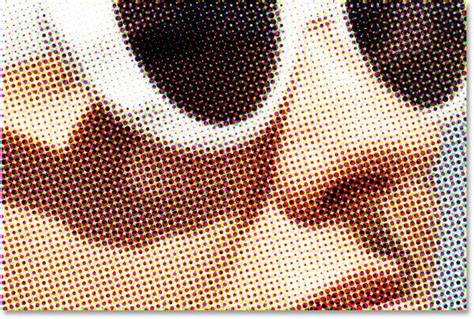
We entered the following values and clicked OK to apply the filter:Max Radius: 20Channel 1: 15Channel 2: 75Channel 3: 0Channel 4: 45
Below is what our image looks like with the values above. Take a look at the image below to get an idea of what the dots look like with the values we entered.

Step 3: Modifying Color Halftone Settings
Because the image is a Smart Object, you can easily go back and refine the halftone effect. Double-click on "Color Halftone" under "Smart Filters" in the Layers panel. This will reopen the dialog box, allowing you to tweak the Max Radius and Screen Angle values. For instance, we entered 30 for the Max Radius and 45 for all the Screen Angles this time around. Below is what the image looks like with the new values. If we zoom in, the dots look like the image below.
Method 2: Employing the Halftone Pattern Filter
Another effective method involves using the "Halftone Pattern" filter, which is found within the Filter Gallery. This approach is particularly useful for creating more stylized, graphic halftone effects.
Step 1: Selecting Foreground and Background Colors
The Halftone Pattern filter utilizes the current Foreground and Background colors of your Photoshop document to generate the dot pattern. Click on the Foreground color icon near the bottom of the left toolbar and select your desired color. Then, click on the Background color icon and select another color. These colors will define the primary tones of your halftone effect.
Step 2: Applying the Halftone Pattern Filter
Go to Filter > Filter Gallery. Within the Filter Gallery, navigate to the "Sketch" folder and select "Halftone Pattern." Ensure that the "Pattern Type" is set to "Dots." Use the preview image on the left to adjust the "Size" and "Contrast" to your liking. The Size setting affects the size of the halftone dots and the spacing in between. You can use the zoom buttons at the bottom left if needed. Click "OK" when you are satisfied with the preview.
Step 3: Editing the Applied Halftone Pattern
As with the Color Halftone filter, if your image is a Smart Object, you can easily edit the Halftone Pattern filter after it has been applied. Simply double-click on "Filter Gallery" under "Smart Filters" in the Layers panel. This will reopen the Halftone Pattern settings, allowing for further adjustments to Size and Contrast.
Enhancing and Customizing Your Halftone Effects
Beyond the basic application of filters, Photoshop offers several ways to further customize and enhance your halftone creations.
Changing the Halftone Effect Colors
You can significantly alter the color palette of your halftone effect using a couple of powerful techniques.
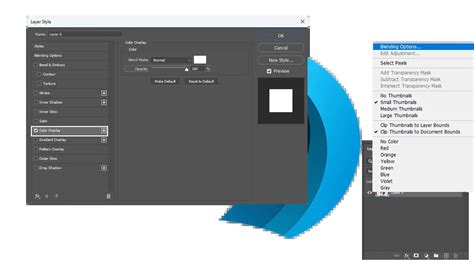
Using Blending Options
Double-click on the Blending Options icon to the right of the filter in the Layers panel. The Blending Options dialog will open, where you can adjust the "Mode" and "Opacity." Mark the "Preview" checkbox to see a live preview of your changes. We went with "Screen" for the Mode and set Opacity at 88%. This option is available for both filters used in this tutorial.
Employing Gradient Maps
For a more dramatic color transformation, apply a Gradient Map adjustment layer. Click on the "New Adjustment Layer" button at the bottom of the Layers panel and select "Gradient Map." The Gradient Map will be created using your current Foreground and Background colors.
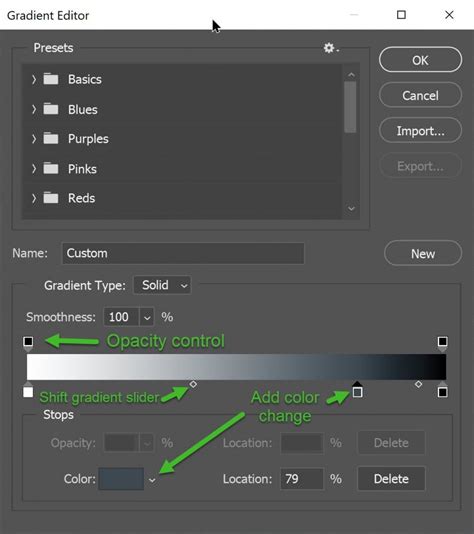
If your Properties panel is not open, you can access it by going to Window > Properties. Select the Gradient Map layer, then the Gradient Map icon in the Properties panel. Click on the gradient bar to open the Gradient Editor dialog. In this dialog, you can add or remove colors on the gradient bar or select a preset. Colors towards the left end will affect the shadows, colors in the middle will affect midtones, and colors on the right end will affect the highlights. Play around with the colors, then click "OK."
Below is what our image looks like with the Gradient Map we created. You can always change the Gradient Map by clicking the gradient bar in the Properties panel. To take it another step, you can also change the Blending Mode of the Gradient Map layer. Select the Gradient Map layer and test out the different Blending Mode options at the top of the Layers panel. We settled on "Multiply" for the image below.
How to Create the Dotted Halftone Pattern Effect in Photoshop CC
Halftoning for Screen Printing: A Deeper Dive
While the previous methods are excellent for general graphic design, preparing an image for screen printing requires a more specific approach. The goal is to create a high-contrast, black-and-white image that translates well to the physical limitations of screen printing.
Step 1: Preparing the Image for Screen Printing
First, select the right image. The quality of the original image significantly impacts the final result. Keep in mind that once the design is converted into halftones, there is no way to make additional changes to the image. This is why ensuring we have the right image is always a priority.
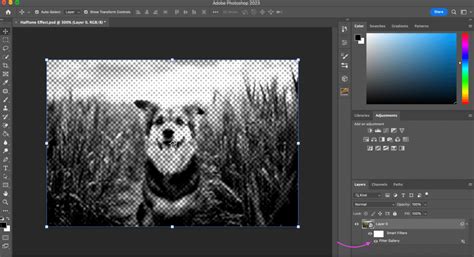
Step 2: Converting to Grayscale
This step simplifies the image and prepares it for halftoning. Go to Image > Mode > Grayscale. Photoshop will likely ask if you want to discard all color information. Click "OK" to finalize the decision. This will cause all colors from the image to disappear, and the only color showing information will be black. Before proceeding, it's good practice to check your grayscale image values to ensure that your black and white areas match. If there is a mismatch, you can use Ctrl+M (or Cmd+M on Mac) to open Levels and make the necessary adjustments.
Step 3: Converting to Bitmap and Applying the Halftone Screen
Now comes the crucial part - applying the halftone filter for screen printing.Go to Image > Mode > Bitmap. A pop window appears that asks if you want to flatten the image layer; click "OK" to confirm. The Bitmap popup also requires you to choose a method. For screen printing, select "Halftone Screen" as the method and click "OK."
Step 4: Fine-Tuning the Halftone Effect for Screen Printing
Several common terms are used when discussing halftone settings for screen printing in Photoshop: LPI, halftone screen, and halftone frequency. These all refer to the same thing: lines per inch (LPI). LPI is directly linked to the size of the halftone dots. A lower LPI causes bigger dots, while a higher LPI results in smaller halftone dots.
Many manufacturers believe that the optimal halftone frequency for screen printing is between 45 to 55 LPI. This is because this LPI range is suitable for most images. However, the LPI will mainly depend on the result you are looking to achieve. For instance, photorealistic images usually need a higher LPI of 65. The output angle is another key factor in halftoning. We usually set the angle at 25 degrees and choose either a round or elliptical dot shape, depending on the project.
Step 5: Preparing for Screen Printing
Finally, prepare your halftone image for screen printing. This involves considering the screen mesh count and ensuring that your halftone dots are compatible with it. Halftones usually go best with a higher mesh count. For our halftone screen printing practices, we use a mesh count between 230 and 280. You also need to consider the ink and substrate you’ll be using, as these can affect the final print. A unique consideration that plays a significant role in the success of halftone design is the type of emulsion used in the screen print. Using high-quality emulsion can give the final halftone print a clearer, more detailed appearance. The emulsion must be applied accordingly, as inconsistencies may easily lead to distorted or blue halftones.
Leveraging Premium Halftone Effects and Actions
While Photoshop's built-in filters are powerful, the process can be further streamlined and enhanced with premium resources. These often come in the form of Photoshop actions or pre-designed textures that offer sophisticated halftone effects with minimal effort.
Premium Halftone Actions and Textures
There are numerous premium halftone effects available for purchase or subscription. These can include:
- Multiple Color Halftone Effects: Some tools apply multiple color halftone effects to your images, offering complex and vibrant results.
- Dotted Halftone Textures: Sets containing multiple dotted halftone textures with a variety of patterns, often in black and white, allowing you to choose the effect you like best.
- Artistic Halftone Effects: Actions designed to create artistic effects that preserve the original colors of the image while applying a halftone pattern. These might offer choices between various dot sizes and styles (fixed or variable).
- Halftone Gradient Patterns: Some downloads not only provide halftone effects but also original halftone gradient patterns, adding another layer of creative possibility.
- Engrave Dotted Halftone Texture: This type of effect mimics the look of engraved prints, adding a unique textural quality.
These premium assets can significantly speed up your workflow and introduce creative possibilities that might be more challenging to achieve manually. Many services, like Envato Elements, offer a vast library of such assets for a monthly subscription, providing thousands of premium assets that can elevate your creative projects.
In summary, mastering the halftone effect in Photoshop opens up a world of creative possibilities, from replicating vintage print styles to enhancing images for screen printing. By understanding the underlying principles and utilizing the available tools, both built-in and premium, you can effectively transform your images into compelling halftone artworks.