Procreate, the acclaimed digital art application for iPad, offers an unparalleled level of customization for its brushes. At the heart of this customization lies the intricate control over how a brush's shape and texture are applied to the canvas, forming what is known as the "stroke path." Understanding these settings unlocks the potential to create an infinite variety of digital tools, from the most delicate sketching pencils to robust paint textures and precise inking pens. This exploration delves into the core attributes that define a Procreate brush, offering insights into how each setting influences the final artwork and empowering users to tailor their digital toolkit to their unique creative vision.
The Anatomy of a Brush Stroke: Shape and Grain
At its fundamental level, a Procreate brush is composed of two primary elements: a Shape and a Grain. The Shape dictates the form of the individual "stamps" that are laid down along a stroke, akin to the physical tip of a pen or brush. The Grain, on the other hand, provides the texture that fills within that shape, much like the pigment and texture of real paint or ink. When you draw, Procreate rapidly repeats these shape and grain elements along a path, creating the illusion of a continuous stroke.

The Shape Source is where you define the brush tip. You can select from Procreate's extensive Source Library, which offers over 150 unique shapes, or import your own images from photos or files. A smooth, circular shape will result in a smooth, even stroke, while an irregular, patchy shape will create a rougher, more organic mark. The Grain Source functions similarly, allowing you to import or create tiling textures that act as the "paint roller" for your brush shape. This texture can be anything from subtle paper grain to intricate fabric weaves or even custom patterns.
Sculpting the Stroke Path: Spacing, Jitter, and Scatter
The Stroke Path settings are crucial for controlling how these individual shape stamps are laid down. The Spacing attribute dictates how many times your brush shape "stamps" itself along the path. When you increase the spacing, you begin to see the brush as a series of distinct shapes with gaps between them. This is particularly useful for creating brushes that simulate stitches, beads, or other repeating elements.
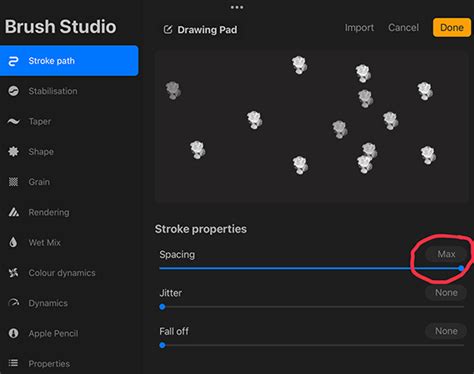
Adding variability to this spacing is the Spacing Jitter. This setting introduces randomness to the space between stamps, making the gaps larger and more varied. This can lead to a more organic and less uniform stroke.
Beyond spacing, the Jitter settings offer further control over the placement of stamps. Jitter Lateral controls how much the brush stamps shift perpendicular to your stroke's direction. This can be used to create a more scattered or textured effect. Jitter Linear, on the other hand, controls the jitter of the stamp in the same direction as the stroke itself. Both Lateral and Linear Jitter can be influenced by the pressure and tilt of the Apple Pencil, and even barrel roll with the Apple Pencil Pro, allowing for highly dynamic and responsive brush behavior.
The Scatter setting introduces randomness to the rotation of each shape stamp. By default, a shape will stamp in the same orientation. With Scatter enabled, each stamp can rotate independently, leading to a more dynamic and less predictable stroke, especially when combined with other settings.
The Count setting allows you to stamp the shape more than once at each point along the path, up to 16 times. This can be used in conjunction with Scatter to create dense, textured marks. Count Jitter then varies the number of stamps applied at each point, further enhancing randomness and complexity.
Smoothing and Stabilization: Achieving Fluidity
For artists aiming for clean lines and precise artwork, Stabilization is a vital feature. It smooths out strokes as you draw, assisting in reducing wobbles and shakes. Stabilization can be applied globally to all brushes or individually within the Brush Studio. The StreamLine setting, found within the Stabilization menu, is particularly important for inking and calligraphy. Increasing the Amount slider provides a smoother, more even result, while increasing the Pressure slider allows for a longer, smoother application of pressure to a brush's stroke. Stabilization works by taking a moving average of a stroke, and the higher the Stabilization setting, the more it averages out imperfections.
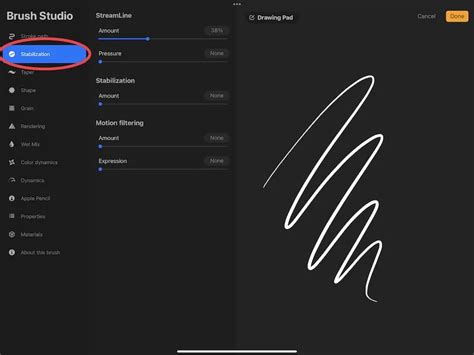
Motion Filtering is Procreate's more advanced approach to stabilization, employing sophisticated algorithms for smoother and straighter strokes regardless of drawing speed. When Motion Filtering is active, Motion Filtering Expression can be used to further refine the stroke's behavior.
Tapering Strokes: The Art of the Beginning and End
Brush Taper refers to the reduction in a brush's thickness and opacity at the beginning and end of a stroke. This replicates the natural feel of traditional drawing tools, where strokes often taper as you lift the pencil or brush from the surface. While Apple Pencil pressure can naturally create tapering, achieving a consistent and controlled taper, especially when lifting the pencil, can be challenging.
The Taper settings provide a visual representation of artificial taper applied at the stroke's start and end. By adjusting sliders towards the middle of the stroke, you control the taper length. Lower settings result in a taper that behaves as if you're using a brush with a very fine tip. The toggle switch allows you to see the effect Procreate applies to the taper. It's important to note that Procreate cannot use pressure settings for taper when painting with a finger.
Azimuth and Barrel Roll: Advanced Input Control
For users of the Apple Pencil Pro, Azimuth and Barrel Roll offer advanced input control that can dramatically alter brush behavior. Azimuth detects the tilt of the Apple Pencil and uses this information to determine the tilt of the shape stamp, mimicking the effect of a calligraphy pen.
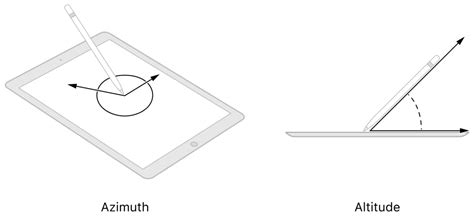
When Barrel Roll is enabled, it adds rotational control to your shape stamps. As you rotate your Apple Pencil Pro, the orientation of the shape rotates accordingly, offering precise and intuitive control over stroke direction.
The Relative to Stroke setting is crucial here. When enabled, the shape's orientation will always start in the same position at the beginning of a stroke. If Relative to Stroke is turned off, the shape's rotation can be adjusted in relation to the direction of your stroke. At 0%, the shape direction remains static. At 100%, the shape rotates to follow the stroke's rotation, creating a dynamic and responsive drawing experience.
Grain and Texture: Adding Depth and Character
The Grain section allows you to introduce texture to your brushes. As mentioned, grain acts like a "paint roller" within the brush shape. You can control whether the grain stays still behind your stroke (Texturized) for a crisp, consistent effect, or moves along with the stroke (Moving) for a more blurred and streaky appearance.
The Scale setting within the Grain Source is particularly important. Setting it to Cropped keeps the texture size fixed, regardless of your brush size. Follow Size, on the other hand, makes the grain scale along with your brush size, which can create a smearing effect based on directional stroke changes.
Grain Filtering adjusts the antialiasing of the grain texture, affecting its edge softness. The Contrast setting determines the minimum level of contrast within the texture, while Offset Jitter randomizes where the texture is placed with each new brushstroke, creating a more organic feel. This is especially useful for pattern brushes where consistent placement is desired. The Blend Mode controls how the grain texture interacts with the underlying color of the brush, allowing for subtle or dramatic textural effects.
Rendering Modes: The Engine of Your Brush
Procreate offers a variety of Render Modes that control how your brush strokes are displayed on the canvas. These modes can be best understood by imagining physical paint. Light Glaze is akin to laying down diluted paints, offering a translucent effect. On the other end of the spectrum, Intense Blending is like applying thick paint, great for wet brushes that blend and mix colors. Other modes, like those that combine Adobe Photoshop rendering styles with a caustic approach, offer unique ways for color to interact.
Within these modes, you can control how pigment dilutes and colors mix. Settings like Dilution, Attack, and Charge fine-tune the amount of "paint" and "water" on your brush, influencing how much pigment is laid down and how it interacts with existing colors. Attack specifically adjusts the amount of paint that sticks to the canvas, while Pull influences how the brush moves existing paint around.
Color Dynamics: Bringing Your Brushes to Life
Color Dynamics unlock a powerful dimension of brush customization, allowing your brush to shift through different color values based on various inputs. You can set your brush to change Hue, Saturation, Lightness, and Darkness. You can also define a secondary color and shift between primary and secondary colors with each stroke.
These color shifts can be controlled by Pressure, Tilt, or even the Speed of your stroke. For instance, setting Pressure to 100% for Color can make your stroke transition through the entire color spectrum. Similarly, Pressure for Saturation can transition from white to fully saturated color.
Speed-based dynamics are independent of Apple Pencil input. You can set your brush to vary its size or opacity based on how fast you draw. For example, drawing slowly could produce a thinner stroke, or a reduced opacity.
Pressure and Tilt Sensitivity: Mimicking the Real World
The Apple Pencil's pressure sensitivity is a cornerstone of digital art, allowing for natural variations in line weight and opacity. Procreate offers extensive control over how your brush responds to pressure. You can adjust the Pressure Curve to fine-tune the sensitivity, making it respond more readily to lighter touches or requiring a firmer press for bolder strokes. Individual settings for Size, Opacity, Flow, and Bleed can also be adjusted based on pressure.
Tilt sensitivity adds another layer of expressiveness. The Tilt Graph allows you to define specific tilt angles at which brush attributes change. This can be used to create brushes that mimic the behavior of graphite pencils, where tilting the pencil creates broader strokes. You can also adjust how the brush bleeds around the edges when tilted and control the size compression based on tilt.
Properties and Miscellaneous Settings: The Finishing Touches
The Properties tab in the Brush Studio allows you to set the Size Limits of your brush, defining the minimum and maximum size it can achieve. This is useful for ensuring detail brushes don't become too thick or for pattern brushes that need to cover large areas efficiently.
Miscellaneous settings include how the brush is represented in the Brush Library preview. For brushes with a distinct "up" and "down" to their stroke, you can control the shape orientation for consistency. You can also add your signature, profile photo, and even a handwritten signature to custom brushes, embedding this information into the .brush file for proper attribution.
Creating Custom Brushes: A Workflow
Creating and customizing brushes in Procreate is an iterative process. It's always recommended to duplicate a brush before making significant changes, ensuring you have a backup of the original.
The process often involves:
- Defining the Shape Source: Importing or selecting a base shape.
- Adding Grain: Importing or creating a texture for the shape.
- Adjusting Stroke Path: Fine-tuning spacing, jitter, and scatter for the desired stroke behavior.
- Refining Stabilization: Applying StreamLine for smoother lines.
- Tweaking Dynamics: Setting up pressure, tilt, and speed responses for color, size, and opacity.
- Experimenting with Render Modes: Choosing how the brush interacts with the canvas.
Procreate 5 Brush Studio - SIMPLIFIED!
By understanding and manipulating these various settings within Procreate's Brush Studio, artists can transcend the limitations of default brushes and craft truly unique digital tools. Whether you're aiming for hyperrealism, expressive painterly strokes, or precise technical lines, the power to sculpt your ideal brush lies within these adjustable attributes. The journey of mastering Procreate brushes is one of continuous exploration and experimentation, leading to a more personalized and powerful digital art workflow.