Distracting backgrounds can detract from the intended focus of a photograph, leading to a cluttered and less impactful image. Fortunately, for users of Adobe Lightroom, the ability to easily remove or alter backgrounds is well within reach. This guide will explore various methods and techniques within Lightroom to achieve professional-looking background edits, from subtle enhancements to complete removal.
Understanding Lightroom and Background Removal
Adobe Lightroom is a powerful and widely adopted photo editing software, utilized by both professional photographers and enthusiastic amateurs. Its comprehensive suite of tools allows for extensive image manipulation, including adjustments to brightness, contrast, saturation, and a host of other parameters. Beyond basic enhancements, Lightroom excels in image organization through its cataloging system and the application of presets for swift editing.
Background removal in Lightroom refers to the process of isolating a subject by diminishing or completely eliminating the background elements. This is a critical technique for photographers and designers aiming to create clean, professional images, either by removing distracting elements or by preparing the subject for placement on a new background. While Lightroom is not a dedicated background removal tool in the same vein as some specialized software, its advanced masking capabilities allow for significant background manipulation and isolation.
Why is Background Removal Important?
The importance of background removal in photography cannot be overstated. It is a fundamental editing technique that dramatically enhances the overall appearance and impact of an image by ensuring the subject becomes the undisputed focal point.
- Eliminating Distractions: A cluttered or distracting background can pull the viewer's attention away from the primary subject. By removing or softening these elements, the viewer's gaze is naturally directed to where it should be. This is particularly vital in product photography, where a clean background makes the product more visible and appealing.
- Design and Marketing Versatility: Isolating a subject from its background opens up a world of creative possibilities. It allows for seamless integration into different backgrounds, making it easier to create compelling graphics, advertisements, social media posts, and other marketing materials. This flexibility is invaluable for maintaining a consistent brand identity across various platforms.
- Enhanced Visual Appeal: A well-executed background removal or alteration contributes to a polished and professional aesthetic. It can transform an ordinary photograph into something that commands attention and communicates its message effectively.
Step-by-Step Guides to Removing Backgrounds in Lightroom
Lightroom offers several powerful masking tools that can be employed for background adjustments. While a complete "removal" to transparency isn't a direct one-click function for all scenarios as it might be in dedicated background removal apps, these tools allow for significant manipulation to achieve a similar effect or prepare an image for further editing.
Method 1: Using the Select Subject Tool (Lightroom AI Masking)
This AI-powered tool is an excellent starting point for isolating your main subject.
- Step 1: Open Your Image in LightroomBegin by importing your photograph into Adobe Lightroom.
- Step 2: Access the Masking PanelNavigate to the Develop module (or Edit panel in Lightroom CC/mobile) and locate the Masking panel. Click the "Create New Mask" button.
- Step 3: Let Lightroom Detect the SubjectSelect the "Select Subject" option. Lightroom's artificial intelligence will analyze the image and automatically create a mask around the perceived main subject.
- Step 4: Invert the MaskOnce the subject is masked, you'll want to edit the background. To do this, invert the mask by clicking the three dots next to the "Subject Mask" and choosing "Invert Mask." Now, any adjustments you make will affect the background.
- Step 5: Adjust the BackgroundWith the background now masked, you can apply various adjustments. Common edits include:
- Exposure: Slightly decrease exposure to make the background darker.
- Clarity/Texture: Reduce clarity or texture to soften the background and create a subtle blur effect, drawing more attention to the subject.
- Saturation: Lower saturation for a desaturated or muted background, making the subject pop.
- Contrast: Adjust contrast to further differentiate the subject from the background.
- Step 6: Refine the EdgesAI masking is powerful but not always perfect, especially with complex edges like hair or fine details. Use the "Subtract" option within the masking tools, selecting "Brush," to manually refine the mask by painting over any areas that were incorrectly masked or missed. Pay close attention to the edges of your subject.

Method 2: Using the Brush Tool for Manual Background Editing
For greater control or when the AI struggles, the Brush tool offers precise manual selection.
- Step 1: Select the Brush ToolIn the Masking panel, choose "Brush" from the tool options.
- Step 2: Adjust Brush Settings
- Size: Adjust the brush size to suit the area you're working on.
- Feather: A higher feather value creates a softer edge, blending the adjustment more naturally. For background removal, a moderate to high feather is often beneficial.
- Flow: Controls the rate at which the adjustment is applied. Lower flow allows for gradual building of effects, which is useful for subtle edits.
- Density: Determines the opacity of the brush stroke.
- Auto Mask: Enabling this option helps Lightroom detect edges and attempt to keep the brush within defined boundaries, which can be very helpful.
- Step 3: Paint Over the BackgroundCarefully paint over the background area you wish to modify. Zoom in to ensure accuracy, especially around intricate details of your subject. If you accidentally paint over your subject, use the "Erase" function (available by holding Alt/Option or by selecting the Erase tool from the brush options) to remove the unwanted painted areas.
- Step 4: Apply AdjustmentsOnce the background is masked, apply your desired adjustments. This could involve reducing clarity for a soft blur, lowering saturation, or adjusting exposure to make the background recede.
- Step 5: Refine the MaskAs with the AI mask, use the Brush tool in erase mode or the dedicated "Subtract" option to clean up any imperfections and ensure a seamless blend between the subject and the altered background.
Method 3: Using the Linear and Radial Gradient Tools for Background Adjustments
These tools are excellent for creating smooth, progressive changes across larger areas of the background.
- Step 1: Select the Linear or Radial Gradient ToolIn the Masking panel, choose either "Linear Gradient" for straight-line adjustments or "Radial Gradient" for circular effects.
- Step 2: Apply the GradientClick and drag on your image to apply the gradient. A linear gradient can be used to darken or desaturate the edges of a photo, creating a subtle vignette. A radial gradient can be used to draw attention to a central subject by darkening or softening the area around it.
- Step 3: Modify the BackgroundWith the gradient applied, make your desired adjustments. For example, you can decrease exposure to create a vignette, reduce saturation for a muted effect, or lower clarity to soften the background.
- Step 4: Fine-Tune the BlendUse the "Feather" slider for the gradient to ensure a smooth transition between the adjusted area and the rest of the image. You can also reposition and resize the gradient after it's applied to perfect its placement.
Method 4: Removing the Background with the Color Range Mask
This tool is particularly effective when the background has a distinct color or range of colors that differ from the subject.
- Step 1: Select the Color Range MaskIn the Masking panel, choose "Color Range."
- Step 2: Pick a Background ColorUse the eyedropper tool to click on the dominant color of the background you want to affect. Lightroom will create a mask based on this color. You can use the "Add" and "Subtract" eyedroppers to further refine the selection by clicking on other areas of the background or subject.
- Step 3: Refine the SelectionThe "Range" slider controls the tolerance of the color selection. A higher range includes more shades of the selected color, while a lower range is more precise. Adjust this slider until the mask accurately covers the background without encroaching too much on the subject.
- Step 4: Make Background AdjustmentsOnce the background is masked by color, apply your desired edits. This could include desaturating the color, adjusting its hue, reducing clarity, or altering exposure. This method is excellent for studio shots with solid-colored backdrops or for isolating elements with specific color profiles.
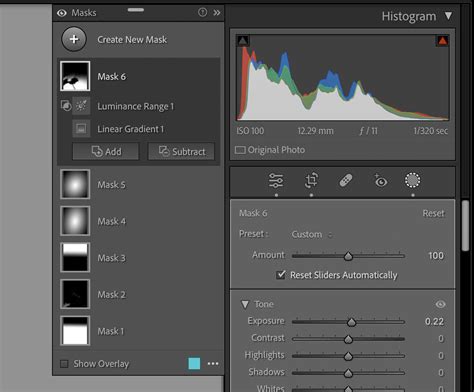
Making Selective Edits Using the Masking Tools in Lightroom Classic
Tips to Remove Background in Lightroom
Achieving the best results when working with backgrounds in Lightroom involves a combination of technique and thoughtful application of tools.
- Use Feathering for Smooth Edges: Harsh, defined selections can look unnatural. Employing feathering in your masks (whether brush, gradient, or AI-generated) creates a softer transition between the subject and the edited background, enhancing realism.
- Enhance Rather Than Erase: Sometimes, the goal isn't complete removal but rather making the background recede. Softening, desaturating, or subtly blurring the background can be more effective and natural-looking than attempting to erase every last detail, especially with complex subjects like fine hair or intricate foliage.
- Combine Masking Tools: Don't limit yourself to a single tool. The most sophisticated edits often result from combining AI selections with manual brushwork for refinement, or using gradients to establish an overall mood before pinpointing specific areas with brushes. For instance, start with "Select Subject," invert it, apply a general exposure adjustment, and then use a brush to fine-tune edges or add a specific blur.
- Zoom In for Precision: Always zoom in to at least 100% or even higher when working on critical areas like the edges of your subject. This allows for meticulous refinement and prevents stray marks or missed details.
- Work in Layers (Masks): Think of each mask as a layer. Apply different adjustments to different masks for greater control. For example, one mask could handle desaturation, while another handles a slight blur. This non-destructive approach allows for easy modification later.
- Check Against Different Backgrounds: If your goal is to place the subject on a new background, it's wise to temporarily change the background color in Lightroom to a contrasting shade (like black or white) to check for any haloing or artifacts around the subject's edges.
Common Mistakes to Avoid While Removing Background in Lightroom
Even with powerful tools, certain pitfalls can undermine the quality of your background edits.
- Over-editing the Background: Applying extreme adjustments can make the background look artificial or detached from the subject. Aim for subtle enhancements that support the subject rather than overpower it.
- Ignoring Edge Refinements: Abrupt, jagged edges where the subject meets the background are a telltale sign of amateur editing. Always dedicate time to refining these transitions, especially around hair, fur, or delicate objects.
- Using One Method for All Images: Every photograph is unique. A studio portrait will require a different approach than a landscape with a distracting element. Experiment with different tools and techniques to find what works best for each specific image.
- Over-saturating the Subject: If you desaturate the background, be cautious not to over-saturate your subject in an attempt to make it "pop." This can lead to an unnatural and jarring contrast.
- Not Using High-Quality Source Images: The quality of your original image significantly impacts the outcome of background removal. Low-resolution or heavily compressed images will inherently have fewer details, making precise selections more challenging.
Frequently Asked Questions
Is the Select Subject tool accurate?
Lightroom's AI-powered "Select Subject" tool is highly advanced and often provides remarkably accurate initial selections. However, it's not infallible. Complex backgrounds, subjects with fine details (like wispy hair or translucent elements), or low-contrast scenes can sometimes lead to imperfect masks that require manual refinement using other masking tools.
Can I use multiple masking tools together?
Absolutely! Combining different masking tools is not only possible but often essential for achieving the best results. You can create an AI mask, then add to or subtract from it using brushes, gradients, or color range masks. This layered approach offers maximum flexibility and precision.
Does Lightroom Mobile have background removal features?
Lightroom Mobile does offer AI masking features, including "Select Subject," and brush tools. While the exact feature set can vary slightly depending on your subscription and the version of the app, you can indeed use these tools to isolate subjects and make adjustments to the background, preparing them for further editing or isolation.
How do I change the background in Lightroom?
Lightroom's masking tools allow you to edit the background, making it darker, lighter, desaturated, or blurred. To truly change the background to an entirely new image, you would typically need to export the subject with a transparent or solid background (which Lightroom can facilitate by making the background very dark or desaturated) and then composite it with a new background in a more advanced program like Adobe Photoshop. However, you can create the illusion of a different background by drastically altering the existing one within Lightroom.
Will background edits affect image quality?
As long as your adjustments are subtle and well-blended, background edits in Lightroom will not significantly degrade image quality. Lightroom is a non-destructive editor, meaning your original image data is preserved. The edits are applied as masks and adjustments. However, aggressive adjustments, particularly those involving significant sharpening or noise reduction applied only to the background, could potentially introduce artifacts if not handled carefully. The key is to maintain a natural look and avoid over-processing.
Alternative Methods for Background Removal
While Lightroom provides powerful tools for background manipulation, for complete background removal to transparency, especially for clean cutouts ready for new backgrounds, dedicated tools often offer a more streamlined workflow.
- Adobe Express: This free online tool offers a one-click AI background remover. It's ideal for quick edits and preparing images for social media or design projects within the Adobe ecosystem. You can easily remove backgrounds from JPG and PNG files and then use Adobe Express's extensive design features to add new backgrounds, text, and graphics.
- Erase.bg: A popular AI-powered online background remover that works quickly and requires no technical expertise. It supports high resolutions and is excellent for e-commerce sellers or anyone needing fast, clean cutouts.
- PhotoRoom: This tool also uses AI to instantly remove backgrounds and offers additional editing features like background generation, blurring, and object removal. It's fast, free, and requires no sign-up for basic background removal.
- Pixelbin.io: An AI-based image transformation platform that includes a powerful and easy-to-use background remover. It's designed for efficient image editing and supports various transformations.
- Pixlr: Offers a suite of AI-powered creative tools, including an automatic background removal feature that quickly separates subjects from their backgrounds.
These tools are often faster for pure background removal and can save significant time compared to intricate masking in Lightroom, especially if the goal is a transparent background for compositing.
By mastering the masking tools within Adobe Lightroom and understanding when to leverage specialized background removal applications, photographers can elevate their images, ensuring their subjects command the attention they deserve.