In the dynamic world of graphic design and photographic post-processing, there often comes a moment when the existing background of an image proves insufficient. Whether you're aiming for a more expansive composition, adapting an image for different aspect ratios, or simply need more breathing room around your subject, the ability to seamlessly expand a photo's background is a crucial skill. Photoshop, a cornerstone of creative tools, offers a sophisticated suite of features designed to address this very need, from traditional methods to cutting-edge generative artificial intelligence. Get ready to unlock endless creative possibilities and bring your visions to life with just a few clicks.
The Foundation: Basic Canvas Expansion
For images with relatively simple backgrounds and clearly defined subjects, an initial approach involves a straightforward canvas extension. This method is particularly effective when you need to add space without introducing complex new elements.
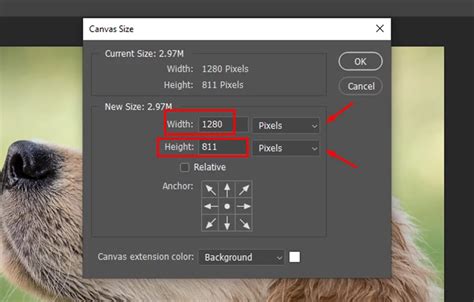
The process begins by opening your desired image in Photoshop. This is achieved by navigating to "File" > "Open" in the menu bar and then selecting your image. Once the image is open, the next step is to increase the canvas dimensions. For instance, if you need to add significant width, you would increase the overall canvas width by a predetermined amount, such as 1000 pixels. This is done through the "Image" > "Canvas Size" menu.
After increasing the width of the image on both sides, a transparent area becomes visible, indicating the newly expanded canvas. At this stage, you can directly manipulate the image. By clicking and dragging the handles on the bounding box, you can resize the image. Crucially, holding down the "Shift" key while dragging will ensure that the image stretches horizontally, maintaining its aspect ratio. The final result, in many cases, is an image where the expanded width on both sides has been automatically filled in, creating a natural continuation of the background.
However, it's essential to acknowledge the limitations of this basic method. The above operation is primarily suitable for images with relatively simple backgrounds and clear subject outlines. When the background becomes more complex, with intricate details, gradients, or patterns, this direct stretching can lead to undesirable distortions or a noticeable lack of realism.
Navigating Complexity: Content-Aware Approaches
When the background presents more intricate challenges, Photoshop offers intelligent tools that leverage contextual information to fill expanded areas. These methods are designed to analyze the surrounding pixels and generate new content that attempts to blend seamlessly with the original image.
Content-Aware Scale: Intelligent Stretching
One such powerful tool is "Content-Aware Scale." This feature allows you to resize an image while intelligently preserving important content and minimizing distortion. To use it, you typically start by making a selection around your subject. This can be achieved using various selection tools, such as the "Quick Selection Tool" or the "Lasso Tool," among others. The goal is to isolate the main subject so that the tool can focus on scaling the background elements.
After making your selection, you can access "Content-Aware Scale" via the "Edit" menu. In the pop-up window, you can choose any name you like for the selection, ensuring it's something memorable for organizational purposes. At this point, pay particular attention to the "Protect" section in the toolbar above. This allows you to specify areas that should not be distorted during the scaling process, further refining the outcome. While the content-aware fill may not always provide optimal results on its own for all scenarios, it represents a significant step towards intelligent background expansion.
The Crop Tool with Content-Aware Fill: A Powerful Combination
A highly effective technique for expanding backgrounds, especially those with more complex elements, involves a combination of the Crop Tool and the "Content-Aware" option. This approach provides a more controlled way to extend the canvas and then intelligently fill the new space.
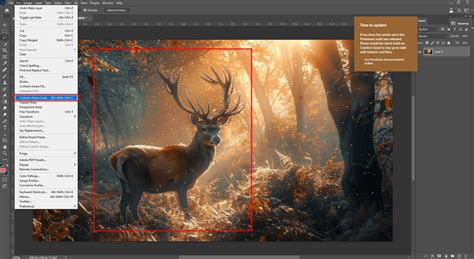
The process begins by selecting the Crop Tool, which can be found in the toolbar on the left side of the Photoshop interface. With the Crop Tool active, you can then extend the canvas size beyond the current background of the image. This is done by clicking and dragging the handles on the corners or edges of the image to expand the canvas area.
Crucially, before confirming the crop, you need to enable the "Content-Aware" option. This is typically found in the top menu bar or the options bar associated with the Crop Tool. Once "Content-Aware" is checked, Photoshop will prepare to analyze the image and generate appropriate fill content for the newly created transparent areas. Confirming the crop by pressing "Enter" or "Return" initiates the process, and Photoshop will then attempt to fill the expanded canvas with content that intelligently matches the surrounding pixels.
To further refine this process, you can create a new layer before initiating the crop. This "Create a new layer" button is located in the Layers panel. This practice ensures that your generative fill is non-destructive, allowing for easier adjustments and edits later on. After extending the canvas and applying the content-aware fill, you can deselect the rectangle (Select > Deselect) to remove any marching ants. If the initial content-aware fill doesn't meet expectations, you can then resort to manual retouching tools.
Content-Aware Fill Workspace: Granular Control
For even greater precision, Photoshop offers the "Content-Aware Fill" workspace, a dedicated environment for intelligently filling selected areas. This method provides more control over how Photoshop samples and synthesizes new content.
The workflow typically starts by creating a selection around the area you wish to expand or fill. This could be the entire background you want to extend, or specific parts that require new content. Once the selection is made, navigate to "Edit" > "Content-Aware Fill" from the menu bar. This action opens the Content-Aware Fill workspace, a powerful dialog box that allows for detailed configuration.
Within this workspace, you can adjust various settings to influence how Photoshop generates the fill. You can define the sampling area (the part of the image Photoshop uses to gather content) and refine the fill settings to achieve a more natural blend. The goal is to guide Photoshop's AI to produce content that seamlessly integrates with the existing image. After configuring the settings to your satisfaction, you can confirm the fill, and Photoshop will apply the generated content to your selected area. The result is then placed on a new layer, preserving the original image data.
How to use Content Aware Fill in Photoshop
The Clone Stamp Tool: Manual Precision
While automated tools are powerful, sometimes the most effective approach for complex backgrounds, or when precise control is paramount, is the manual method using the "Clone Stamp Tool." This tool allows you to sample pixels from one area of your image and paint them onto another, effectively copying and pasting textures and details.
To use the Clone Stamp Tool, first ensure you have a new layer created above your image layer to work non-destructively. Then, select the Clone Stamp Tool from the toolbar. The crucial step is to set the source point: hold down the "Alt" key (or "Option" key on a Mac) and click on the part of the image you want to clone from. This establishes the source from which the tool will sample pixels.
Once the source point is set, you can begin painting over the area you want to extend or fill. By carefully painting and repeatedly setting new source points as you move across the canvas, you can meticulously recreate and extend background elements. This method requires patience and a keen eye for detail, but it offers unparalleled control, allowing you to seamlessly duplicate textures, patterns, and even subtle lighting variations. This technique is particularly useful if you don't have much texture to copy from or when you need to expand a significant part of the background, allowing you to duplicate small parts of texture and merge them together without any visible seams.
The AI Revolution: Generative Fill and Generative Expand
The landscape of image manipulation has been dramatically reshaped by the advent of generative artificial intelligence, and Photoshop is at the forefront of this revolution with its "Generative Fill" and "Generative Expand" features. These tools leverage advanced AI models to create entirely new content based on prompts and the surrounding image context, offering unprecedented capabilities for background extension.
Generative Fill: AI-Powered Creation
Generative Fill represents a paradigm shift in how we approach image editing. It allows you to magically extend your image background, transforming a seemingly limited composition into something far grander. Things that would have taken hours, or even days, for highly skilled Photoshop users can now be accomplished in mere minutes.
The process begins by extending the canvas using the Crop Tool, as described earlier. Once the canvas is enlarged, you then use a selection tool, such as the "Marquee Tool," to select the newly created transparent area. With the area selected, you can then invoke Generative Fill. You'll typically find this option within the "Edit" menu or as a contextual taskbar button.

Upon invoking Generative Fill, a prompt bar appears, inviting you to describe the content you wish to generate. This is where your creative input comes into play. You can type a simple description of how you want to fill your expanded canvas. For example, if you're extending a landscape, you might describe "rolling hills and a distant forest." Photoshop then uses its AI to generate original content that not only matches your prompt but also harmonizes with the existing image's lighting, shadows, perspective, and even depth of field.
The result is an expanded canvas instantly filled with new and original AI-generated content. A significant advantage is the non-destructive nature of this process. A new "Generative layer" appears in the Layers panel, containing the AI-generated content. In the Properties panel, you'll typically find several variations of the generated content to choose from, allowing you to select the one that best suits your vision. You can cycle through these variations using the left and right arrows in the Contextual Task Bar or generate entirely new sets of variations by clicking "Generate" again.
This capability is incredibly powerful for various scenarios. Marketers can effortlessly transform a square or 4:3 image into a 16:9 aspect ratio for YouTube thumbnails or a 9:16 format for Instagram Stories. Photographers can easily expand landscape shots or reframe images to shift focus, freeing their photos from their original frames. The AI-generated content intelligently extends beyond the original borders, adding realistic, context-aware elements while meticulously preserving the look and composition of the original image.
Generative Expand: Seamless Extension
Closely related to Generative Fill is "Generative Expand," a feature specifically designed for extending images outwards. While Generative Fill can be used for both filling and replacing content, Generative Expand is optimized for pushing the boundaries of your existing image.
The underlying technology is the same powerful AI model, but the workflow is streamlined for expansion tasks. You can use Generative Expand when you want to extend the canvas of an image outward, effectively creating more space around your subject. This is particularly useful when you have an almost perfect shot that's just a little too tight.
The process is intuitive: you extend the canvas using the Crop Tool, and then the Generative Expand feature intelligently fills the newly created space. Adobe Firefly, a suite of creative generative AI tools, integrates this functionality, allowing creators to extend an image beyond its original boundaries with just a few clicks and simple text prompts. This opens up new possibilities for framing and composition, enabling you to create visually compelling narratives with more space.
Firefly's Generative Expand model is built directly into its image editing workflow, making it easy to adjust images for social media, presentations, print layouts, or widescreen formats. The AI intelligently extends images beyond their original edges, adding realistic, context-aware content while preserving the look and composition of the original.
How to use Content Aware Fill in Photoshop
Extending Both Sides Simultaneously
When you need to extend both sides of an image at the same time, Photoshop offers a couple of efficient methods. The first is faster, while the second provides more flexibility.
The faster method involves extending the canvas on both sides first. Then, you can create a selection that encompasses both the original image and the newly added canvas areas. Invoking Generative Fill on this combined selection will generate content for both sides simultaneously. In the Properties panel, you'll again have multiple variations to choose from.
For greater control and flexibility, especially if you anticipate needing different types of content or varying prompts for each side, it's better to generate the content for each side separately. You would extend the canvas on one side, select that area, and apply Generative Fill. Then, you would repeat the process for the other side. This approach allows you to use specific prompts for each side, for example, describing "a mysterious island shrouded in fog" for one side and "calm ocean waves" for the other. This results in separate Generative layers for each side, offering independent control over the generated content. This is particularly beneficial if you like the result on one side but wish to regenerate or refine the content on the other.
Refining AI Generations: The Remove Tool
Even with the most advanced AI, occasional artifacts or minor imperfections can appear in the generated content. Photoshop addresses this with another new AI-powered feature: the "Remove Tool." This tool allows for precise cleanup of any unwanted elements within the generated areas.
Since you cannot directly edit a Generative layer, you need to clean up distractions on a separate layer. The Remove Tool is found in the toolbar, often nested with other healing tools like the Spot Healing Brush. To use it, you resize the Remove Tool's brush using the left and right bracket keys on your keyboard to match the size of the distraction. Then, you simply paint over the artifact you wish to remove. Releasing the mouse button triggers the AI to remove the distraction, seamlessly blending the area with its surroundings. This allows you to fine-tune the AI-generated content for a polished final result.
Advanced Techniques and Considerations
Beyond the core tools, several advanced techniques and considerations can enhance your background extension workflow.
Layer Masks and Gradients
For print applications where absolute precision and high quality are paramount, a professional technique involves using a layer mask with a gradient on one side to soften the edge. This is then combined with duplicating and merging color or texture from a layer below. This method is especially useful if you don't have much texture to copy from or when you need to expand a big part of the background, allowing you to duplicate small parts of texture and merge them together without any seam.
Understanding Tool Suitability
It's important to recognize that different tools are suited for different types of images and desired outcomes. The "Content-Aware Scale" tool is excellent for images with straightforward backgrounds. For more complex scenarios, the "Crop Tool" with "Content-Aware Fill" or the dedicated "Content-Aware Fill" workspace offers more robust solutions. The "Clone Stamp Tool" provides ultimate manual control for intricate details. And for rapid, AI-driven expansion, "Generative Fill" and "Generative Expand" are revolutionary.
High-Quality Originals Matter
Regardless of the method employed, the quality of the original image significantly impacts the success of background extension. Methods like the "magic wand or lasso to select as much of the background as possible without losing her hair" or painting over the edge of hair with a paintbrush to remove background while keeping hair, work best with a high-quality original image. Photoshop will interpolate the stretched pixels to appear high quality, and they won't appear as "stretched" in most cases, but a good starting point is crucial.
Limitations and Best Practices
While Photoshop offers powerful tools for background expansion, it's not always a magic bullet. Some images, due to their inherent composition, lack of detail, or extreme simplicity, may not be extendable with satisfactory results using automated tools. In such cases, manual compositing or starting with a different source image might be necessary.
When preparing images for print, always ensure you are working with a sufficiently high resolution. The minimum dimensions requirement for some AI features, such as 512 x 512 pixels, should be kept in mind. By understanding the strengths and limitations of each tool and applying them judiciously, you can effectively expand your image backgrounds and unlock new creative potential within Photoshop.