Adobe Illustrator offers a powerful suite of tools for managing your design workspace, and at the core of this management lies the Artboard. Whether you're designing a complex multi-page document, a set of individual icons, or a series of banner ads, understanding how to effectively control your artboards is crucial for an efficient workflow. This guide delves into the essential techniques for renumbering, resizing, and rearranging artboards, ensuring your creative process is as smooth and organized as possible. From initial creation to final organization, we'll explore how to bring order to your digital canvas.
Creating Individual Artboard Sizes for Icon Sets
One of the most common scenarios where precise artboard control is necessary is when creating sets of individual icons. Exporting each icon as a separate file is a frequent requirement, and having each artboard perfectly sized to its content can streamline this process significantly. Adobe Illustrator provides an intuitive method for achieving this quickly.
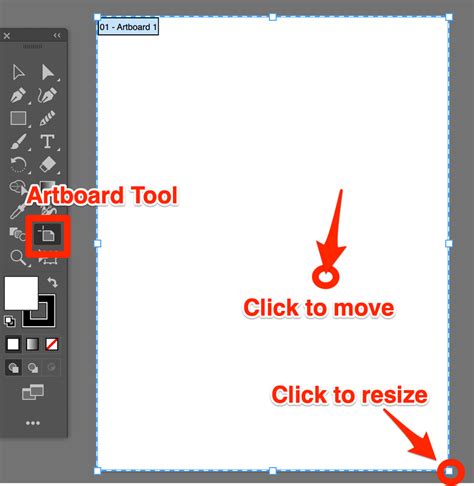
To begin, you'll need to activate the Artboard tool. This is typically found in the main toolbar. Once the Artboard tool is selected, you enter a dedicated artboard editing mode. Within this mode, you can interact directly with your artboards on the canvas. If you're working with an existing document that already has artboards, you'll see them listed in the Artboards panel, usually accessible via the "Window" menu. For instance, a new document might start with a single artboard, often named "Artboard 1."
The key to creating individual artboard sizes for each icon lies in a simple yet effective action: double-clicking. While in artboard editing mode, navigate to your artwork in the document window. By double-clicking directly on an icon or piece of artwork with the Artboard tool, you instruct Illustrator to automatically resize the currently selected artboard to precisely fit the boundaries of that artwork. This is an incredibly efficient way to generate a series of perfectly proportioned artboards for a collection of icons, eliminating the need for manual resizing and measurement, which can be time-consuming and prone to error.
Managing Artboard Names for Clarity
As you create multiple artboards within a single Illustrator document, the software automatically assigns them sequential numerical names, such as "Artboard 1," "Artboard 2," and so on. While this automatic naming convention is functional, it can quickly become a source of confusion, especially when the visual order of your artboards on the canvas doesn't align with their numerical sequence. When names are out of order with the artboard numbers, it can lead to a disorienting experience, making it difficult to locate and manage specific designs.
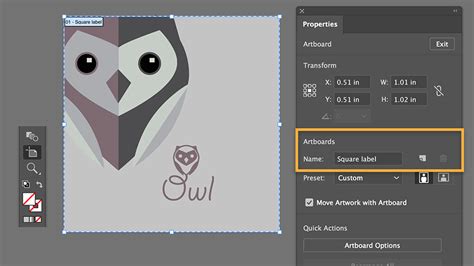
Fortunately, Illustrator offers a straightforward solution for this common issue: bulk renaming. This feature allows you to quickly bring order to your artboard names. To initiate the bulk renaming process, first, ensure you are in artboard editing mode by selecting the Artboard tool. Next, open the Artboards panel. Within this panel, you can select all the artboards you wish to rename simultaneously. The most efficient way to do this is by holding down the "Shift" key while clicking on each artboard, or by clicking on the first artboard and then Shift-clicking on the last one to select the entire range.
Once all the desired artboards are selected, direct your attention to the Control bar, which is typically located at the top of the Illustrator window. In the "Name" field within the Control bar, you can enter a common prefix for your artboards. For example, if you're working with icons, you might enter "icon" as the prefix. After typing your desired prefix, simply press "Enter." Illustrator will then apply this prefix to all selected artboards, automatically appending sequential numbers. This action not only renames all the artboards but also reorders their naming convention from first to last, ensuring that your artboard names, such as "icon 1," "icon 2," etc., now accurately correspond to their numerical order and their position within the Artboards panel.
While this bulk renaming method is exceptionally fast, there's an even more robust approach for managing artboard names in the long run. The best process for maintaining clarity and organization, especially in complex projects, is to name each artboard individually with a descriptive name that reflects its content. For instance, instead of "icon 5," you might name an artboard "shoppingcarticon" or "userprofileavatar." This individual naming strategy, though requiring a bit more initial effort, pays dividends in terms of long-term project management and collaboration.
Changing the Visual Order of Artboards
The visual arrangement of artboards on your Illustrator document canvas is a matter of preference and can significantly impact how you navigate and manage your design. While the Artboards panel dictates the underlying order of your artboards, changing this order doesn't automatically alter their visual placement on the document window. To synchronize the visual layout with your desired order, you first need to establish the correct sequence within the panel and then rearrange them.
My recommended two-step process involves first setting the correct order in the Artboards panel and then visually rearranging them on the canvas. To begin, open the Artboards panel and click on an individual artboard to select it. Once an artboard is selected, you have two primary methods for changing its position within the panel's list. You can utilize the arrow buttons located at the bottom of the Artboards panel to move the selected artboard up or down in the order. Alternatively, and often more intuitively, you can simply drag and drop the artboard to its new position within the panel, much like you would reorder items in the Layers panel.
It's important to note a key distinction: moving an artboard to the first position in the panel's list does not automatically change its visual location on the document window. To make the visual arrangement of your artboards on the canvas match the order you've meticulously set in the Artboards panel, a separate "rearranging" step is required.
Rearranging Artboards for Visual Layout
Once you have established the desired order of your artboards within the Artboards panel, the next crucial step is to visually rearrange them on the document canvas to reflect this order. This is achieved through Illustrator's "Rearrange Artboards" function.
To access this feature, ensure you are in artboard editing mode (with the Artboard tool selected) and have the Artboards panel open. Within the Artboards panel, you will find a prominent "Rearrange Artboards" button. Clicking this button will open a dialog box with various layout options. Here, you can adjust settings such as the grid layout (how many columns and rows you want), the spacing between artboards, and crucially, ensure that the "Move Artwork with Artboard" option is checked. This ensures that any artwork residing on an artboard moves with it when the rearrangement occurs, preventing design elements from becoming detached from their intended canvases. After configuring your layout preferences, click "OK."
Illustrator will then automatically reposition your artboards on the document canvas according to the order established in the panel and the layout settings you've chosen.
A quick tip to enhance this process: by default, Illustrator tends to position artboards starting from the top-left corner of the document. If you prefer a different reference point for your artboard layout, you can change this in the Control bar before initiating the rearrangement. Look for the reference point icon (often a small grid or set of squares) and select your desired origin point (e.g., center, top-right, bottom-left) before clicking "Rearrange Artboards."
It's also worth noting that after a significant rearrangement, you might find that the automatic numbering of your artboards becomes out of sync with their new visual order. In such cases, you may need to repeat the bulk renaming process described earlier to ensure the numbers align correctly with the visual flow.
Page layout - Educational Book - Illustrator.
Creating Margins for Artwork
When designing elements like icons, it's often desirable to have a small buffer or margin between the artwork and the edge of the artboard. This margin can prevent icons from appearing too cramped or too close to the export boundary, especially when dealing with various display sizes or resolutions. While you could manually scale each icon, Illustrator offers a more efficient method for applying consistent scaling to multiple objects simultaneously: the "Transform Each" function.
To utilize this feature, you first need to exit artboard editing mode and return to normal selection mode. With your artboards arranged as desired, select all the icons or artwork elements that you wish to scale. Navigate to the "Object" menu, then select "Transform," and finally choose "Transform Each."
The "Transform Each" dialog box provides several options. For creating margins, you'll want to set the reference point. Often, the center point is a good choice, but you can select the reference point that best suits your needs by clicking on the corresponding square in the reference point indicator. Next, adjust the "Scale" values. For instance, to create a small margin, you might set the scale to 95%. Ensure that "Proportional Scaling" is locked (indicated by a chain icon) to maintain the aspect ratio of your artwork. Click "OK" to apply the transformation to all selected elements.
A quick tip for those working with strokes: if your artwork involves strokes, you might need to adjust Illustrator's preferences to ensure strokes are scaled proportionally along with the artwork. Navigate to "Edit" > "Preferences" (or "Illustrator" > "Settings" on macOS) and look for options related to "Scale Strokes and Effects." Ensure these are checked as needed before applying transformations to maintain consistent stroke weight relative to the scaled artwork.
Working Efficiently in Adobe Illustrator
While making individual adjustments to artboards can seem straightforward for simple tasks, relying on manual, one-by-one modifications for a large number of artboards can quickly become a significant drain on your time and productivity. This tutorial has focused on demonstrating how to save valuable time by leveraging Illustrator's capabilities for bulk actions. Whether it's renaming multiple artboards simultaneously, resizing them to precise dimensions, or rearranging their visual layout, these bulk operations are fundamental to an efficient design workflow.
Beyond the scope of artboard management, Illustrator offers a wealth of features designed to further optimize your creative process. For instance, understanding how to effectively export your artwork, including the creation of custom export presets, can dramatically reduce the time spent on repetitive tasks. These kinds of time-saving tips and advanced techniques are often explored in more depth within dedicated learning communities and tutorials focused on maximizing your proficiency in Adobe Illustrator. By mastering these tools, you can transform your design workflow from a series of laborious steps into a streamlined and enjoyable creative experience.