Lightroom presets are a powerful tool for photographers, offering a way to save time and maintain a consistent editing style. Whether you're applying a specific aesthetic to a portrait session or automating repetitive export settings, presets can transform your workflow from tedious to efficient. This guide will delve into the intricacies of creating, saving, importing, and managing presets in Adobe Lightroom Classic and Lightroom Mobile, ensuring you harness their full potential.
Understanding Lightroom Presets: The Foundation of Efficiency
At their core, Lightroom presets are collections of editing adjustments that can be saved and applied to other photos with a single click. Imagine meticulously adjusting the tones, colors, and effects of a photograph until it achieves your desired look. Instead of repeating these exact steps for every image in a series, you can save these adjustments as a preset. This not only saves significant time but also ensures a cohesive and professional look across your entire body of work.
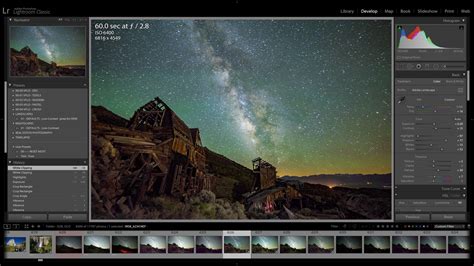
Presets are primarily utilized within the Develop Module of Lightroom Classic, where the majority of your photo editing takes place. When you navigate to the Presets panel, you'll discover a variety of pre-installed presets, often provided by Adobe, as well as those you may have purchased or created yourself. These presets can range from subtle enhancements to dramatic stylistic transformations.
The Power of Customization: Creating Your Own Presets
The true magic of presets lies in their customizability. By creating your own, you can develop a signature look that is uniquely yours, or build "workflow presets" designed to streamline specific tasks.
Creating a Develop Preset in Lightroom Classic:
- Select a Template Image: Begin by selecting a photo in the Develop module that you are satisfied with. This image will serve as the basis for your new preset.
- Locate the Presets Panel: On the left side of the Develop module, you will find the Presets panel.
- Initiate Preset Creation: At the top-right of the Presets panel, click the small '+' icon. From the drop-down menu that appears, select "Create Preset…".
- Name Your Preset: A dialog box titled "New Develop Preset" will appear. Here, you should provide a descriptive name for your preset. This name should clearly indicate the style or purpose of the preset, making it easy to identify later. For instance, "Warm Portrait Tones" or "Moody Landscape" are good examples.
- Select Adjustment Settings: This dialog box presents a comprehensive list of editing options, each represented by a checkbox. These checkboxes correspond to different aspects of the editing process, such as Exposure, Contrast, Highlights, Shadows, Whites, Blacks, Texture, Clarity, Vibrance, Saturation, and many more. If you are unsure about which settings to include, a "Check All" button is available to select every adjustment. However, it is often more effective to select only the specific adjustments you wish to save. For example, if you are creating a preset for subtle color grading, you might only select settings within the "Color" tab and avoid "Effects" or "Detail" adjustments.
- Finalize Creation: Once you have chosen the desired settings, click the "Create" button. Your new preset will now be visible in the specified folder within the Presets panel, ready for immediate use.
Tip: It's highly recommended to plan your presets. For a "Signature Look" preset, you might apply a wide range of adjustments. Conversely, for a "Workflow Preset," you might group related adjustments that serve a specific purpose, such as preparing images for a particular output.
Applying and Refining Presets: The Amount Slider
After applying a preset to an image, you'll notice that the adjustment sliders on the right side of the Develop module will change to reflect the preset's settings. In newer versions of Lightroom Classic (version 11.4 and later), an "Amount" slider feature has been introduced for some presets. This slider, located between the Navigator and Presets Panel in the Develop Module, allows you to control the intensity of the preset's effect. You can increase or reduce the overall impact of the preset by adjusting this slider.
Important Note: If you manually adjust any of the sliders after applying a preset, the Amount slider will become disabled. This indicates that the preset's original settings have been modified.
Presets in Lightroom Mobile: Editing on the Go
Lightroom Mobile also offers robust support for presets, enabling you to maintain editing consistency across your mobile workflow.
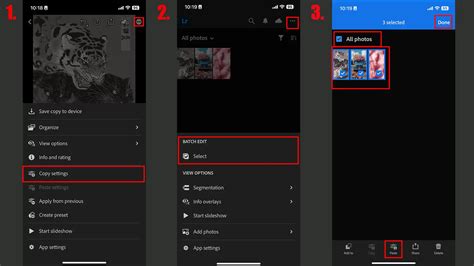
- Edit Your Photo: Start by selecting a photo in your Lightroom Mobile library and applying the edits you wish to save as a preset.
- Save as New Preset: Once you are satisfied with your edits, tap the "Save as New Preset" option.
- Name and Select Edits: A new panel will appear, prompting you to name your preset. Be descriptive to easily recall its purpose. Below the name, you'll find categories of edits (e.g., 'Light', 'Color', 'Effects', 'Detail'). By default, all your made edits will be included. You can choose to include or exclude specific categories of edits.
- Confirm and Save: After selecting the desired edits and naming your preset, tap the checkmark in the upper right corner to confirm. Your new preset will now be listed among your collection of saved presets.
Importing and Managing Presets
Beyond creating your own, you can also import presets shared by other photographers or downloaded from online resources. This is an excellent way to expand your editing toolkit and explore different styles.
Importing Presets into Lightroom Classic
There are two primary methods for importing presets into Lightroom Classic:
Method 1: Using the Plus Icon in the Presets Panel
- Navigate to the Presets Panel: In the Develop module, locate the Presets panel.
- Click the Plus Icon: Click the '+' icon at the upper-right corner of the Presets panel.
- Select "Import Presets": Choose "Import Presets" from the drop-down menu.
- Select Preset Files: In the dialog box that appears, navigate to and select the preset files you wish to import. Lightroom Classic can import individual preset files or a .zip file containing multiple presets.
Method 2: Right-Clicking on a Preset Group
- Navigate to the Presets Panel: In the Develop module, locate the Presets panel.
- Right-Click a Group: Right-click on the desired preset group where you want to import the new presets.
- Select "Import Presets": Choose "Import Presets" from the context menu.
- Select Preset Files: Similar to the first method, select the preset files or a .zip file containing presets in the dialog box.
Important Considerations for Importing:
- File Formats: Presets typically come as .xmp, DNG, or the older .lrtemplate files. Lightroom Classic can import these formats.
- Version Compatibility: You cannot import XMP presets in Lightroom Classic versions 8.2 or earlier. Ensure your Lightroom version is up-to-date for compatibility.
- Partial Compatibility: Some presets might be only partially compatible with a selected photo. This occurs when not all of the preset's settings can be applied to that specific image due to its unique characteristics or the presence of certain profiles.
- JPEG Compatibility: If your presets are not working with JPEG files, ensure that the preset has a JPEG profile associated with it.
Managing Preset Locations: Global vs. Catalog-Specific
A common point of confusion for Lightroom users revolves around where presets are stored and how this interacts with their catalogs. Lightroom Classic offers two main options for storing presets, configurable in the Preferences:
- Global Location: This is the default setting and refers to a central location on your computer where all presets are stored. These presets are accessible across all catalogs you open.
- Store Presets with This Catalog: If you select this option (found under Edit > Preferences > Presets), Lightroom Classic will store presets within the specific catalog you are currently working with. This can be beneficial for organization if you manage multiple distinct catalogs for different types of work or clients. However, it can lead to presets appearing to be "missing" if you switch to a different catalog that doesn't have those presets stored within it.
Migrating Presets Between Computers:
To migrate your presets from an old computer to a new one, the most reliable method is to manually copy your custom preset folders from the old computer and paste them into the corresponding preset location on the new computer. This ensures all your custom presets are transferred correctly.
Troubleshooting Missing Presets
If your presets are not showing up after importing them, consider the following:
- Catalog Selection: If you have "Store presets with this catalog" enabled, ensure you are working with the correct catalog where the presets were imported.
- Restart Lightroom: Sometimes, a simple restart of Lightroom Classic can resolve issues with newly imported presets appearing.
- Check the Presets Panel: Verify that the presets have been imported into the correct group within the Presets panel. They usually land in a "User Presets" group by default.
- File Corruption: In rare cases, the preset file itself might be corrupted. Try re-downloading or re-creating the preset.
Export Presets: Automating Your Output Workflow
Export presets are a specialized type of preset designed to automate the process of exporting your images from Lightroom. This is particularly valuable for photographers with repetitive export needs, such as wedding photographers who often need to deliver images in various formats and sizes for different purposes.
Create Export Presets and save time in Adobe Lightroom
The concept of export presets might seem obscure to some, but they are a "crucial step to saving time." They automate tasks you perform every single time you export photos, making the process significantly faster and more consistent.
Creating an Export Preset in Lightroom Classic
- Open the Export Dialog Box: Initiate the export process by clicking the "Export" button in the bottom-left corner of the Lightroom window, or by navigating to File > Export.
- Configure Export Settings: Within the Export dialog box, meticulously set up all the desired export parameters. This includes:
- Export Location: You can choose to export to a specific folder, or more commonly for presets, select "Choose Folder Later" which prompts you each time you use the preset.
- File Naming: This is where you can automate custom file names. Choose your desired "fields" such as "Custom Text," "Filename," and "Sequence #" (e.g., "Sequence # (1)"). Use the "Insert" button for each field and arrange them in the desired order by clicking and dragging the highlighted blue boxes.
- File Settings: Determine the File Format (JPEG, TIFF, etc.), Quality, Color Space (sRGB is common for web, Adobe RGB for print), and Image Sizing (setting specific dimensions or scaling options).
- Output Sharpening: It is highly recommended to always apply sharpening on export. This compensates for the sharpness lost during the upscaling, downscaling, or printing process. You can choose to sharpen for "Screen" or "Matte" and matte paper.
- Post-Processing: Define actions to take after export, such as opening in another application or running a command-line utility.
- Add the Preset: Once you have configured all the settings for a particular export workflow, locate the "Export Presets" section on the left side of the dialog box. Click the "Add" button.
- Name Your Export Preset: A new dialog will appear asking you to name your preset. Choose a name that clearly identifies its purpose (e.g., "Web JPEGs - sRGB," "Print Full Resolution," "Album Design Favorites").
- Save: Click "Add" or "Done" to save your export preset. It will now be available in the Export Presets list for future use.
Example Workflow Presets:
For a wedding photographer, you might create several export presets:
- "Main Gallery - Web": Exports images as JPEGs, sRGB, medium quality, scaled to a specific web-friendly size (e.g., 2048px on the long edge), with appropriate sharpening for screen viewing.
- "Album Design Favorites": Exports higher resolution JPEGs or TIFFs, perhaps larger than web images (e.g., 6000px wide) if intended for print album design, allowing for easy import into album software.
- "Client Selects - Social Media": Smaller JPEGs, optimized for quick sharing on social media platforms.
Understanding Export Preset Variations
Export presets can cater to different needs:
- Print vs. Web: Settings like color space (Adobe RGB for print, sRGB for web) and resolution (300 PPI for print, 72 or 240 PPI for web) will differ significantly.
- File Size and Dimensions: For online galleries, you might export smaller files. For clients ordering prints, you'll need full resolution. For album design, specific dimensions might be required.
- File Format: JPEGs are common for general use and web, while TIFFs might be preferred for archival purposes or when further editing is anticipated.
Third-Party Plugins and Export Actions
Lightroom Classic also supports third-party plugins that can extend the functionality of the Export dialog box. These plugins might offer specialized export options or integrate with other services. To add a plugin, you typically click an "Add" button within the Export dialog box and follow the plugin's installation instructions.
Conclusion: Embracing the Power of Presets
Presets in Lightroom are not merely shortcuts; they are fundamental tools for building an efficient, consistent, and professional photography workflow. By mastering the art of creating, importing, and managing both editing and export presets, photographers can significantly reduce editing time, ensure a cohesive visual style, and focus more on the creative aspects of their craft. Whether you're a beginner looking to speed up basic edits or an advanced user aiming to automate complex export routines, understanding and utilizing Lightroom presets is an investment that will yield substantial returns in productivity and creative output.