When you embark on the journey of creating digital art with Krita, a small yet significant element demands your attention for hours on end: the cursor. This cursor acts as the tip of your "digital pen," and from this brush tip emerge the multitude of brush strokes essential for bringing an artwork to life. Consequently, this component holds considerable importance for a vast number of users across all digital painting software. Over the years, the Krita development team has introduced numerous presets, offering a wide variety of cursor options. This leads to a crucial question for many artists: what is the optimal Krita cursor to select for your creative process? Why choose one over another? What are the advantages and disadvantages? This article, drawing upon insights and experiences with Krita, aims to provide comprehensive tips and feedback on this vital feature, offering a thorough review of the brush cursor.
The "Cursor" Panel: Krita's Gateway to Pointer Precision
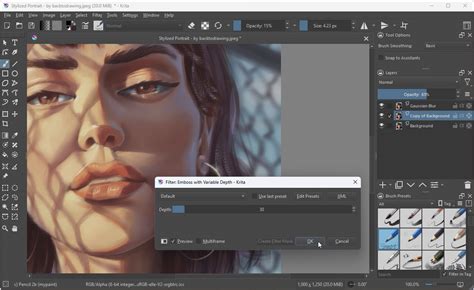
The "Cursor" panel stands as a pivotal interface within the "Configure Krita" windows. It is no mere coincidence that this panel appears at the forefront when you access the settings (accessible via the top menu bar: Settings > Configure Krita). Within this panel, Krita offers the ability to configure two primary aspects of the cursor: Cursor Shape and Outline Shape.
The "Cursor Shape" option presents a list of presets that can replace your current cursor with an alternative form. By default, this setting is "No Cursor," and the list includes nine additional options. This "Cursor Shape" essentially functions as a static black or white image, superimposed at the (x,y) coordinates of your pointer on the canvas. These static images are configurable within Krita's source code as *.xpm files, located in the krita/data/cursors folder.
The second option, labeled "Outline Shape," is more intricate. It acts as a dynamic visual decoration generated by Krita around the (x,y) position of your cursor, offering more immediate feedback regarding the shape, type, and size of the selected brush. The default setting for this is "Preview Outline," and the list comprises four other options. Furthermore, a checkbox situated beneath these two lists allows you to choose whether to "Show" or "Hide" the "Outline Shape" while actively painting (i.e., when the stylus makes contact with the tablet).
By combining the various options from these two lists, users can potentially create up to thirty-six distinct cursor configurations. To provide a clearer understanding of the possibilities, a comprehensive table detailing all these combinations can be invaluable, though compiling it is a considerable undertaking.
Default Settings: The Balanced Approach (No Cursor + Preview Outline)
In many cases, artists familiar with certain workflows or video tutorials might observe the predominant use of one or two specific presets, often chosen based on the task at hand. For general painting, coloring, and speedpainting, the default settings-"No Cursor" combined with "Preview Outline"-are frequently employed. There's a sound rationale behind this default selection: it proves effective in the majority of scenarios.
How to Change Cursor in Krita
Essentially, with this configuration, your cursor transforms to mirror the shape of the brush you have currently selected. This is incredibly convenient as it ensures you always have a clear idea of the brush type you're using and its corresponding size. It becomes difficult to misinterpret the feedback provided by a textured brush with a specific outline compared to a large airbrush with a purely circular outline.
The color of the "Preview Outline" also dynamically adjusts to contrast with the background color of your artwork. The outline typically appears dark when hovering over a white background and bright over a dark background. Moreover, it can shift colors, adopting hues of red, blue, pink, and so on, to enhance its visibility against the background. The "Preview Outline" is a solid choice that works well in almost all situations. It offers significantly better feedback for the brush preset compared to "Circle Outline" or "Tilt Outline." These two alternatives primarily display a simple circle with a diameter corresponding to the maximum size of your selected brush. The "Tilt Outline" additionally includes a small line to indicate the tilt direction, provided your tablet supports tilt functionality.
However, despite being a long-standing favorite for many Krita users, the "Preview Outline" is far from perfect. Several aspects can be improved:
- Noise and Aliasing: A noticeable effect, particularly with presets that utilize rotation sensors, is the presence of aliased pixels that appear to "dance" as the cursor's shape is re-rendered while moving across the canvas. This can create a distracting visual jitter.
- Inconsistent Maximum Width Feedback: Krita alters the size of the "Preview Outline" when dynamic sensors are applied to the size attribute of the active brush presets. Software like MyPaint and Clip Studio Paint often opt against this type of dynamic sizing, preferring to maintain a consistent visual cue. It would be more beneficial to have the maximum diameter consistently visible to provide a clearer indication of the brush's full potential width.
- Lack of Precision: A significant drawback is that the "Preview Outline" does not inherently display its center point. This can be addressed by overlaying a smaller cursor, a technique frequently employed by artists when performing detailed work. Krita offers two primary methods to achieve this:
- Using an Additional Cursor Shape: The "Small Cursor" preset can be utilized in conjunction with an outline. However, this cursor is somewhat substantial, measuring 3x3 pixels. Despite its size, it functions effectively on both white and black backgrounds.
- Single Pixel Cursors: Alternatively, you can opt for the "Single Pixel White" or "Single Pixel Dark" cursors. Both of these solutions are highly effective, providing a single pixel at the center that greatly aids in precisely aiming the start of a stroke.
- Blinking Effect: The "Preview Outline" can exhibit a noticeable blinking effect, which is absent in applications like MyPaint.
Alternative Cursor Shapes for Enhanced Precision and Performance
To circumvent the blinking and precision issues associated with the "Preview Outline," many artists resort to using a cursor shape like "Triangle Righthanded" on its own, without any accompanying outline. This option provides a sharp, defined tip, akin to the triangular point of a sharpened pencil, allowing for quick crosshatching without the disorienting "epileptic blinking" effect. A left-handed version of this triangle cursor is also available for those who prefer it.
Furthermore, "Cursor Shapes" generally exhibit superior performance within Krita compared to "Outline Shapes." They often provide more immediate and accurate feedback of your actual position, whereas "Outline Shapes" invariably introduce a slight latency in their rendering. This lag can be observed as the outline trails behind the cursor's true position.
This lower latency is a critical factor when sketching, performing crosshatching, or rapidly drawing fine details. The "Preview Outline," while often adequate for painting with larger brushes, becomes a significant impediment when applying thin details or drawing precise lines, as it consistently exhibits a delay of a few milliseconds.
Exploring the Full Spectrum of Krita's Cursor Options
The Krita team has commendably provided a wide array of options to cater to diverse user needs and workflows. This extensive range of settings makes it possible to find a workaround or an ideal solution for almost any artistic scenario. The hope is that by exploring the various cursor configurations detailed in this article, artists will discover new ways to enhance their creative process and that this guide will assist those who feel somewhat lost amidst the choices.
Artists are encouraged to experiment with these settings to determine which configuration best suits their individual preferences and artistic demands.
Beyond Krita: System-Level Cursor Customization in Windows
While Krita offers extensive in-application cursor customization, it's also worth noting that the operating system itself provides options for altering the mouse pointer's appearance. This can be particularly useful if you find Krita's default options insufficient or if you wish for a more globally consistent cursor experience.
Changing Cursor Size in Windows
Windows provides a straightforward method to adjust the size of your mouse pointer, making it easier to see on your screen.
- Open Settings: Press the "Start key + I" shortcut to open the Windows Settings app.
- Navigate to Accessibility: Select "Accessibility" from the sidebar.
- Access Mouse Pointer Settings: Go to the "Mouse pointer and touch" page.
- Adjust Size: Use the "Size" slider to increase or decrease the cursor pointer size. Dragging the slider to the right makes the cursor larger, while dragging it to the left makes it smaller. To revert to the default cursor size, drag the slider all the way to the left.
It's important to remember that changing the pointer size in Windows affects all system pointers, including crosshairs, move cursors, and text cursors. These changes are applied instantly and saved automatically.
Changing Cursor Color in Windows
Windows also allows for customization of the mouse pointer's color, offering an additional layer of personalization and visibility.
- Open Settings: Press the "Start key + I" shortcut to open the Windows Settings app.
- Navigate to Accessibility: Select "Accessibility" from the sidebar.
- Access Mouse Pointer Settings: For Windows 10 users, navigate to the "Ease of Access -> Mouse Pointer" page. For newer versions, go to the "Accessibility -> Mouse pointer and touch" page.
- Select Custom Color: Choose the "Custom" cursor option.
- Pick Your Color: Select the desired color for your cursor from the available palette. The chosen color will be applied instantly.
To restore the original pointer color, return to the "Mouse pointer" page within the Settings app and select the "White" cursor option.
Understanding Krita's Dynamic Cursor Behavior
It's important to understand that Krita's cursor behavior is not always a static element with a dedicated color setting. Instead, it's a dynamic component that often reflects the active tool, selection modes, or even the underlying pixel colors of your artwork.
For instance, when using certain brush presets, particularly those with dynamic properties, the cursor's appearance might change. The "Preview Outline," as discussed, dynamically adjusts its size. In some configurations, the cursor color might invert to provide contrast against the artwork. One user noted that when hovering over brushed areas, the cursor color would invert from a teal green to a violet, depending on the intersected pixels. While this is an intended feature to aid visibility, some users find it visually distracting and prefer a solid, unchanging outline color.
The precise behavior of these dynamic elements can sometimes be influenced by the graphics card and driver combination in use. This can lead to variations in how the cursor appears across different machines, even when running the same Krita version. For example, one user observed a consistently solid green cursor on one machine, while on another, the color inverted over dark pixels. This phenomenon is attributed to the interplay between Krita's rendering engine and the graphics hardware.
Troubleshooting Cursor Color Issues
If you encounter issues with your Krita cursor color, such as it being too light to see against a light background, there are a few avenues to explore.
- Ensure Latest Stable Version: Always make sure you are using the latest stable release of Krita.
- Graphics Acceleration Settings: Within "Settings > Configure Krita > Display," try switching the graphics acceleration setting between OpenGL and ANGLE (or vice versa). This often requires a restart of Krita to take effect and can resolve rendering anomalies.
- Krita 4.0 and Later: Newer versions of Krita (specifically Krita 4.0 and subsequent releases) introduced more direct options for changing the cursor color, offering greater control over its appearance.
By understanding these various aspects of Krita's cursor system, from the detailed panel settings to the underlying rendering behaviors and even system-level adjustments, artists can fine-tune their digital workspace for maximum comfort, precision, and creative flow. Experimentation is key to finding the perfect cursor configuration that enhances your artistic experience.